
Related Manuals for Pisector PS03


Summary of Contents for Pisector PS03
- Page 1 PiSector Land Line Auto Dial Professional Wireless Alarm System User Manual ( PS03 ) Read manual fully before use. PiSector Inc., USA, www.pisector.com...
- Page 2 This guide will walk you through the easy set up of your PiSECTOR system no matter which one you ordered. We've started with already customizing and tuning your system to your specifications, so everything is ready to go when you open the box.
-
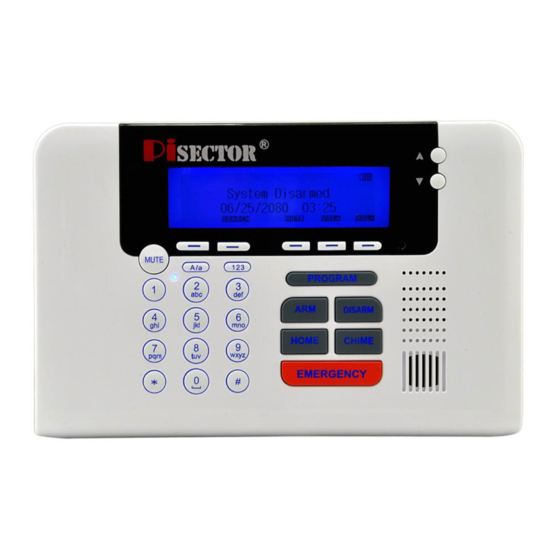
Page 3: Function Keys
Main Console Console Panel Program: press this key then input password, you can enter program status (default password 888888 ) Arm: press this key and input password, you can activate your system Disarm: press this key and input password, you can deactivate your system Chime: press this key you will see icon... - Page 4 Connect console Panel: Put the console near your phone cord Remove the table stand and cover on back side of console Connect the phone cord to LINE Port on back of console (if you have no landline, you can use OBi110/ MagicJack / Vonage / Ooma VoIP service to connect your Router / Modem then connect console to the VoIP device ) Connect the regular telephone device to TEL port on back of console Route the phone cord through the channel toward the side of the console...
-
Page 5: Keychain Remote
T_VCC DC 12V Positive Wired In Ground +12V External antenna for cell phone reception Keychain Remote Press to Arm / Activate your system as Away from home Press to Disarm/ Deactivate your system when you come back home to Home arm /Active your system as Stay Home( if you go to Press Sensor-Edit and set part of sensors for Home zone as No, when you press Home, that sensor will disable, and all other sensors still enable) - Page 6 Program and Mount Bracket Door/Window Sensors If you received a pre-Programed system kit, please ignore this step and do not program it again. All new Door/Window sensors you need should be programmed to your console. Open the cover and remove the insulated paper then close the cover. Put small magnet next to sensor Press PROGRAM button on console, enter the default password 888 888.
- Page 7 disarm and home alarm status, use for door only Delayed Zone Highlight it press Enter, Default is NO, ( if set YES, allows you to come back home and open the door without triggering the system. System default delay alarm time is 45 seconds. You can change this time by going to "System Settings"...
- Page 8 Program and Mount Motion Sensors: Prepare Motion Sensor A. Separate the front and back covers of the Motion Sensor by pressing the tab with your finger or the top of a pen (Figure A and B). Remove insulating paper from the battery and CLOSE the cover. The sensor needs 1-3 minutes to initialize itself.
- Page 9 (B) the Motion Sensor is not in communication with the PiSECTOR system main console. If you want to re-start the Walk Test mode again, open the Front Cover as shown in Figure 1 and then re-attach the Front Cover.
-
Page 10: Detection Patterns
Mount Motion Sensor D. Place the motion sensor in the following location recommendations (check marked locations) shown in Figure C. Avoid the example location marked with the "X" which are household areas that typically cause false alarms, such as heat, air conditioning, fans, or direct sunlight. The recommended mounting height is 6.5-7.0 feet for both coverage and pet immunity purposes. - Page 11 Plug the indoor siren directly to Siren port, no need program any wired siren or wired sensor with console. It will automatic work with main console Wireless Indoor Siren (option) Program Indoor Wireless Sirens If you received a pre-Programed system kit, please ignore this step and do not program it again Plug the siren into wall outlet, then press PROGRAM key on console.
- Page 12 Outdoor Wireless Siren If you received a pre-Programed system kit, please ignore this step and do not program it again Press PROGRAM key on the console. Enter default password 888 888. Use the scroll key to select Wireless Sirens, press ENTER. You will see below list. Add for add a wireless sensor, highlight Add press Enter, you will see a default siren name such as Siren1 / Siren2 / Siren3, then press Enter You will see"Put siren in Setting Mode".
-
Page 13: Outgoing Message
Add Contact Phone Numbers Press PROGRAM key on console. Enter the default password 888 888. Use scroll key to select Phone Numbers, press Enter, you will see below list select Add press Enter. You will see Input phone number, than direct input your area code and phone number. -
Page 14: System Settings
Daily Schedule to Arm or Disarm Alarm System Press PROGRAM key on console. Enter the default password 888 888. Use scroll key to select Daily Schedule. Enable If you want to enable this function, first select Disable then press Enter, set NO, then back and select Enable, you can set the Arm time for your departure, and Disarm Time for when you arrive Home, then the system will Arm/Disarm automatically on schedule, so that you will never forget to arm or disarm system. -
Page 15: About System
Version press Enter you will find your software version Production Date: press Enter you will see the producing time of your system Manufacture By Pisector Inc. Remotely Control Your Home Security Alarm System Dial the number of the main unit panel by your cell phone, and after 1 ring, you will hear a voice prompt “Please enter password”. - Page 16 Wireless Signal Transmitter (Repeater) Wireless Signal Transmitter expands your wireless range up to 300 feet and makes the communication between all sensors and the main console better. Please install the antenna and plug a 12V 1A power adapter to the Power plug. Place the Wireless Signal Transmitter away from the main console for about 5-10 feet.
Need help?
Do you have a question about the PS03 and is the answer not in the manual?
Questions and answers