Table of Contents
Advertisement
Quick Links
ParkZone
DSM and DSM2 are trademarks or registered trademarks of Horizon Hobby, Inc.
The Spektrum trademark is used with permission of Bachmann Industries, Inc.
products are distributed exclusively by
®
Horizon Hobby, Inc.
4105 Fieldstone Road
Champaign, IL 61822
© 2008 Horizon Hobby, Inc.
Horizon Hobby UK
Units 1-4, Ployters Road
Staple Tye
Harlow, Essex
CM187NS
United Kingdom
Horizon Hobby Deutschland GmbH
Otto Hahn Str. 9a
25337 Elmshorn
Germany
Multiple Patents Pending
www.parkzone.com
12353.1
Advertisement
Table of Contents

Subscribe to Our Youtube Channel
Related Manuals for PARKZONE Ember 2


Summary of Contents for PARKZONE Ember 2
- Page 1 ParkZone products are distributed exclusively by ® Horizon Hobby, Inc. 4105 Fieldstone Road Champaign, IL 61822 © 2008 Horizon Hobby, Inc. Horizon Hobby UK Units 1-4, Ployters Road Staple Tye Harlow, Essex CM187NS United Kingdom Horizon Hobby Deutschland GmbH Otto Hahn Str. 9a...
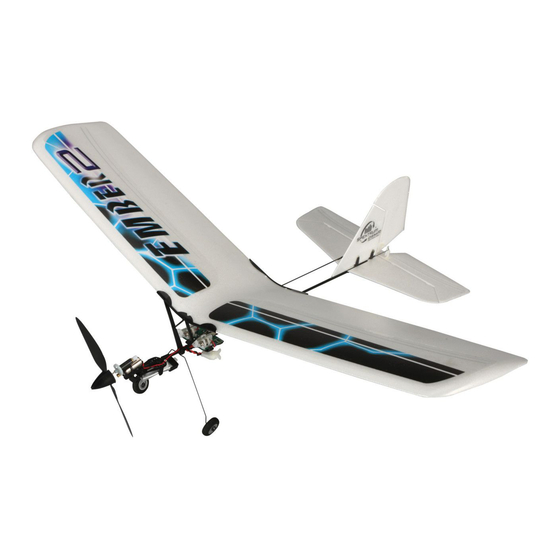
- Page 2 Instruction Manual MICRO FLYERS, MAXIMUM FUN. Transmitter: PKZ 4-channel with Spektrum 2.4GHz DSM2 technology Battery: 3.7V 70mAh Li-Po Wingspan: 16.5 in (420mm) Length: 13.25 in (335mm) Flying Weight: 0.7 oz (20 g)
- Page 3 This means you can spend your time refining your flying instead of your building skills. Your ParkZone Ember 2 will allow you to perform many aerobatic maneuvers, all in an area the size of half a basketball court.
- Page 4 Warning Though your ParkZone Ember 2 comes ready to fly, this aircraft is for experienced RC pilots only and is not a toy. It can cause serious bodily harm and damage to property. FCC Statement This device complies with part 15 of the FCC rules. Operation is subject...
-
Page 5: Step 1 - Charging The Aircraft Battery
AA batteries. Replacing with alkaline batteries will provide more charge cycles. Note: The Li-Po battery included with your Ember 2 will arrive partially charged. For this reason the initial charge may only take 10–15 minutes. -
Page 6: Step 2 - Functional Tests
Step 2 – Functional Tests Installing the Transmitter Batteries Your ParkZone Ember 2 aircraft comes with a fully proportional 4+ channel radio system that includes digital trims. 1. Insert the 4 AA batteries that are included with the package into the transmitter. - Page 7 Once the Li-Po battery has been fully charged, it’s ready to be installed in the Ember 2. Install the battery in the Ember 2 by pressing it to the battery tray with the label facing downward and the connector oriented toward the back of the airplane.
- Page 8 Transmitter Control Identification Note: Each time before you fly you should ALWAYS turn the transmitter on before connecting the flight battery to the ESC unit. After each flight, be sure that you always disconnect the flight battery from the ESC unit before powering the transmitter off. Mode 2 Rudder/Throttle Aileron/Elevator...
- Page 9 Shown with aileron stick pushed to the right. Note: For most aircraft, the aileron stick is used for primary turning control. For the Ember 2, the rudder provides turning control and is therefore commanded by the aileron stick. 4. Move the elevator stick on the transmitter forward and aft to check elevator pitch control.
- Page 10 5. With the elevator stick pulled back, the elevator should move upward. If at any time during the test the controls respond in the opposite direction, it may be necessary to reverse/change the direction of operation of the flight controls. Please see the section labeled Reversing Flight Controls located in the back of this manual.
- Page 11 Making Adjustments to the Control Surfaces 1. Any changes necessary to bring both the rudder and elevator to neutral (zero degrees) when the right transmitter stick is centered should be possible using the digital trim buttons. 2. If you find this is not the case, do not fly until this has been corrected.
-
Page 12: Step 3 - Range Test
You may notice there is quite a bit of down thrust when looking at the prop/prop shaft. This is intentional and is not a sign of damage. Adult Supervision Required Warning: Keep everything clear of the propeller and hold the plane securely. - Page 13 If you choose to make your flights outdoors, the conditions MUST be COMPLETELY CALM. The Ember 2 weighs less than 1 ounce and can easily be blown away. If you choose to fly outdoors, remember to always keep the plane upwind from you to avoid flyaways.
-
Page 14: Step 6 - Runway Takeoff
3. Turn on the transmitter. 4. Plug in the aircraft battery. 5. Stand behind the Ember 2. Make certain you are on a smooth surface such as concrete or wood. 6. Apply full throttle and adjust the left stick so that you keep your Ember 2 on its intended path. - Page 15 Step 7 – Flying 1. After launching, your Ember 2 will climb at full throttle. Keep the throttle full on until you have reached a safe altitude. At this same time, make sure that you are continuing to keep the airplane directed on its intended path.
-
Page 16: Step 8 - Throttle Adjustment
Elevator Trim If the Ember 2 wants to go up or down, use the elevator digital trim but- tons next to the control stick to correct. The model should fly straight with the control stick at neutral and should have a steady, shallow climb at full throttle. - Page 17 Step 10 – Landing Your Ember 2 When you begin to notice that your Ember 2 no longer climbs well under full power (normally after approximately 10-15 minutes), the battery is getting low and it is time to land. Bring in your aircraft toward the desired landing spot.
-
Page 18: Reference Information
Reference Information Binding process The 2.4GHz DSM2 receiver in the Ember 2 uses a unique binding operation to link your transmitter with your receiver. Please note that your radio system has been bound for you already. Should you need to replace a transmitter or your aircraft, you will need to perform the binding process as detailed below. - Page 19 Center of Gravity Location It is very important to confirm the ParkZone Ember 2 is properly bal- anced prior to flying. The Ember 2 should balance at 37mm (+/- 2mm) behind the leading edge of the wing with the battery tray centered.
- Page 20 Transmitter Dual Rate Function The ParkZone 4+ channel 2.4GHz DSM2 transmitter included with the Ember 2 features dual rate capability. The default setting is high rate. To access the low rate function, simply press IN on the right gimbal. The LED light on the transmitter face will begin to blink, alerting you that the transmitter is on low rate.
- Page 21 Warranty Period: Exclusive Warranty- Horizon Hobby, Inc., (Horizon) warranties that the Products purchased (the “Product”) will be free from defects in materials and workmanship at the date of purchase by the Purchaser. Limited Warranty (a) This warranty is limited to the original Purchaser (“Purchaser”) and is not transferable.
- Page 22 Safety Precautions: This is a sophisticated hobby Product and not a toy. It must be operated with caution and common sense and requires some basic mechanical ability. Failure to operate this Product in a safe and responsible manner could result in injury or damage to the Product or other property.
- Page 23 expiration date. Any repair left unpaid or unclaimed after 90 days will be considered abandoned and will be disposed of accordingly. Please note: non-warranty repair is only available on electronics and model engines. United States: Electronics and engines requiring inspection or repair should be shipped to the following address: Horizon Service Center 4105 Fieldstone Road...
- Page 24 Replacement Parts Make sure that you keep your Ember 2 flying. Replacement parts are available at your local hobby shop or from Horizon Hobby (www.horizonhobby.com). Please try your local hobby shop first. By supporting them, they will be there when you need them.
Need help?
Do you have a question about the Ember 2 and is the answer not in the manual?
Questions and answers