Kärcher K 2.20 M Operator's Manual
Hide thumbs
Also See for K 2.20 M:
- Manual (196 pages) ,
- Operator's manual (52 pages) ,
- User manual (21 pages)
Advertisement
Table of Contents
- 1 Table of Contents
- 2 Specifications
- 3 Model Overview
- 4 Important Safety Instructions
- 5 Assembly Instructions
- 6 Operating Instructions
- 7 Using the Accessories
- 8 Working with Detergents
- 9 TAKING a BREAK ..Five Minutes or more
- 10 Shutting down & Clean-Up
- 11 Cleaning the Water Inlet Filter
- 12 Winterizing and Long-Term Storage
- 13 Maintenance Instructions
- 14 Cleaning Tips
- 15 Optional Cleaning Accessories
- 16 Troubleshooting
- Download this manual
Advertisement
Table of Contents

Related Manuals for Kärcher K 2.20 M


Summary of Contents for Kärcher K 2.20 M
- Page 1 K 2.20 M English Español Français 59634730 08/09...
-
Page 2: Table Of Contents
Max. Pressure 1500 PSI Customer Support Max. Water Flow 1.3 GPM Mexico Amp draw 13 AMPS Voltage 120 V Call: 01-800-024-13-13 for help or visit Part No. 1.672-600.0 our website: www.karcher.com.mx Serial no. For household use only! English... -
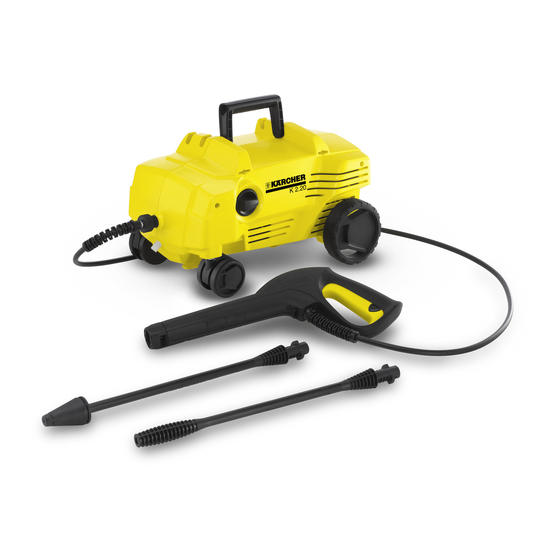
Page 3: Model Overview
MODEL OVERVIEW 1 Swivel casters 9 Wheels 2 ON/OFF switch 10 Trigger gun 3 Detergent suction tube with filter 11 Trigger gun safety lock 4 High pressure outlet 12 Locking slide for high pressure hose 13 High pressure hose 6 Spray Wand Storage 14 Spray wand 7 Water inlet with garden hose connec- 15 Dirtblaster... -
Page 4: Important Safety Instructions
IMPORTANT SAFETY INSTRUCTIONS physical injuries to the operator and WARNING When using this product basic precau- irreversible damage to the machine. tions should always be followed, includ- CAUTION ing the following: Gun Kicks Back – Hold with both Read all the instructions before using hands. - Page 5 become necessary, use only identical TURE AND INJURY, DO NOT replacement parts that include GFCI OPERATE THIS PUMP WITH COM- protection. PONENTS RATED LESS THAN 1600 PSI WORKING PRESSURE (INCLUD- WATER SUPPLY ING BUT NOT LIMITED TO SPRAY (Cold Water Only) GUNS, HOSE AND HOSE CONNEC- TIONS).
-
Page 6: Assembly Instructions
ASSEMBLY INSTRUCTIONS STEP 3: Required tools Fix the VELCRO fastener to the ap- ® Screwdriver, small size (not supplied) pliance. for connecting high pressure hose and trigger gun. STEP 4: A Pull out the locking slide of the trigger Assembly gun handle. - Page 7 STEP 3: STEP 6: Connect garden hose to unit’s water Unlock the trigger gun safety lock. inlet. Trigger the gun to eliminate trapped air, wait for a steady flow of water to emerge from the spray nozzle. STEP 4: Connect garden hose to the cold wa- ter source and turn water on com- STEP 7: pletely.
-
Page 8: Using The Accessories
USING THE ACCESSORIES WARNING Dirtblaster® To avoid serious injury never point spray nozzle at yourself, other per- This nozzle features a 0º pencil jet sons or animals. which rotates 360º for maximum dirt Always test an inconspicuous area cutting action, effectively increasing before cleaning with high pressure. -
Page 9: Working With Detergents
WORKING WITH DETERGENTS Detergents can only be applied at low For best results see Cleaning Tips for pressure. specific information on how to clean A low-pressure jet is generated if no different surfaces. spray wand is attached to the trigger gun. -
Page 10: Taking A Break ..Five Minutes Or More
TAKING A BREAK ..five minutes or more STEP 1: Release trigger and engage gun safety lock. STEP 2: Turn pressure washer to OFF (0) po- sition. SHUTTING DOWN & CLEAN-UP STEP 1: STEP 5: Turn the switch to OFF (0) position Disconnect the garden hose from the and unplug cord from outlet. -
Page 11: Winterizing And Long-Term Storage
WINTERIZING AND LONG-TERM STORAGE 1: Disconnect all water connections. CAUTION 2: Turn on the machine for a few sec- Failure to follow the above directions will onds, until the water which had re- result in damage to the pump assembly mained in the pump exits, turn off and accessories and will void the war- immediately. -
Page 12: Cleaning Tips
CLEANING TIPS 6 feet and always apply detergent from CAUTION Before cleaning any surface an in- bottom to top). Allow detergent to re- conspicuous area should be cleaned main on surface 1-3 minutes. Do not al- to test spray pattern and distance for low detergent to dry on surface, if maximum cleaning results. -
Page 13: Optional Cleaning Accessories
keeping the spray nozzle approximately tremely stubborn dirt, it may be neces- 6-8 inches from the cleaning surface sary to move the spray nozzle even (distance should increase when rinsing closer to the surface for greater dirt cut- pin-striping or other sensitive surfaces). ting action. - Page 14 Rotating Wash Brush (bayonet) Wet Sandblasting Kit (bayonet) For more effortless cleaning of all Why spend hours stripping old paint and smooth surfaces (painted, glass and rust by hand using harsh chemicals? Let plastic) try the Kärcher Rotating Wash the Kärcher Wet Sandblasting Kit do ®...
-
Page 15: Troubleshooting
TROUBLESHOOTING CAUTION Disconnect the machine from the power source before making any repair. Symptom Cause Solution Motor will not start On/Off switch is in the “OFF” Turn switch to the “ON” (I) po- (0) position. sition Power cord is not plugged in. Plug in power cord. Electrical outlet does not Try a different outlet. - Page 16 Call Customer Support drops per minute worn. is permissible). Oil Drip. Oil seals are damaged or Call Customer Support worn. If you encounter any additional difficul- ties not listed, please visit our website. USA / Canada: www.karcherresidential.com México: www.karcher.com.mx English...
Need help?
Do you have a question about the K 2.20 M and is the answer not in the manual?
Questions and answers