Honeywell Thor CV31 User Manual
Vehicle-mount computer
Hide thumbs
Also See for Thor CV31:
- Installation instructions manual (32 pages) ,
- Quick start manual (16 pages) ,
- Instructions (4 pages)
Table of Contents
Advertisement
Quick Links
Advertisement
Table of Contents

Related Manuals for Honeywell Thor CV31


Summary of Contents for Honeywell Thor CV31
- Page 1 Thor CV31 Vehicle-Mount Computer Model CV31A User Manual...
- Page 2 Disclaimer Honeywell International Inc. (“HII”) reserves the right to make changes in specifications and other information contained in this document without prior notice, and the reader should in all cases consult HII to determine whether any such changes have been made. The information in this publication does not represent a commitment on the part of HII.
-
Page 3: Table Of Contents
About the Thor CV31 ........ - Page 4 Hide Menu Items in Intermec Settings ......37 Configure the Computer Remotely with SmartSystems ..... 38 Thor CV31 Vehicle-Mount Computer User Manual...
- Page 5 Update the Computer with SmartSystems ......52 Update the Computer with a microSD Card ......53 Thor CV31 Vehicle-Mount Computer User Manual...
- Page 6 Virtual Wedge..........81 Thor CV31 Vehicle-Mount Computer User Manual...
-
Page 7: Before You Begin
Note: Notes either provide extra information about a topic or contain special instructions for handling a particular condition or set of circumstances. Global Services and Support Warranty Information To understand the warranty for your Honeywell product, visit the Honeywell website at www.honeywellaidc.com and click Resources > Warranty. -
Page 8: Send Feedback
Visit the Honeywell website at www.honeywellaidc.com. Click Products. Use the Products menu to navigate to your product page. For example, to find the CV31 product page, click Vehicle-Mount Computers > Thor CV31 Vehicle-Mount Computer. viii Thor CV31 Vehicle-Mount Computer User Manual... -
Page 9: About The Computer Features
About the Computer Features This chapter introduces the Thor™ CV31 Vehicle-Mount Computer with Microsoft® Windows® Embedded Compact 7 (CE 7). Use this chapter to learn about basic features and functions of the computer, as well as available accessories. -
Page 10: About The Thor Cv31
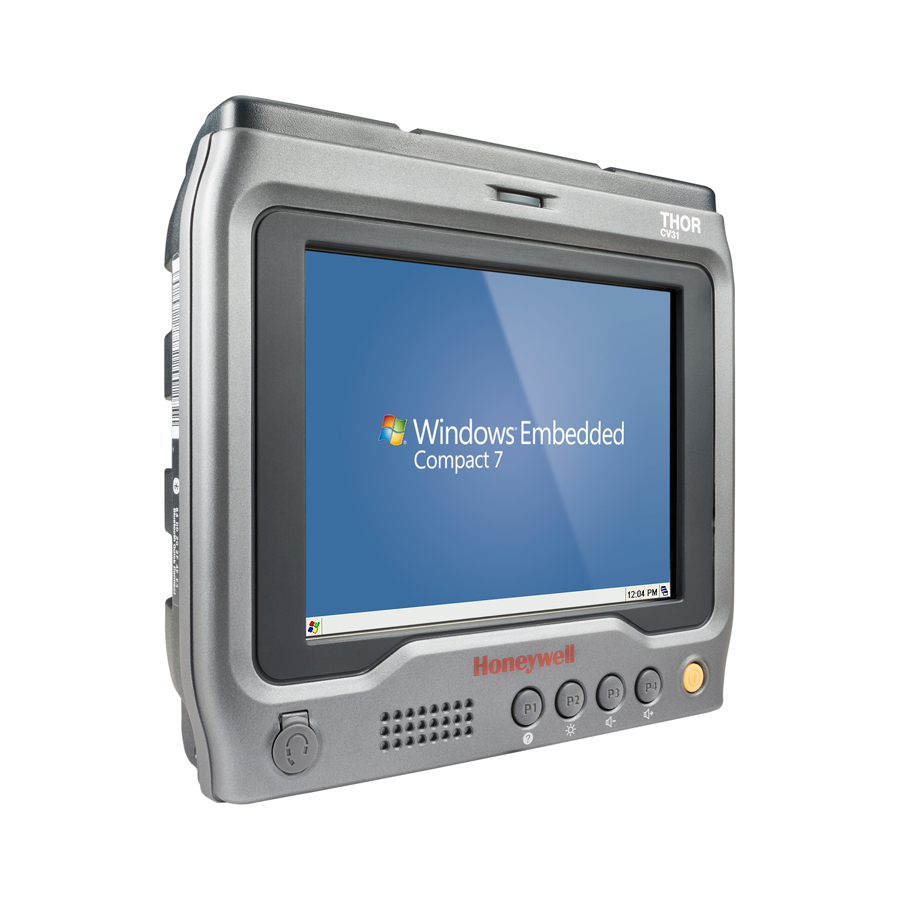
Microsoft® Windows® Embedded Compact 7 (CE 7.0) operating system. The CV31 with a Texas Instruments WL1273 802.11a/b/g/n radio installed is Wi-Fi® certified for interoperability with other 802.11a/b/g/n wireless LAN devices. CV31 Front View Thor CV31 Vehicle-Mount Computer User Manual... -
Page 11: About The Buttons
CV31 Buttons Callout Button Description Opens the Device Health Dashboard. Press and release to cycle through the five backlight levels. Decreases the volume. Increases the volume. Power Controls the power state of the computer. Thor CV31 Vehicle-Mount Computer User Manual... -
Page 12: About The Power Button
Power Options menu. The timeout bar at the bottom of the screen indicates how much time is left to make a selection. If you do not select a power option, the selected action (outlined in bold) occurs after the timeout. Thor CV31 Vehicle-Mount Computer User Manual... - Page 13 If you are using WPA or 802.1x security, the computer may need to reauthenticate before it resumes your application. The Real Time Clock (RTC) persists through all of the power options as long as it receives power from the Real Time Clock battery. Thor CV31 Vehicle-Mount Computer User Manual...
-
Page 14: Configure The Power Options Menu
To set the amount of time to make a selection (from 1 to 20 seconds), tap Screen timeout (seconds). 4 To save your changes, tap OK. About the Ports and Connectors The connectors provide access to power, external devices, and communications. Back View of the CV31 Thor CV31 Vehicle-Mount Computer User Manual... - Page 15 Chapter 1 — About the Computer Features Headset Jack on the Front of the CV31 Antenna Connector on the Top of the CV31 Thor CV31 Vehicle-Mount Computer User Manual...
- Page 16 USB 1.1 Client connection. Power Connects the computer to an AC/DC or DC/DC power supply. Headset Connects a 3.5 mm (1/8") headset to the Jack computer. Antenna Connects an external antenna to the computer. Thor CV31 Vehicle-Mount Computer User Manual...
-
Page 17: About The Status Leds
If you do not have ITE, you can configure the Ready-to-Work indicator to turn on or off to indicate a healthy state. Blinking ITE is running but not connected to blue the host. The computer is unhealthy. Thor CV31 Vehicle-Mount Computer User Manual... -
Page 18: How To Supply Power To The Cv31
CV31 and the vehicle you are installing it on to determine which power supply to use. Note: The AC power supply for the CV31 is different than the AC power supply for the CV30. Do not use the CV30 power supply with the CV31. Thor CV31 Vehicle-Mount Computer User Manual... -
Page 19: About The Backup Battery
12 V, 2.1 A or 9- AC Power Supply (P/N 203-955-001)* VAC,50-60 Hz 36 V, 5.1 A Vehicle: 9-36 V, 5.1 A Thor CV31/CV61 Direct Wiring Kit (P/ 9-36 VDC N 203-950-001) Vehicle: 12 V, 2.1 A or 9- Universal Vehicle Power Supply Kit Over 36 VDC, 36 V, 5.1 A... -
Page 20: Disable Backup Battery Charging
1 Start Intermec Settings. 2 Tap Device Settings > Boot Charging Options. 3 Select Disable charging during startup. How to Mount the CV31 Use a Honeywell approved mounting accessory to mount the CV31: • Desktop Mounting Kit (P/N 805-815-001) •... -
Page 21: About Serial Scanners
5 To change the scanner model, tap Scanner Settings, and then select a Scanner model from the list. 6 Configure the settings for the scanner you selected in Step 5 and close Intermec Settings. 7 Connect the scanner to the appropriate COM port. Thor CV31 Vehicle-Mount Computer User Manual... -
Page 22: About Usb Scanners
CV31 is not the same size as the headset jack on the CV30 (2.5 mm, 3/32"). • Use the Bluetooth Audio applet. • Pair a Vocollect Bluetooth headset with the near-field communication (NFC) radio. Thor CV31 Vehicle-Mount Computer User Manual... -
Page 23: How To Change The Volume
Control panel Tap Start > Settings > Control Panel, and then double-tap Volume & Sounds. Intermec Settings Start Intermec Settings and go to Device Settings > Sounds > Beeper and voice. Thor CV31 Vehicle-Mount Computer User Manual... -
Page 24: Connect An External Keyboard
However, you may need to experiment with antenna position to find an orientation that provides the best antenna performance. Use the ISpyWiFi application that ships on the computer to determine which antenna position provides the best signal strength. Thor CV31 Vehicle-Mount Computer User Manual... -
Page 25: Install An External Antenna
128, UPC A, UPC E, EAN 8, and EAN 13. You should only enable the symbologies that you plan to read. When you scan a bar code, the Good Read LED turns green to indicate a successful scan. Thor CV31 Vehicle-Mount Computer User Manual... -
Page 26: Configure The Bar Code Slot Reader
1 To turn off the computer, press the Power button and tap Suspend. 2 Disconnect the power cord from the computer. 3 Use a Phillips screwdriver to remove the six screws that secure the cover. (x6) Thor CV31 Vehicle-Mount Computer User Manual... - Page 27 Chapter 1 — About the Computer Features 4 The antenna cable is connected to the cover, so carefully lift but do not remove the cover. 5 Insert the microSD card into the microSD card slot. 6 Close the cover. Thor CV31 Vehicle-Mount Computer User Manual...
-
Page 28: Cv31 Accessories
(D-size) (P/N 805-814-001) RAM ball • Wall Mounting Kit (P/N VE011-2006) • Mounting Screw Kit (P/N 213-043-001) to mount the CV31 to an existing 1.5-inch (C-size) or 2.25-inch (D-size) RAM ball • Wall Mount Cable Protector Thor CV31 Vehicle-Mount Computer User Manual... - Page 29 (P/N 213-042-001), if necessary. Screen Blanking Box Use the screen blanking box (P/N VX89351PWRSPLY) to help improve operator safety and reduce driver distractions by turning off the computer display when the vehicle is in motion. Thor CV31 Vehicle-Mount Computer User Manual...
- Page 30 • VT-220 DE-15S Backlit QWERTY Keyboard (P/N 340-054-004) • 5250 Extreme Temp QWERTY Keyboard (P/N 340-054-102) Screen Protector Install the screen protector (P/N 346-086- 001, 10-pack) to reduce damage to the screen due to scratches. Thor CV31 Vehicle-Mount Computer User Manual...
-
Page 31: About The User Interface And Installed Applications
About the User Interface and Installed Applications Use this chapter to learn about the Microsoft® Windows® Embedded Compact 7 (CE 7) user interface and how to interact with the screen. You can also use this chapter to learn about the applications installed on your computer, as well as additional applications you can download. -
Page 32: About The User Interface
The Windows Embedded Handheld 6.5 Windows CE7 interface supports the use of gestures with the finger or stylus to move around the screen. Screen Gestures Gesture Description Represents the left click of a mouse. Double-tap Represents the left double-click of a mouse. Thor CV31 Vehicle-Mount Computer User Manual... -
Page 33: Calibrate The Touch Screen
Intermec Use Intermec Settings to configure your Settings computer. You can use Intermec Settings to individually configure a computer or you can use it through SmartSystems to configure all of your computers. Thor CV31 Vehicle-Mount Computer User Manual... -
Page 34: Downloadable Applications For The Computer
HTML5 Browser provides a free, open-platform application for Honeywell computers. You can now run the same cross-platform web applications that you run on iOS and Android devices on Honeywell computers. HTML5 Browser also lets you run applications while the computer is connected to the web or offline. -
Page 35: About Intermec Terminal Emulator
ITE. Press Enter to close the message box. When the demo period ends, you need to purchase a license. For help, contact your local Honeywell representative. About SmartSystems Intermec SmartSystems is an easy-to-use centralized software platform. - Page 36 Chapter 2 — About the User Interface and Installed Applications Thor CV31 Vehicle-Mount Computer User Manual...
-
Page 37: Configure The Computer
Configure the Computer Use this chapter to learn about the available methods for configuring your computer and how to use Intermec Settings. You can also use this chapter to learn how to configure network communications and wireless security. -
Page 38: How To Configure The Computer
You can configure parameters for important functions like data collection and communications. You can also password protect Intermec Settings to prevent users from making changes to the configuration settings. Thor CV31 Vehicle-Mount Computer User Manual... -
Page 39: Start Intermec Settings
Note: You can also double-tap the Intermec Settings shortcut on the desktop to start Intermec Settings. 1 Tap Start > Settings > Control Panel. 2 Double-tap Intermec Settings. The Intermec Settings Main Menu appears. Thor CV31 Vehicle-Mount Computer User Manual... -
Page 40: About The Structure Of Intermec Settings
• Security Choice • Funk Security Settings • IP Settings • Certificates • Radio Measurement • Radio Bands • Allow Security Changes Ethernet Adapter IP Settings Bluetooth Bluetooth Settings UDP Plus UDP Plus Activate Thor CV31 Vehicle-Mount Computer User Manual... - Page 41 Note: The Printers menu displays settings for Bluetooth connected printers. The settings that appear in the menu depend on the printer paired with the computer. The printer needs to use the Wireless Printing application. Thor CV31 Vehicle-Mount Computer User Manual...
- Page 42 • Enable Wipe • Interval License Manager Menu License Manager Options Parameters You Can Configure About Read-only License Vault Read-only Virtual Wedge Menu Virtual Wedge Options Parameters You Can Configure Enable Virtual Wedge Enable Virtual Wedge Thor CV31 Vehicle-Mount Computer User Manual...
- Page 43 Keep Alive Ping Interval Keep Alive Ping Interval RFID Menu RFID Options Parameters You Can Configure Enable RFID Service Enable RFID Service Application Connection • Allow External BRI Connections • BRI TCP Port • Enable Logging Thor CV31 Vehicle-Mount Computer User Manual...
-
Page 44: How To Navigate In Intermec Settings
4 Type your password in the Enter: text box. 5 Retype your password in the Confirm: text box. 6 (Optional) Select the Use password to protect CAB Installation if you want to restrict the installation of .cab files. 7 Tap OK. Thor CV31 Vehicle-Mount Computer User Manual... -
Page 45: Restore Default Settings
1 Navigate to the menu item that you want to hide. 2 Tap and hold the menu item. A list appears. 3 Select Hide Menu Item. 4 When you are prompted to hide the menu, tap Yes. Thor CV31 Vehicle-Mount Computer User Manual... -
Page 46: Configure The Computer Remotely With Smartsystems
About Bluetooth Communications The computer is Bluetooth-enabled, which lets you connect to these Bluetooth devices: • Scanners • Printers • Audio devices • Wireless readers Thor CV31 Vehicle-Mount Computer User Manual... -
Page 47: Configure Bluetooth Communications
2 With your Bluetooth scanner, scan the Quick Connect bar code on either side of the computer. 3 When prompted, enter the passcode for your scanner. For Intermec Bluetooth scanners, the default passcode is 0000. The scanner pairs with your computer. Thor CV31 Vehicle-Mount Computer User Manual... -
Page 48: Connect A Bluetooth Scanner With The Wireless Scanning App
2 Double-tap Wireless Printing. 3 Tap Search to find a printer, or tap Manual to enter a device address. 4 Follow the instructions. 5 (Optional) Tap Print Test. The printer prints a test page. Thor CV31 Vehicle-Mount Computer User Manual... -
Page 49: About Wireless Security
• LEAP (Funk security only) • Honeywell recommends WPA2 security with PSK (Personal) or 802.1x (Enterprise) key management. Before you set security, you need to enable the radio, set the date, and set the SSID on your computer. To use 802.1x security, you need to load a root certificate on your computer. -
Page 50: Select A Funk Security Profile
TLS protocol, you also need to load a user and root certificate. On your computer, you need to enable the radio and set the date. 1 Start Intermec Settings. 2 Select Communications > 802.11 Radio > Funk Security. 3 Select a Funk security profile to configure. Thor CV31 Vehicle-Mount Computer User Manual... -
Page 51: Configure Wpa Or Wpa2 Personal (Psk) Security With
Enter the pre-shared key (0x followed by 32 hexadecimal pairs) for your access point. • Enter the passphrase (8 to 63 ASCII characters) for your authenticator. The computer internally converts the passphrase to a pre-shared key. 8 Tap OK. Thor CV31 Vehicle-Mount Computer User Manual... -
Page 52: Configure 802.1X Security With Funk Security
The default encryption is TKIP for WPA, AES for WPA2, and WEP for Open or Network EAP. 6 For Prompt for Credentials, select Enter credentials now. 7 Type a User Name and User Password. 8 Save your settings. Thor CV31 Vehicle-Mount Computer User Manual... -
Page 53: Configure Static Wep Security With Funk Security
1 Start Intermec Settings. 2 Select Communications > 802.11 Radio > Funk Security. 3 Select the active Funk security profile. 4 Enter the SSID. 5 For Association, select Open. 6 For Encryption, select WEP. 7 Tap OK. Thor CV31 Vehicle-Mount Computer User Manual... - Page 54 Chapter 3 — Configure the Computer Thor CV31 Vehicle-Mount Computer User Manual...
-
Page 55: Manage The Computer
Manage the Computer You can update, configure, and monitor your computers remotely. You can also develop and install applications, as well as upgrade the system software. -
Page 56: How To Manage The Computer In Your Network
• remotely change settings on the computer and peripherals. The SmartSystems console can report on asset locations and battery status, making it easier to manage your computers. Thor CV31 Vehicle-Mount Computer User Manual... -
Page 57: How To Manage The Computer With Third-Party Software
Typically, you will have a set of files to install. Intermec recommends using cabinet (.cab) files to install more complex applications. The computer uses standard Windows Mobile .cab files and will install third-party .cab files. Thor CV31 Vehicle-Mount Computer User Manual... -
Page 58: Install Applications With Smartsystems
Microsoft synchronization software is installed on your PC and is up and running. 1 Connect to the mobile computer through the synchronization software. 2 Copy the .cab files from your development PC to the mobile computer. Thor CV31 Vehicle-Mount Computer User Manual... -
Page 59: Install Applications With A Microsd Card
At boot time, AutoRun executes any commands found in its data file, Autouser.dat. For more information on using AutoRun, see the Readme.txt file located in the My Device\Flash File Store\2577 directory on the computer. Thor CV31 Vehicle-Mount Computer User Manual... -
Page 60: How To Update The System Software
While your computer is offline, SmartSystems displays a red stop symbol. This process can take anywhere from 30 seconds to 15 minutes depending on the update. After the update is complete, the computer boots again. Thor CV31 Vehicle-Mount Computer User Manual... -
Page 61: Update The Computer With A Microsd Card
9 Press the Power button and suspend the computer. 10 Remove the microSD card. If you do not remove the microSD card, the update process repeats each time the computer restarts. 11 Turn on the computer, and follow the setup process. Thor CV31 Vehicle-Mount Computer User Manual... - Page 62 Chapter 4 — Manage the Computer Thor CV31 Vehicle-Mount Computer User Manual...
-
Page 63: Troubleshoot And Maintain The Computer
Troubleshoot and Maintain the Computer Find solutions to problems you may have while using the computer, as well as information on routine maintenance. -
Page 64: How To Troubleshoot The Computer
Note: If you send the computer in for service, it is your responsibility to save the computer data and its configuration. Honeywell only ensures that the hardware matches the original configuration when repairing or replacing the computer. -
Page 65: How To Check Wi-Fi Network Status
The computer indicates Make sure the computer IP address, host IP that it is authenticated, address, subnet mask, and default router are but it does not configured for the network. communicate with the host. Thor CV31 Vehicle-Mount Computer User Manual... - Page 66 • Make sure that the network name matches the access point network name. The default network name is “INTERMEC.” • Make sure the access point is turned on, properly configured, and has 802.1x security enabled. Thor CV31 Vehicle-Mount Computer User Manual...
-
Page 67: Problems Reading Bar Codes
Good Read LED stays on, there may be a problem. Press the Scan button or pull the trigger again without scanning a bar code label. If the LED is still on, contact Product Support. Thor CV31 Vehicle-Mount Computer User Manual... - Page 68 The input device attached to the Set the Scanner Model command to computer does not work well or the specific attached input device. read bar code labels very Enable only the bar code symbologies quickly. being used. Thor CV31 Vehicle-Mount Computer User Manual...
-
Page 69: Problems Using The Computer
COM port for scanners: COM port. 1 Start Intermec Settings. 2 Tap Data Collection > Tethered Scanners > Tethered Scanner (COM1 or COM3) > Enable scanner port. 3 Clear the Enable scanner port check box. Thor CV31 Vehicle-Mount Computer User Manual... -
Page 70: Call Product Support
Before you call Intermec Product Support, you need know the operating system version on your computer. 1 Press to open the Device Health Dashboard. 2 Double-tap Information. The OS Version field displays the operating system version. Thor CV31 Vehicle-Mount Computer User Manual... -
Page 71: How To Restart The Computer
2 Dip a clean cloth towel in the cleaning agent and wring out the excess. 3 Wipe the touch screen. Do not allow any abrasive material to touch the surface. 4 Wipe off the exterior of the computer. 5 Wipe dry. Thor CV31 Vehicle-Mount Computer User Manual... - Page 72 Chapter 5 — Troubleshoot and Maintain the Computer Thor CV31 Vehicle-Mount Computer User Manual...
-
Page 73: Specifications
Specifications... -
Page 74: Physical And Environmental Specifications
0 °C to 40 °C (32 °F to 104 °F) (battery cell) Storage temperature -20 °C to 50 °C (-4 °F to 122 °F) For maximum battery life, store at 23 °C (73 °F) at 50% charge. Relative humidity 5% to 95% non-condensing Thor CV31 Vehicle-Mount Computer User Manual... -
Page 75: Screen Specifications
• DataMatrix* • Dutch Post* • EAN/UPC • GS1 Composite* • GS1 DataBar Expanded • GS1 DataBar Limited • GS1 DataBar Omni-Directional • HanXin • Infomail • Intelligent Mail • Interleaved 2 of 5 Thor CV31 Vehicle-Mount Computer User Manual... -
Page 76: Pin Assignments
The CV31 has these ports and connectors: • COM1 • COM3 • • Power COM 1 and COM 3 Ports By default, Pin 9 is configured to provide + 5 V for an external bar code scanner. Thor CV31 Vehicle-Mount Computer User Manual... -
Page 77: Usb Port
Chassis ground USB Port The USB port on the CV31 is labeled AUX. USB Port Pin Assignments Signal Description – – – – – USB1_D- USB client data signal USB1_D+ USB client data signal Thor CV31 Vehicle-Mount Computer User Manual... -
Page 78: Power Connector
V In+. Power Connector Pin Assignments Signal Description Chassis ground 12 V regulated DC+ input VIn- DC- power return – Not connected Ignition Ignition sensing input VIn+ 9 to 36 V non-regulated DC+ input Thor CV31 Vehicle-Mount Computer User Manual... -
Page 79: Device Settings
Device Settings This section lists all default settings for computer-specific features such as the backlight and power management. -
Page 80: Default Configuration
Codablock A Disable Codablock F Disable Code 11 Disable Code 39 Enable Code 93 Disable Code 128/GS1-128 Enable DataMatrix Enable DutchPost Disable EAN/UPC Enable UPC A, UPC E, EAN 8, EAN 13 GS1 Composite Disable Thor CV31 Vehicle-Mount Computer User Manual... - Page 81 Disable QR Code Disable Standard 2 of 5 Disable SwedenPost Disable Telepen Disable TLC 39 Disable Symbology Option Settings Symbology Option Default Value Preamble None (disabled) Postamble None (disabled) Symbology Identifier Disable Multicode Disable Thor CV31 Vehicle-Mount Computer User Manual...
- Page 82 Illumination Level Initial 1D Search Area Smart Raster Enable Direct Product Marking (DPM) Enable Mode Enable DPM Automatice Exposure Enable Control (AEC) AEC area Small (center) Damaged 1D Codes Disable Image File Location \My Documents\MDI Thor CV31 Vehicle-Mount Computer User Manual...
-
Page 83: Rfid
Center Decoding Tolerance RFID RFID Settings RFID Setting Default Value Enable RFID Service Enable Application Connection Settings Application Connection Setting Default Value Allow External BRI Connections Enable BRI TCP Port 2189 Enable Logging Disable Thor CV31 Vehicle-Mount Computer User Manual... - Page 84 Antenna Timeout 50 ms ID Tries Antenna Tries Read Tries Write Tries Initialization Tries Lock Tries Select Tries Unselect Tries Initial Q Field Strength dB Session Enable Antenna Port 1 Enable Antenna Port 2 Thor CV31 Vehicle-Mount Computer User Manual...
-
Page 85: Communications
Funk Security Settings Funk Security Setting Default Value Active Profile Profile 1 Hide Password Text Enabled Profile Label Profile_1 Network Type Infrastructure Channel SSID INTERMEC Power Mode Diabled(CAM) 8021x None Association Open Encryption None Thor CV31 Vehicle-Mount Computer User Manual... - Page 86 Default Value Current Device IP Address 0.0.0.0 DHCP Enable DHCP Client Identifier Null IP Address Null Subnet Mask 255.0.0.0 Default Router Null Primary DNS Null Secondary DNS Null Primary WINS Null Secondary WINS Null Thor CV31 Vehicle-Mount Computer User Manual...
-
Page 87: Device Settings
One beep Power Management Settings Power Management Setting Default Value Enable Power Button Screen Screen Options Displayed Suspend, Reboot, Shutdown Screen Timeout (Seconds) Power Button Behavior Suspend External Power, Screen Turns Off After (minutes) Thor CV31 Vehicle-Mount Computer User Manual... -
Page 88: Core Messaging Service
Off for Ready-to-Work Set Rule File Location \SmartSystems\HealthRules.txt Asset Message Send Period System Device Health (Seconds) Network Device Health (Seconds) Printer Device Health (Seconds) Directory \SmartSystems\ScreenCapture Screen Captures Allowed Enable Wipe Disabled Interval (in Days) Thor CV31 Vehicle-Mount Computer User Manual... -
Page 89: Virtual Wedge
READ Date (YYYY-MM-DD) Disabled Time (HH_MM_SS) Disabled Tag Separator SP (space) User-Defined Tag Separator Null End of Message CRLF (Return-Line Feed) User-Defined End of Message Null RFID Reader Grid Null OEM Scanner Grid Null Thor CV31 Vehicle-Mount Computer User Manual... -
Page 90: Thor Cv31 Vehicle-Mount Computer User Manual
Honeywell Scanning & Mobility 9680 Old Bailes Road Fort Mill, SC 29707 www.honeywellaidc.com Thor CV31 Vehicle-Mount Computer User Manual *935-081-001* P/N 935-081-001...
Need help?
Do you have a question about the Thor CV31 and is the answer not in the manual?
Questions and answers