
Subscribe to Our Youtube Channel
Related Manuals for Kogan ThermoBlend 2 KATHMXBENXA


Summary of Contents for Kogan ThermoBlend 2 KATHMXBENXA
- Page 2 Safety & Warnings..........................2 Product Layout, Accessories and Control Panel..............4 Power Indicator Light ........................4 Timer Dial............................4 ON/OFF Button..........................5 Pulse Button............................5 Temperature............................5 Soft start function (above 60°C)...................5 SPEED Dial............................5 Speed for Creamy Mixtures......................5 LCD Screen.............................6 Time..............................6 Speed..............................6 Speed for Creamy Mixtures......................6 Temperature...........................6 Steam Function..........................6 Screen Messages...........................6 Getting to know the ThermoBlend 2..................7...
- Page 3 • Operate on a dry level surface. Sinks, drainboards or uneven surfaces must be avoided. • The use of attachments or accessories not recommended or sold by Kogan.com can cause fire, • electric shock or injury. Never insert utensils into the appliance when the appliance is running.
- Page 4 The appliance becomes very hot during steaming and may cause burns when touched. Only lift the • bowl by its handle. Beware of hot steam that comes out of the steam basket during steaming and when you remove • the lid. Always unplug the appliance and let it cool down before you clean it.
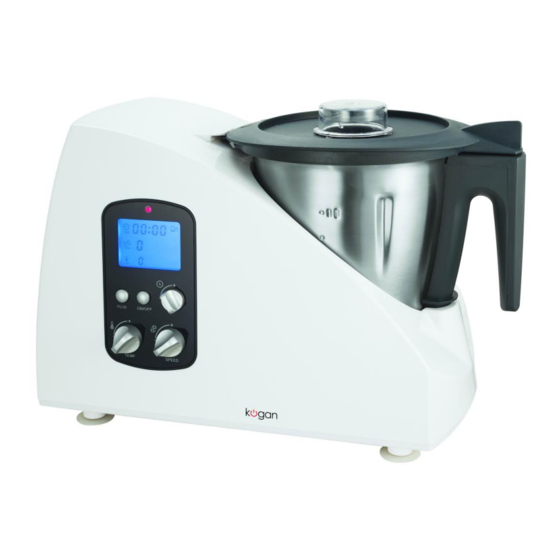
- Page 5 Central Unit Power Indicator Light LCD Screen ON/OFF Button 2 Litre Stainless Steel Bowl Pulse Button Timer Dial Temperature Dial Control Panel Speed Control When the ThermoBlend 2 is connected to the power supply, a red Power Indicator Light situated in the upper part of the control panel will light up, and will remain this way until the machine is disconnected from the electrical supply.
- Page 6 This button is used to start the ThermoBlend 2 after having selected the time, speed and temperature (although the temperature function is not always necessary depending on the cooking function). When it is ON, the Power Indicator Light changes from red to blue and the appliance begins to perform the programmed task.
- Page 7 When ThermoBlend 2 is connected to the power supply, the LCD screen lights up and shows all the control symbols of the ThermoBlend 2. (See Figure 1) Figure 1 The selected time appears in the upper part of the screen with the symbol of the clock and the work time.
- Page 8 This symbol will flash on the screen for a few seconds to indicate that the ThermoBlend 2 has reached the selected temperature. When this symbol appears, a beep tone will also sound. Ensure that the blades are securely placed in the bowl. Connect the bowl to the central unit by placing it in the cavity of the central unit and lightly pressing it down so that it fits correctly in place.
- Page 9 The ThermoBlend 2 bowl is made of stainless steel and has a maximum capacity of 2 litres with marked levels of 0.5 litres indicated on the outside and inside of the bowl. Never fill the bowl exceeding the maximum level amount for safe use of the •...
- Page 10 Chopping Blade: has a sharp edge and is intended for blending, chopping, mincing, ice crushing and grinding functions. Ensure great care when handling the chopping blade, due to its sharp edge. Stirring Blade: has a blunt edge and is intended for gently stirring delicate foods which are not required to be chopped.
- Page 11 Place the ThermoBlend 2 on a clean and stable surface that does not radiate heat. • ThermoBlend 2 comes with two security sensors that can be found in the handle and • bottom of the bowl. For optimum use of the machine, the bowl has to be properly fitted to the central unit, otherwise the machine will detect an error and will not work.
- Page 12 Never use the Pulse button, high speed or abruptly increase the speed above speed 3 when processing hot food. Turn the Measuring cup to lock position while operating at higher (6 –10) speed levels or pressing Pulse button to chop or to purée cold food to avoid the measuring cup or food splashing out.
- Page 13 Unit not icon appears on LCD Bowl is incorrectly placed and not Reposition the bowl correctly until this working completely pushed down into position. icon disappears. E3 appears on the LCD Motor has overheated. Unplug the power plug, allow the unit to cool down.
Need help?
Do you have a question about the ThermoBlend 2 KATHMXBENXA and is the answer not in the manual?
Questions and answers