
Subscribe to Our Youtube Channel
Related Manuals for Clarke TIGER1700


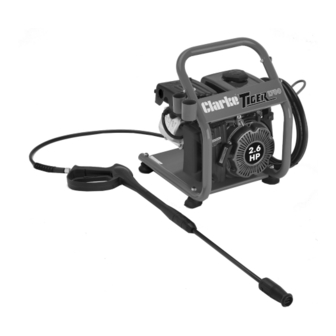
Summary of Contents for Clarke TIGER1700
- Page 1 WARNING Read the instructions before using the machine PETROL DRIVEN POWER WASHER MODEL NO: TIGER1700 PART NO: 7320054 OPERATION & MAINTENANCE INSTRUCTIONS LS0511...
- Page 2 Parts & Service: 020 8988 7400 / E-mail: Parts@clarkeinternational.com or Service@clarkeinternational.com...
- Page 3 Faulty goods should be returned to their place of purchase, no product can be returned to us without prior permission. This guarantee does not effect your statutory rights. ACCESSORIES The range of accessories listed below may be purchased from your CLARKE dealer. ITEM PART NUMBER...
-
Page 4: General Safety Rules
3. NEVER allow children or untrained personnel to use this machine. 4. NEVER operate the machine with any of the covers removed. 5. NEVER attempt any repairs to this machine. Always refer to your Clarke dealer. 6. NEVER supply any liquid other than water to the water inlet. -
Page 5: Safety Symbols
SAFETY SYMBOLS WARNING: Risk of injection or severe injury. Do not direct discharge stream at persons or animals. Keep clear of nozzle. This machine is to be used only by qualified operators. WARNING: Risk of spray injury. Spray can propel objects. - Page 6 OVERVIEW DESCRIPTION NO DESCRIPTION Fuel Tank Cap Fuel Valve Fuel Tank Throttle Spark Plug Engine On/Off Switch Choke Oil Filler Cap Gun Assembly Water Outlet Lance Detergent Hose Air Filter Cover Water Inlet Recoil Starting Handle Bypass Drain Hose Parts & Service: 020 8988 7400 / E-mail: Parts@clarkeinternational.com or Service@clarkeinternational.com...
-
Page 7: Unpacking And Assembly
UNPACKING AND ASSEMBLY Unpack your pressure washer and check to ensure the following items are present. Contact your Clarke dealer immediately if any parts are missing or damaged. • 1 x Petrol Pressure Washer • 1 x Hose • 1 x Gun Assembly •... - Page 8 THE HIGH PRESSURE HOSE CONNECT THE HOSE TO THE GUN 1. Screw the high pressure hose onto the gun assembly. 2. Use a spanner to tighten the connector. NOTE: Make sure the connection is secure. CONNECT THE HOSE TO THE PRESSURE WASHER 1.
-
Page 9: Before Use
BEFORE USE WARNING: TO CARRY OUT THIS CHECK, PLACE THE PRESSURE WASHER ON LEVEL GROUND WITH THE ENGINE SWITCHED OFF. WARNING: TAKE CARE NOT TO TOUCH ANY HOT PARTS OF THE PRESSURE WASHER WHEN CHECKING THE OIL LEVEL. IMPORTANT: The engine is supplied without any oil in it and must be filled to the correct level before use, see below. -
Page 10: Adding Fuel
ADDING FUEL • Refuel in a well-ventilated area, away from any sources of ignition. • If the engine has been running, allow it to cool before refueling. • Do not leave fuel within the reach of children. • Refuel carefully to avoid spilling fuel. 1. -
Page 11: Starting Your Pressure Washer
STARTING YOUR PRESSURE WASHER 1. Turn the water supply on, making sure that the tap is fully open. WARNING: FAILURE TO TURN ON THE WATER COULD CAUSE DAMAGE TO THE PRESSURE WASHER. 2. Set the choke lever to the ON position. - Page 12 5. Set the engine switch to the on (I) position 6. Pull the recoil starting handle lightly until you start to feel resistance and then pull up sharply to start the engine. • You may have to do this more than once.
-
Page 13: Interrupting Operation
INTERRUPTING OPERATION 1. Release the trigger. NOTE: The pressure washer will automatically go into bypass mode. WARNING: DO NOT ALLOW THE UNIT TO OPERATE IN BYPASS MODE FOR MORE THEN TWO MINUTES AT ANY TIME. TURN THE UNIT OFF IF IT IS NOT GOING TO BE USED FOR A PERIOD LONGER THAN THIS. -
Page 14: Applying Chemicals And Cleaning Agents
• Only use detergents recommended for use with pressure washers, such as CLARKE Traffic Film Remover which is a powerful low foaming agent for car cleaning, patio cleaning etc., or CLARKE Wash & Wax, both available from your CLARKE dealer. -
Page 15: Before Storing The Pressure Washer
4. Turn water supply off at the tap. 5. Release the pressure in the pump and hose by squeezing the trigger for a few seconds until no more water comes out of the nozzle. 6. Turn off the fuel supply valve. 7. -
Page 16: Maintenance
MAINTENANCE CLEANING THE NOZZLE 1. Shut off the pressure washer and turn off the water supply. 2. Pull trigger on the gun handle to relieve any water pressure. 3. Disconnect the lance from the gun assembly. 4. Remove any obstructions with the nozzle cleaning tool provided and back flush with clean water. -
Page 17: Cleaning The Fuel Strainer
5. Rinse thoroughly and leave it to dry. Once it is completely dry, immerse the filter in clean engine oil and sqeeze the filter to remove excess oil. • If the air filter is damaged contact Clarke spare parts department for a replacement. -
Page 18: Changing The Spark Plugs
CHANGING THE SPARK PLUGS CAUTION: ALLOW THE ENGINE TO COOL BEFORE REMOVING THE SPARK PLUG. 1. Remove the spark plug cap from the spark plug. 2. Use the supplied spark plug spanner to remove the spark plug. 3. Remove any carbon that has accumulated around the sparkplug. 4. -
Page 19: Troubleshooting
TROUBLESHOOTING If the following does not solve your problem, please contact the CLARKE service department. PROBLEM CAUSE SOLUTION Engine will not No fuel. Add fuel. start (see engine Low oil. Add oil. manual for further engine Pressure builds up after... - Page 20 PROBLEM CAUSE SOLUTION Lack of pressure Choke lever is in the ON Set the choke lever to the OFF position. (initial use) position. continued Throttle control lever is Move the throttle control lever to left. not set high enough. High pressure hose is too Make sure the high pressure hose is under long.
-
Page 21: Specifications
SPECIFICATIONS ENGINE Engine type Petrol (unleaded). OHV Single Cylinder 4 stroke forced air cooling Capacity/displacement: 87 cc Oil Capacity 0.4 L Lubrication Grade SAE10W-30 Fuel Tank Capacity:(Litres) 1.6L WATER CONNECTION Max. Feed Temperature 50 °C Max. Feed Pressure 3-6 Bar PERFORMANCE DATA Maximum Pump Pressure 110 Bar... -
Page 22: Exploded Diagram
EXPLODED DIAGRAM WARNING: TO ENSURE MACHINE SAFETY, USE ONLY ORIGINAL SPARE PARTS FROM CLARKE INTERNATIONAL. Parts & Service: 020 8988 7400 / E-mail: Parts@clarkeinternational.com or Service@clarkeinternational.com... -
Page 23: Parts List
PARTS LIST NO DESCRIPTION PART NO NO DESCRIPTION PART NO Drain Hose RKTIG170001 13 Cross Bolt M5x35 RKTIG170013 Thermal Relief Cap RKTIG170002 14 Washer RKTIG170014 Inlet Connector RKTIG170003 15 Gun Holder RKTIG170015 Gasoline Engine RKTIG170004 16 Locknut M5 RKTIG170016 Wand RKTIG170005 17 Locknut M8 RKTIG170017... -
Page 25: Declaration Of Conformity
DECLARATION OF CONFORMITY Parts & Service: 020 8988 7400 / E-mail: Parts@clarkeinternational.com or Service@clarkeinternational.com... - Page 26 Parts & Service: 020 8988 7400 / E-mail: Parts@clarkeinternational.com or Service@clarkeinternational.com...
- Page 27 NOTES Parts & Service: 020 8988 7400 / E-mail: Parts@clarkeinternational.com or Service@clarkeinternational.com...
- Page 28 NOTES Parts & Service: 020 8988 7400 / E-mail: Parts@clarkeinternational.com or Service@clarkeinternational.com...
Need help?
Do you have a question about the TIGER1700 and is the answer not in the manual?
Questions and answers