Table of Contents
Advertisement
Available languages
Available languages
Advertisement
Table of Contents

Related Manuals for Zte WiFi MF20


Summary of Contents for Zte WiFi MF20
- Page 1 Base WiFi MF20 Manual de usuario/User Manual Versión en Español English Version...
- Page 2 ZTE Corporation. The manual is published by ZTE Corporation. We reserve the right to make modifications on print errors or update specifications without prior notice.
- Page 3 BIENVENIDO Gracias por elegir el adaptador inalámbrico ZTE MF20. Para sacar el máximo partido a su adaptador inalámbrico y mantenerlo en las mejores condiciones, lea atentamente este manual. Las imágenes, símbolos y contenidos de este manual son solamente para fines de referencia.
- Page 4 Glosario (U)SIM: módulo de identificación del suscriptor (UMTS) APN: nombre de punto de acceso CA: corriente alterna CD: corriente eléctrica DHCP: protocolo de configuración dinámica de servidores DNS: sistema de nombres de dominio (o Servicio o Servidor) ...
- Page 5 WLAN: LAN inalámbrica WPA-PSK: acceso protegido de fidelidad inalámbrica con clave previamente compartida...
- Page 6 Índice BIENVENIDO Glosario Índice Preparación previa Componentes suministrados Aspecto Indicador LED Descripción de la interfaz Instalación del hardware Insertar la tarjeta (U)SIM Insertar el módem Insertar la batería Cargar su dispositivo Conexión al ordenador Conexión a la red eléctrica externa Encendido del dispositivo Observaciones sobre servicio y cobertura Establecer una conexión con su dispositivo...
- Page 7 Registro del sistema Estado Cerrar sesión Resolución de problemas...
-
Page 8: Componentes Suministrados
Preparación previa La base WiFi ZTE MF20 funciona con redes HSPA/ UMTS / GSM / GPRS y además puede utilizarse como router Wi-Fi convencional. Componentes suministrados Componentes Cantidad Adaptador inalámbrico MF20 Adaptador de red eléctrica externa Batería cable Ethernet Manual de usuario Certificado de calidad *En este manual, el módem USB está... -
Page 9: Indicador Led
Aspecto Indicador LED Elemento Estado del LED Descripción Encendido Luz azul fija Encendido Batería Luz roja fija Batería baja Luz azul fija Batería normal Luz morada fija Carga de la batería Sin batería Apagado O la batería no funciona Wi-Fi Luz azul fija Wi-Fi activada Luz roja fija... -
Page 10: Descripción De La Interfaz
intermitente (una vez por 3 seg.) Luz azul intermitente Módem USB conectándose a 3G (una vez por seg.) O conectando a WAN Luz morada intermitente Módem USB conectándose a 2G (una vez por seg.) Módem USB conectado a 3G Luz azul fija O conectado a WAN Apagado WAN desconectado... - Page 11 queda orientada hacia el módem. 4. Inserte la tapa de plástico en el módem. Oirá un clic cuando la tarjeta (U)SIM encaje en su sitio. Insertar el módem Insertar el módem en el router. 1. Levante la cubierta frontal. 2. Inserte el conector USB en el puerto USB. Advertencia: Apague el adaptador antes de retirar o insertar el módem.
-
Page 12: Insertar La Batería
Insertar la batería 1. Retire la tapa del compartimento de la batería como se muestra en la imagen. 2. Inserte la batería. 3. Cierre la tapa de la batería. Cargar su dispositivo Puede cargar su dispositivo usando un cable o adaptador USB. 1. -
Page 13: Conexión Al Ordenador
Conexión al ordenador Conecte su ordenador a la interfaz LAN con un cable Ethernet (RJ45). También puede conectarse vía WiFi al dispositivo móvil. Notas: El adaptador inalámbrico se adaptará al estilo de cable Ethernet automáticamente. Conexión a la red eléctrica externa Conecte el adaptador de la red eléctrica externa a una toma eléctrica convencional. - Page 14 Establecer una conexión con su dispositivo A través de Wi-Fi 1. Encienda su dispositivo directamente. Tardará entre 1 a 2 minutos en inicializar y, después, el indicador LED de Wi-Fi se encenderá. 2. Utilice su aplicación Wi-Fi habitual de cliente para buscar la red inalámbrica disponible. Notas: Debe comprobar su conexión de red inalámbrica.
-
Page 15: Acceso A Internet
Acceso a Internet Acceso a Internet mediante su Base WiFi Nota: 1. Asegúrese de haber insertado la tarjeta (U)SIM en el módem; 2. Introduzca el módem en el adaptador antes de encender el dispositivo. 1. Acceda a WebGUI y defina el Modo de Red (Ajustes de Red) como 3G o Automático. 2. - Page 16 Manejo del PIN y primera conexión 1. Inserte el módem USB e introduzca el código PIN de la tarjeta SIM. Después, puede pulsar Aceptar. 2. Una vez que se acepte el código PIN, puede ir a la Página de Inicio del Administrador y consultar el estado de conexión.
- Page 17 La página completa se divide en dos partes. Las funciones relacionadas pueden ser ejecutadas por operación en áreas relacionadas. • Área del índice: mostrar la lista de configuración para su adaptador. • Área de contenido: mostrar la configuración de los detalles. Puede hacer clic en Idioma >...
- Page 18 Tipo de ejecución: habilita y configura el tiempo de actividad y configura el tiempo de inactividad a demanda. Automático :el adaptador se conectará a Internet automáticamente cuando se encienda. Manual: conéctese a Internet haciendo clic en Conectar. ...
- Page 19 Dirección IP: la dirección IP para la interfaz LAN. Máscara de subred indique la máscara de subred local. Dirección MAC: la dirección de la capa física para el puerto LAN del adaptador. Tipo de DHCP :defina el tipo de DHCP. Por defecto, el router está configurado como servidor DHCP.
-
Page 20: Opciones Avanzadas
addresses) hasta un total de tres dispositivos con direcciones MAC específicas; es decir, el servidor DHCP siempre asigna a estos dispositivos las mismas direcciones IP. Proxy DNS: habilita el proxy DNS en el puerto LAN. El proxy DNS recibe consultas de DNS desde la red local y las envía a un servidor DNS de Internet. - Page 21 Interfaz : la interfaz seleccionada para la cual se debe aplicar una subred de enrutamiento estático. Comentario : introduce un comentario útil que ayuda a identificar esta ruta. Tabla de enrutamiento actual en el sistema: muestra la información de los enrutamientos actuales.
-
Page 22: Conexión Inalámbrica
Conexión inalámbrica Ajustes básicos Seleccione WiFi > Ajustes básicos, los parámetros de los ajustes básicos de la conexión inalámbrica se muestran en la siguiente figura: Versión del Driver : la versión del controlador inalámbrico. WIFI activada/desactivada: activar/ desactivar WIFI. ... - Page 23 Nombre de red (SSID): el nombre del servicio de red inalámbrica proporcionado por el CPE. Los clientes que deseen conectarse a la red deben definir su SSID al mismo que al del adaptador. BSSID: el identificador (dirección MAC) del adaptador en la red del conjunto de servicios básicos (Basic Service Set, BSS).
- Page 24 Opciones avanzadas Seleccione Wifi > Ajustes Avanzados; los parámetros de los ajustes avanzados de la conexión inalámbrica se muestran en la siguiente figura: Modo de protección BG : habilita un mecanismo de protección compatible hacia atrás para los clientes 802.11b. Hay tres modos: (Modo predeterminado: automático). ...
- Page 25 Preámbulo corto : habilite o no el preámbulo corto. Ranura corta : habilite o no la ranura corta. Ráfaga Tx (Tx Burst): habilite o deshabilite TX Burst. Pkt_Aggregate: habilite o deshabilite Pkt_Aggregate. Soporte IEEE 802.11H (IEEE 802.11H Support): habilite o no el soporte IEEE 802.11H.
- Page 26 Elegir SSID: seleccione el SSID. Modo de seguridad : seleccione el modo de seguridad. Desactivado Si el modo de seguridad está Desactivado, puede conectar el adaptador directamente sin introducir ninguna contraseña. WEP abierto/ WEP Compartido/WEPAUTO Si el modo de seguridad es WEP abierto, WEP Compartido, WEPAUTO, la página de configuración muestra los parámetros, tal y como se indica a continuación: ...
- Page 27 WEP Compartido: los clientes WLAN que tengan la misma clave WEP con la pasarela inalámbrica pueden autenticarse y acceder a la red inalámbrica. WEPAUTO: seleccione la seguridad WEP automáticamente. Claves WEP: Pueden definirse un máximo de cuatro claves en el espacio en blanco.
- Page 28 TKIP: usa claves del protocolo de integridad de clave temporal (TKIP) para la codificación. WPA especifica TKIP como el método de codificación de datos para sustituir WEP. TKIP evita los problemas de las claves estáticas WEP cambiando de forma dinámica las claves de codificación de los datos. ...
- Page 29 WPA: los clientes que usen WPA con un método de autentificación 802.1X serán autenticados. Dirección IP :especifica la dirección del servidor RADIUS. Puerto: el número de puerto del protocolo de datagramas de usuario (User Datagram Protocol, UDP) usado por el servidor RADIUS para los mensajes de autentificación. ...
- Page 30 autentificados recordando las claves y otra información de seguridad en una caché, de manera que si un cliente se aparta de un punto de acceso y después vuelve no se requiere volver a autentificarse. Este parámetro define el tiempo para eliminar la información sobre seguridad de la clave maestra en pares (PMK) del WPA2 almacenado.
- Page 31 WPS SSID: el servicio establece el identificador para la unidad. Modo de autent. WPS: el método de autentificación utilizado. Tipo de codificación WPS: el tipo de codificación usada para la unidad. Índice de clave predeterminada WPS: muestra la clave predeterminada WEP (1~4). ...
- Page 32 Firewall Filtro de contenido Haga clic en Firewall > Filtro de contenido para configurar el Filtro de contenido para limitar el acceso a contenidos indebidos Ajustes del filtro de contenido: configure el filtro de contenido de Proxy, Java o ActiveX.
- Page 33 Filtro de dirección Haga clic en Firewall > Filtro de dirección para configurar las reglas del firewall para proteger su red frente a virus, gusanos y actividad maliciosa en Internet. MAC/IP/Filtro del puerto: habilite o deshabilite MAC/IP/Filtro del puerto. ...
-
Page 34: Servidor Virtual
Rango del puerto de origen: defina los números del puerto de origen que serán filtrados. Acción: defina cómo manejar el paquete si coincide con la regla. Comentario: introduzca contenido sin espacios para los ajustes del filtro. Servidor virtual Haga clic en Firewall >... - Page 35 Rango del puerto: defina los números del puerto para el servidor virtual. Protocolo: defina el protocolo para el servidor virtual. Comentario: introduzca un comentario para los ajustes del servidor virtual. envíe el ajuste de servidor virtual de puerto único: habilite o deshabilite el servidor virtual de puerto único.
- Page 36 Control remoto (a través de WAN)): permita o rechace la función de control remoto Ping desde el filtro WAN: habilite o deshabilite ping desde WAN en el requisito. Bloquear la búsqueda del puerto: habilite o deshabilite la función bloquear la búsqueda del puerto.
- Page 37 Administrador Administrador Seleccione Administrador > Ajustes para acceder a la siguiente pantalla: Ajustes del administrador: para definir una nueva cuenta, introduzca una cuenta y una clave nuevas y después haga clic en Aplicar para confirmar su configuración. Ajustes NTP ...
- Page 38 Ajustes de exportación : guarda la configuración actual en un archivo localmente. Registro de exportación: exporte el registro de exportación. Ajustes de importación : permite al usuario cargar los archivos de configuración guardados previamente desde una fuente local. ...
-
Page 39: Registro Del Sistema
En Actualizar Firmware, haga clic en <Examinar...>, localice la versión de software más reciente y después haga clic en Aplicar. Notas: No actualice el software a menos que sea necesario. Si se actualiza incorrectamente, el router puede funcionar mal o no funcionar. Registro del sistema Seleccione Administrador >... -
Page 40: Resolución De Problemas
Resolución de problemas Problemas relacionados con Internet Síntomas Posibles problemas y soluciones No puede acceder a Internet. Compruebe sus ajustes de configuración. Espere durante 1 a 2 minutos para que adaptador inalámbrico se inicialice. Compruebe el LED de indicador de servicio. La velocidad de carga o descarga es muy lenta. - Page 41 The pictures, symbols and contents in this manual are for your reference only. They might not be completely identical with your wireless adaptor. ZTE operates a policy of continuous development. We reserve the right to update the technical specifications in this manual at any time without prior notice.
- Page 42 Glossary AC: Alternating Current • APN: Access Point Name • DC: Direct Current • DHCP: Dynamic Host Control Protocol • DNS: Domain Name System (or Service or Server) • EDGE: Enhanced Data GSM Evolution • Ethernet: A frame-based computer networking technology for local area networks •...
- Page 43 Wi-Fi:Wireless Fidelity • WLAN: Wireless LAN • WPA-PSK: Wi-Fi Protected Access–PreShared Key •...
- Page 44 Contents WELCOME Glossary Contents Getting started Parts Supplied Appearance LED Indicator Interface Description Installation Inserting the (U)SIM Card Inserting the modem Insert the battery Charge your device Connecting to WAN/LAN Connecting with External Power Switching on your device About (U)SIM card Notes on Service and Coverage Internet Access Preparation...
- Page 45 Management Settings Upload System Log Status Logout Troubleshooting...
-
Page 46: Getting Started
Getting started The ZTE MF20 wireless adaptor operates on the HSPA/ UMTS / GSM / GPRS network and it also can be used as a ordinary Wi-Fi router. Parts Supplied Parts Quantity MF20 Wireless Adaptor External power adapter Battery Ethernet Cable... -
Page 47: Led Indicator
LED Indicator Item LED Status Description Power Blue always on Power on Battery Red always on Battery low Blue always on Battery normal Purple always on Battery charging No battery Or battery is out of power Wi-Fi Blue always on Wi-Fi is on Red always on Ethernet is on... -
Page 48: Interface Description
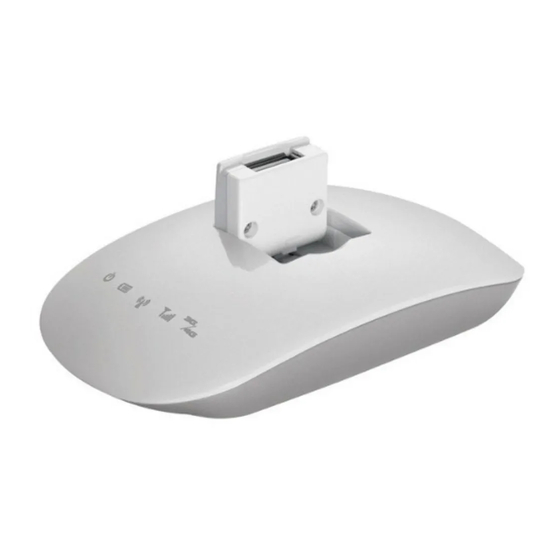
Interface Description Reset button/WPS. 5. Reset: 6. ON/OFF: Turn the wireless adaptor ON or OFF. 7. WAN/LAN: Ethernet connections to internet. 8. POWER Socket: Connection to the external power supply. Installation This section shows you how to install the hardware. Inserting the (U)SIM Card Insert the (U)SIM card into the modem. -
Page 49: Inserting The Modem
Inserting the modem Insert the modem into the router. 1. Rotate the front cover. 2. Plug the USB connector into the USB port. Warning: Please power off the Adaptor and remove the external power adapter before removing or inserting the modem, if not, the Adaptor or modem may be damaged. -
Page 50: Insert The Battery
Insert the battery 4. Remove the battery cover as shown. 5.Insert the battery. 6.Close the battery cover. Charge your device You can charge your device by using USB cable or adapter. 1. Insert the charger lead carefully with the plug arrow facing the bottom of the device. 2. -
Page 51: About (U)Sim Card
Connecting to WAN/LAN Connect WAN with an Ethernet cable (RJ45). You can also connect via WiFi. Connecting with External Power Connect the external power adaptor to a standard power outlet. Insert the plug into the socket at the rear of the wireless adaptor. Switching on your device 1. -
Page 52: Internet Access
Internet Access The wireless adaptor does not require any drivers, and it supports all operating systems with Ethernet LAN capability, such as Windows 2000, XP, Vista, MAC OS X and Linux. Notes: All the parameter settings in this chapter are just for your reference. Please contact your service provider for detail. -
Page 53: Accessing The Internet
Wait for a moment, the connection between your device and the client will be established successfully. Notes: You can connect also via ethernet cable. Accessing the Internet 1. Switch on the device. 2. Establish a connection between your device and the client. Notes: The parameter settings may have been preset by your service provider, and you will enjoy your Internet service directly. - Page 54 5. Launch the internet browser and enter http://192.168.0.1 in the address bar. Notes: It is recommended that you use IE (8.0 or later), Firefox (2.0 or later), Opera (10.0 or later), Safari (4.0 or later) or Chrome (10.0 or later). The login page appears as follows.
- Page 55 3. If you only want to insert the PIN once you can mark the option Remember, and the PIN will be remembered. 4. If the status follows off line after a while, connect manually in the Status tab (See the Login point how to enter in the Status tab ): The whole page is divided into two parts.
- Page 56 Internet There are different WAN Connection Modes: 3G and 2G. In 3G/2G/Automatic mode Select Internet > WAN, and then select 3G/2G/Automatic in the drop list at WAN Connection Type. You can configure how to connect to the Internet. NET MODE: Select the network mode,3G 2G or automatic.
- Page 57 Profile Name: A name that identifies the profile. APN: Access Point Name. If a fixed APN is provided by your service provider, select Manual APN. Otherwise select the Auto APN and the router will automatically obtain this parameter. ...
- Page 58 to access the following screen: Select Internet > LAN IP Address: IP address for LAN interface. Subnet Mask: Indicate the local subnet mask. MAC Address: The physical layer address for the adaptor LAN port DHCP Type: Define the DHCP type. By default, router is set as DHCP server. ...
- Page 59 Lease Time: Select a time limit for the use of an IP address from the IP pool. When the time limit expires, the client has to request a new IP address. Statically Assigned: Up to three devices with specific MAC addresses can be assigned static IP addresses.
-
Page 60: Dhcp Clients
Comment: Enters a useful comment to help identify this route. Current Routing table in the system: Show the information of the current routings. Click Apply to confirm. DHCP Clients Click Internet > DHCP Client to show the DHCP Client. - Page 61 Wireless Basic Select Wireless > Basic, the wireless basic settings parameters are shown in the following figure: Driver Version: The wireless driver version. WIFI On/Off: Turn On / Off the WIFI. Network Mode: If all of the wireless devices connect with this router in the same transmission mode, performance will be improved by choosing the appropriate wireless mode.
- Page 62 Network Name (SSID): The name of the wireless network service provided by the CPE. Clients that want to connect to the network must set their SSID to the same as that of the adaptor. BSSID: The identifier (MAC address) of the adaptor in the Basic Service Set (BSS) network.
- Page 63 Advanced Select Wireless > Advance, the wireless advance settings parameters are shown in the following figure: BG Protection Mode: Enables a backward compatible protection mechanism for 802.11b clients. There are three modes: (Default: Auto). Beacon Interval: The rate at which beacon signals are transmitted from the access point.
- Page 64 of 2347. TX Power: Transmit power should be remained as the value of 100. Short Preamble: Enable short preamble or not. Short Slot: Enable short slot or not. Tx Burst: Enable or disable the TX Burst. Pkt_Aggregate: Enable or disable the Pkt_Aggregate.
- Page 65 If the security mode is Disable, you can connect the adaptor directly without input any password. OPENWEP/SHAREDWEP/WEPAUTO If the security mode is OPENWEP, SHAREDWEP, WEPAUTO, the configuration page displays parameters as shown:...
- Page 66 OPENWEP: The WLAN clients who have the same WEP key with wireless gateway can pass the authentication and access the wireless network. SHAREDWEP: The WLAN clients who have the same WEP key with wireless gateway can pass the authentication and access the wireless network. ...
- Page 67 WPA-PSK: Clients using WPA with a Pre-shared Key are accepted for authentication. WPA2- PSK: Clients using WPA2 with a Pre-shared Key are accepted for authentication. WPAPSKWPA2PSK: Clients using WPA or WPA2 with a Pre-shared Key are accepted for authentication.
- Page 68 WPA / WPA1/WPA2 If the security mode is WPA / WPA1/WPA2, the configuration page displays s parameters as shown: WPA: Clients using WPA with an 802.1X authentication method are accepted for authentication. IP Address: Specifies the IP address of the RADIUS server.. ...
- Page 69 PMK Cache Period: WPA2 provides fast roaming for authenticated clients by retaining keys and other security information in a cache, so that if a client roams away from an access point and then returns reauthentication is not required. This parameter sets the time for deleting the cached WPA2 Pair wise Master Key (PMK) security information.
- Page 70 Select Enable, click Apply, the WPS settings are shown in the following figure: WPS Current Status: Displays if there is currently any WPS traffic connecting to the adaptor.
-
Page 71: Content Filter
WPS Configured: States if WPS for wireless clients has been configured for this device. WPS SSID: The service set identifier for the unit. WPS Auth Mode: The method of authentication used. WPS Encrypt Type: The encryption type used for the unit. ... -
Page 72: Address Filter
Content Filter Settings: Set the content filter of Proxy, Java or ActiveX. Webs URL Filter Settings: Enter the web URL address, and then click Add the URL address into the filtering list. Webs Host Filter Settings: Enter the client host name, and then click Add to add the host into the filtering list. - Page 73 MAC/IP/Port Filtering: Enable or disable the MAC/IP/Port Filtering. Default Policy: Choose Accept or Drop the packet that doesn’t match with any roles. Source MAC address: Set the source MAC address that will be filtered. Dest IP Address: Set the destination IP address that will be filtered. ...
-
Page 74: Virtual Server
Virtual Server Click Firewall > Virtual Server to setup Virtual Servers to provide services on Internet. Virtual Server Settings: Enable or disable virtual server. IP Address: Set IP address for the virtual server. Port Range: Set port numbers for the virtual server. ... - Page 75 forward single port virtual server setting: Enable or disable single port virtual server. forward virtual server public port: Set the public virtual server port. forward virtual server private port: Set the private virtual server port. Select Firewall > DMZ to setup a De-militarized Zone(DMZ) to separate internal network and Internet.
- Page 76 Remote management (via WAN): Allow or Deny the remote management function Ping form WAN Filter: Enable or Disable ping from WAN on requirement Block port scan: Enable or Disable block port scan. Block SYN Flood: Enable or Disable block SYN flood. ...
- Page 77 Settings Select Admin > Settings to access the following screen: Export Settings: Saves the current configuration to a file locally. Export LOG: Export the Log record. Import Settings: Allows the user to load previously saved configuration files from a local source. ...
-
Page 78: System Log
Click <Browse...>, locate the latest software version, and then click Apply. Notes: Do not upgrade software unless necessary. Wrongly upgrade action may cause router malfunction or cannot work. System Log Select Admin > System Log to view the system record. ... - Page 79 Status Click Status to view the detail configuration information. Logout 1. Select Logout, a pop-up window will appear as shown in the following figure: 2. Click OK to log out.
-
Page 80: Troubleshooting
Troubleshooting Internet Related Problems Symptoms Possible Problems/ Solutions I cannot access the internet at all. Please check your configuration settings. Please wait 1~ 2 minutes for the wireless adaptor to initialize. Check your service indicator LED’s. The download or upload speeds are very slow. The speed is dependent on signal strength.
Need help?
Do you have a question about the WiFi MF20 and is the answer not in the manual?
Questions and answers