Advertisement
Available languages
Available languages
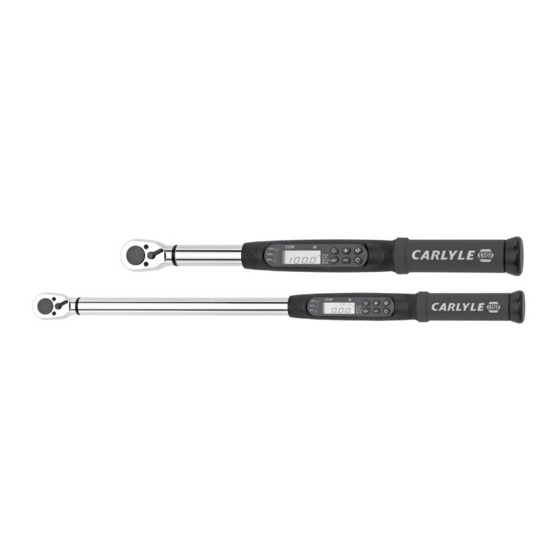
DTW38, DTW12
DTW38, DTW12
3/8", 1/2" Dr. Digital Torque Wrenches
3/8" Torque Range . . . . . . . . . . . . . . . . . . . . . . . . . . . . . . . . . . . . . 10-100 ft.-lbs.
1/2" Torque Range . . . . . . . . . . . . . . . . . . . . . . . . . . . . . . . . . . . . . 25-250 ft.-lbs.
Torque Accuracy (*1) . . . . . . . . . . . . . . . . . . . . . . . . . .10% to 100% of full scale
Angle Accuracy . . . +/- 1% of reading +/- 1°, Angle Velocity 10°/sec ~180°/sec
Data Memory Values . . . . . . . . . . . . . . . . . . . . . . . . . . . . . . . . . . . . . . . . . . . . .99
Operation Modes . . . . . . . . . . . . . . . . . . . . . . . . . . . . . . . . . . . . Peak Hold/Track
Unit Selection . . . . . . . . . . . . . . . . . . . . . . . . . . . . . . . . ft-lb, in-lb, N-m, & kg-cm
Head Type . . . . . . . . . . . . . . . . . . . . . . . . . . . . . . . . . . . . . . . . . . . . . . . . . . Fixed
Gear teeth . . . . . . . . . . . . . . . . . . . . . . . . . . . . . . . . . . . . . . . . . . . . . . . . . . . . 32
Audible Alarm . . . . . . . . . . . . . . . . . . . . . . . . . . . . . . . . . . . . . . . . . . . . . . . . . Yes
Buttons . . . . . . . . . . . . . . . . . . . . . . . . . . . . . . . . . . . . . . . . . . . . . . . . . . . . . . . . 6
LED Indicator . . . . . . . . . . . . . . . . . . . . . . . . . . . . . . . . . . . . . . . . . . . . . . 3 LED's
Batteries . . . . . . . . . . . . . . . . . . . . . . . . . . . . . . . . . . . . . . . . . . . . . . . . . . . . 2 AA
Battery Life-Continuous Operation (*2) . . . . . . . . . . . . . . . . . . . . . . . . . . . 60 Hrs
Battery Life-Standby (*2) . . . . . . . . . . . . . . . . . . . . . . . . . . . . . . . . . . . . . . 1 Year
Operating Temperature . . . . . . . . . . . . . . . . . . . . . . . . . . . . . . . . . .41ºF ~ 108ºF
Storage Temperature . . . . . . . . . . . . . . . . . . . . . . . . . . . . . . . . . . . . -4ºF ~ 122ºF
Humidity . . . . . . . . . . . . . . . . . . . . . . . . . . . . . . . . . .Up to 90% non-condensing
DTW38 and DTW12
SPECIFICATIONS
CW +/-2% CCW +/-2% of reading,
1
WARNING
AlwAys reAd
instructions
before using
tools
AlwAys weAr
sAfety
goggles
not
wAterproof
Rev. 02/27/15
Advertisement
Table of Contents

Related Manuals for Napa Carlyle DTW38


Summary of Contents for Napa Carlyle DTW38
-
Page 1: Before Using
Humidity ........Up to 90% non-condensing DTW38 and DTW12... -
Page 2: Warranty
IMPORTANT SHIPPING NOTE: To avoid shipping damage when you return your torque wrench for repair, please enclose your Carlyle Torque Wrench in its original molded case (if included with your model) and package securely so that it is resistant to impact shock while in transit. -
Page 3: Features And Functions
RePlAceMeNT PARTS AVAIlABle AS: RSC1 Battery Cap RSDTW38HRP Head Repair Kit for DTW38 RSDTW38CS Blow Mold Case for DTW38 RSDTW12HRP Head Repair Kit for DTW12 RSDTW12CS Blow Mold Case for DTW12 No other internal parts are available due to the sensitivity of this professional model. Please utilize the repair facility listed under the warranty statement for all repairs in and out of warranty. - Page 4 Step 3: Place the steel ball on top of the pawl spring. See Fig. 3 Fig. 3 Step 4: Insert the pawl with the square hole facing inward and the circle hole facing you. See Fig. 4 Fig. 4 DTW38 and DTW12 Rev. 02/27/15...
- Page 5 See Fig. 6 Fig. 6 Step 7: Place the lid on the driver with the chamfer side of the lid facing out. See Fig. 7 Fig. 7 DTW38 and DTW12 Rev. 02/27/15...
-
Page 6: Battery Installation
2. + = Increase measurement/UP 3. - = Decrease measurement/Down 4. M = Memory Mode 5. C = Clear Value/Return 6. On/Off = Hold for 3 seconds to power off - Hold for 1 second to power on. DTW38 and DTW12 Rev. 02/27/15... -
Page 7: Lcd Display
U : Change unit and to enter the desired torque value. + : Value increase - : Value decrease ON/OFF : Power on/Power off. Press momentarily to set the wrench to its maximum torque value. M : Enters memory mode. C : Clear Angle reading. DTW38 and DTW12 Rev. 02/27/15... -
Page 8: Low Battery Display
• When the force applied is over 110% of the maximum torque rating for the wrench, the red LED light will blink and the LCD display will flash “FULL”. • The ‘FULL” indication means the wrench needs to be reset. • Please press the "On/Off" key for 3 seconds to power off the wrench and reset the "FULL" indicator. DTW38 and DTW12 Rev. 02/27/15... - Page 9 Press “+” button, the display shows preset torque from 5% of full scale, then start to increase to preset torque value. Press “-” key, the display shows preset torque from 100% of full scale, then start to decrease to preset torque value. DTW38 and DTW12 Rev. 02/27/15...
- Page 10 Press “+” button, the display shows preset torque from 5% of full scale, then start to increase to preset torque value. Press “-” key, the display shows preset torque from 100% of full scale, then start to decrease to preset torque value. DTW38 and DTW12 Rev. 02/27/15...
- Page 11 Temperatura de almacenamiento ......-4ºF ~ 122ºF Humedad ......De hasta un 90% sin condensación DTW38 and DTW12 Rev. 02/27/15...
-
Page 12: Especificaciones
NOTA IMPORTANTE SOBRE EL ENVÍO: Para evitar daños durante el envío al momento de devolver su torquímetro para reparaciones, por favor envuelva su torquímetro Carlyle en su estuche moldeado original (si viene incluido con su modelo) y empáquelo seguramente con el fin de que esté... -
Page 13: Características Y Funciones
14. Unit (N-m, ft-lb, in-lb, kg-cm) lAS PARTeS De RePueSTo DISPoNIBleS coMo: RSC1 Tapa de batería RSDTW38HRP Equipo de reparación de cabeza para DTW38 RSDTW38CS Estuche moldead por soplado para DTW38 RSDTW12HRP Equipo de reparación de cabeza para DTW12 RSDTW12CS Estuche moldead por soplado para DTW12 Ninguna otra parte está... - Page 14 Paso 3: Coloque la bola de acero en la parte superior del resorte del trinquete. Ver la fig. 3 Fig. 3 Paso 4: Inserte el trinquete con el agujero cuadrado orientado hacia adentro y el agujero circular orientado hacia usted. Ver la fig. 4 Fig. 4 DTW38 and DTW12 Rev. 02/27/15...
- Page 15 Ver la fig. 6 Fig. 6 Paso 7: Coloque la tapa en el conductor con el lateral del chaflán de la tapa orientado hacia afuera. Ver la fig. 7 Fig. 7 DTW38 and DTW12 Rev. 02/27/15...
-
Page 16: Instalación De La Batería
2. + = Aumentar la medida /ARRIBA 3. - = Disminuir la medida/ABAJO 4. M = Modo de memoria 5. C = Borrar valor/Volver 6. 3. Encendido/Apagado = Sostenga por 3 segundos para apagarlo - Sostenga por un segundo para encenderlo. DTW38 and DTW12 Rev. 02/27/15... - Page 17 + : Aumento de valor - : Disminución de valor ON/OFF : Encendido/Apagado. Presione momentáneamente para ajustar la llave a su máximo valor de torsión. M : Entrar al modo de memoria. C : Borrar la lectura de ángulo. DTW38 and DTW12 Rev. 02/27/15...
- Page 18 DEL roja y el despliegue LCD parpadeará “FULL”. • La indicación ‘FULL” quiere decir que el torquímetro requiere ser ajustado. • Por favor presione la llave "Encendido/Apagado: por 3 segundos para apagar el torquímetro y reajustar el indicador "FULL". DTW38 and DTW12 Rev. 02/27/15...
-
Page 19: Instrucciones De Operación
Presione la llave “-”, el despliegue muestra la torsión pre-ajustada desde un 100% hasta la escala completa, luego comienza a disminuirse hasta llegar al valor pre-ajustado de torsión. DTW38 and DTW12 Rev. 02/27/15... - Page 20 5% hasta la escala completa, luego comienza a aumentar el valor pre-ajustado de torsión. Presione el botón “-”, el despliegue muestra la torsión pre-ajustada desde un 100% hasta la escala completa, luego comienza a disminuir el valor pre-ajustado de torsión. DTW38 and DTW12 Rev. 02/27/15...
Need help?
Do you have a question about the Carlyle DTW38 and is the answer not in the manual?
Questions and answers