Table of Contents
Advertisement
Available languages
Available languages
Quick Links
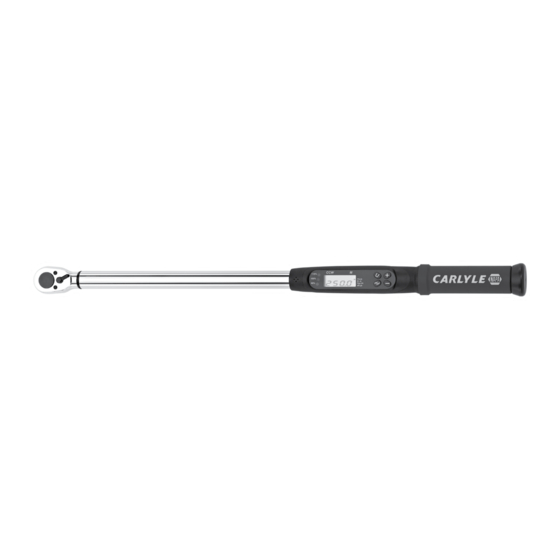
ETW38, ETW12
ETW38, ETW12
3/8", 1/2" Dr. Electronic Torque Wrenches
3/8" Torque Range ......................................................................... 10-100 ft.-lbs.
1/2" Torque Range ......................................................................... 25-250 ft.-lbs.
Accuracy (*1) .......... CW ±2%, CCW ±2% of reading 10% to 100% of full scale
Data Memory Values ......................................................................................... 3
Operation Modes ....................................................................... Peak Hold/Track
Unit Selection ............................................................... ft-lb, in-lb, N-m, & kg-cm
Head Type .................................................................................................... Fixed
Gear teeth ........................................................................................................32
Audible Alarm .................................................................................................. Yes
Buttons ................................................................................................................4
LED Indicator ............................................................................................ 3 LED's
Batteries ........................................................................................................ 2 AA
Battery Life-Continuous Operation (*2) ...................................................... 60 Hrs
Battery Life-Standby (*2) .............................................................................1 Year
Operating Temperature ....................................................................41ºF ~ 108ºF
Storage Temperature ........................................................................ -4ºF ~ 122ºF
Humidity ...................................................................Up to 90% non-condensing
ETW38 and ETW12
SPECIFICATIONS
1
WARNING
AlwAys reAd
instructions
before using
tools
AlwAys weAr
sAfety
goggles
not
wAterproof
Rev. 02/27/15
Advertisement
Table of Contents

Related Manuals for Napa Carlyle ETW38


Summary of Contents for Napa Carlyle ETW38
- Page 1 ETW38, ETW12 ETW38, ETW12 3/8", 1/2" Dr. Electronic Torque Wrenches SPECIFICATIONS WARNING 3/8" Torque Range ................. 10-100 ft.-lbs. 1/2" Torque Range ................. 25-250 ft.-lbs. Accuracy (*1) ..CW ±2%, CCW ±2% of reading 10% to 100% of full scale AlwAys reAd Data Memory Values ..................
- Page 2 ToRquE & AccuRAcY ScAlE Notes from Page 1: *1: The accuracy of the readout is guaranteed from 10% whichever comes first. Accuracy is based on the zero to 100% of maximum range + / -2%. To maintain the degree of offset from perpendicular drive. accuracy of the torque wrench, calibration should be *2.
-
Page 3: Features And Functions
FEATuRES AND FuNcTIoNS Head Repair Kit 1. Reversible Ratchet Head 5. Ratchet Drive 9. Torque Value Readout 13. Unit (N-m, ft-lb, in-lb, kg-cm) 2. Direction Lever 6. Anti-slip Handle 10. Memory Indicator 14. On/Off Button 3. Alarm/Buzzer 7. Battery Cover 11. Unit Setting Button 4. - Page 4 REPlAcING THE HEAD KIT Step 2: Insert the pawl spring into the handle spring hole. See fig. 2 Fig. 2 Step 3: Place the steel ball on top of the pawl spring. See fig. 3 Fig. 3 Step 4: Insert the pawl with the square hole facing inward and the circle hole facing you.
- Page 5 REPlAcING THE HEAD KIT Step 5: Insert the switch into the square hole on the pawl making sure the the tail of the switch and the bottom of the pawl (See fig. 5) are both pointing in the same direction. Then fasten with the switch screw.
-
Page 6: Battery Installation
REPlAcING THE HEAD KIT Step 8: Fasten the lid to the ratchet head with lid screws. See fig. 8 Test the functionality by making sure the driver turns and the switch can pivot in both directions. Fig. 8 BEFoRE uSING THE WRENcH BATTERY INSTAllATIoN • Remove the battery cap. -
Page 7: Lcd Display
lcD DISPlAY • Light: 110%: The Red LED Light & Audible Buzzer Will Sound Indicating a Torque Overage Exceeding 104% of the Target Torque Setting. 100%: The Green LED Light & Audible Buzzer Will Sound Indicating a Torque Reading of 97%-104% of the Target Torque Setting 90%: The Yellow LED Light &... - Page 8 oPERATING INSTRucTIoNS • Power On Press the "On/Off" key for 1 second to Power On, 1. The wrench will beep, illuminate 3 LED indicators, and blink a zero from left to right until 4 zeros (0000) are displayed. 2. The display will then show the last set torque value. The wrench can now be set to a new torque value, or can be used with the previous set value.
-
Page 9: Memory Mode
MEMoRY MoDE Storing Measurements • During operation every measurement taken will be stored sequentially (1-3) in the wrench’s memory. Example: If the wrench has taken 2 measurements, then the first number stored (1) is going to be the most recent measurement taken. The number (2) will be the oldest stored measurement. - Page 10 ETW38, ETW12 ETW38, ETW12 Torquímetros Electrónicos Encaje 3/8" y 1/2" ESPECIFICACIONES ADVERTENCIA Rango de Torsión 3/8" ......10 N-m / 100 libras-pie sieMpre Rango de Torsión 1/2"...
-
Page 11: Especificaciones
ESPEcIFIcAcIoNES Notas de la página 1: al año o cada 5,000 ciclos, cualquiera que viene siendo La precisión de la lectura está garantizada desde un 10% primero. La precisión se basa en el grado cero del hasta un 100% del rango máximo + / -2%. Para mantener la descentrado del encaje perpendicular. -
Page 12: Características Y Funciones
cARAcTERíSTIcAS Y FuNcIoNES Equipo de reparación de cabeza 1. Cabeza de trinquete reversible 6. Mango anti-deslizante 10. Indicador de la memoria 14. Botón de encendido/apagad 2. Manivela de sentido 7. Tapa de batería 11. Botón de más 3. Alarma/timbre 8. Lámparas indicadoras DEL 12. - Page 13 REPoSIcIÓN DEl EquIPo DE cABEzA Paso 2: Inserte el resorte del trinquete en el agujero del resorte del mango. Ver la fig. 2 Fig. 2 Paso 3: Coloque la bola de acero en la parte superior del resorte del trinquete. Ver la fig. 3 Fig.
- Page 14 REPoSIcIÓN DEl EquIPo DE cABEzA Paso 5: Inserte el interruptor en el agujero cuadrado en el trinquete, asegurándose que la cola del interruptor y la parte inferior del trinquete (ver la fig.5) los dos estén apuntándose en la misma dirección. Luego sujete con el tornillo del interruptor.
-
Page 15: Instalación De La Batería
REPoSIcIÓN DEl EquIPo DE cABEzA Paso 8: Sujete la tapa a la cabeza de la carraca con los tornillos de la tapa. Ver la fig. 8 Compruebe la funcionalidad al asegurar que el conductor gire y que el interruptor pivote en ambos sentidos. Fig. - Page 16 DESPlIEGuE lcD • Luz: 110%: La luz DEL roja y el timbre audible sonará – indicando una sobre-torsión, excediendo un 104% del ajuste meta de torsión. 100%: La luz verde DEL – El timbre audible sonará indicando una lectura de torsión del 97% al 104% del ajuste meta de torsión.
-
Page 17: Instrucciones De Operación
INSTRuccIoNES DE oPERAcIÓN • Encendido Presione la llave “ENCENDIDO/APAGADO” por un segundo para encender. 1. El torquímetro pitará, se iluminarán 3 indicadores DEL y se parpadeará un cero desde el izquierdo hasta la derecha hasta que se desplieguen 4 ceros (0000). -
Page 18: Modo De Memoria
MoDo DE MEMoRIA Almacenamiento de medidas • Durante la operación, cada medida tomada será almacenada secuencialmente (1al 3) en la memoria del torquímetro. Ejemplo: Si el torquímetro ha guardado 2 medidas, entonces el primer número guardado (1) será la medida más reciente tomada. El segundo número (2) será...
Need help?
Do you have a question about the Carlyle ETW38 and is the answer not in the manual?
Questions and answers