Table of Contents
Advertisement
Available languages
Available languages
Quick Links
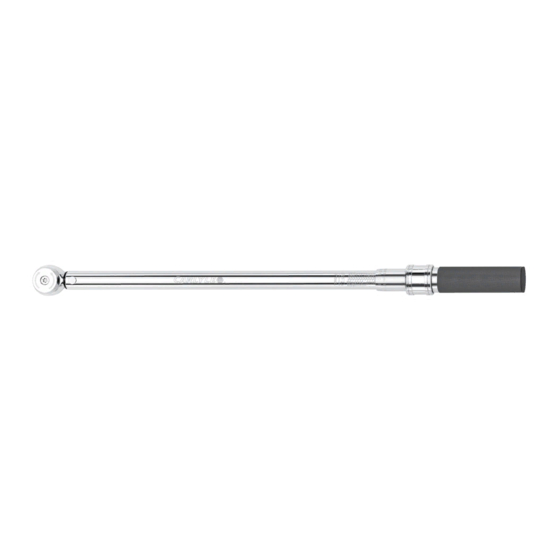
TW12RH2
TW12RH2
1/2" Round Head Click Style Torque Wrench
1/2" Torque Range . . . . . . . . . . . . . . . . . . . . . . . . . . . . . . . . . . . . . . 30-250 ft. lbs.
Torque Accuracy . . . . . . . . . . . . . . . . . . . . . . . . . . . . . . . . . . . . . . . . . . . CW±4%,
Unit Selection . . . . . . . . . . . . . . . . . . . . . . . . . . . . . . . . . . . . . . . . . . . . Ft.lbs., N-m
Head Type . . . . . . . . . . . . . . . . . . . . . . . . . . . . . . . . . . . . . . . . . . . . . . . . . . . Fixed
Gear Teeth . . . . . . . . . . . . . . . . . . . . . . . . . . . . . . . . . . . . . . . . . . . . . . . . . . . . . 72
TW12RH2
SPECIFICATIONS
1
WARNING
AlwAys reAd
instructions
before using
tools
AlwAys weAr
sAfety
goggles
not
wAterproof
Rev. 02/27/15
Advertisement
Table of Contents

Related Manuals for Napa Carlyle TW12RH2


Summary of Contents for Napa Carlyle TW12RH2
- Page 1 TW12RH2 TW12RH2 1/2" Round Head Click Style Torque Wrench SPECIFICATIONS WARNING 1/2" Torque Range ........30-250 ft. lbs. AlwAys reAd Torque Accuracy .
-
Page 2: Warranty
WARNING - FOLLOW THESE RULES FOR SAFE OPERATION! FAILURE TO OBSERVE THESE WARNINGS COULD RESULT IN INJURY • Do not use torque wrench to loosen fasteners. This insTrucTion Manual conTains iMporTanT safeTy inforMaTion. read This insTrucTion • The wrench should be sent in for calibration once Manual carefully and undersTand all every year or every 5,000 cycles for re-calibration. -
Page 3: Features And Functions
FEATURES AND FUNCTIONS Head Repair Kit 1. Reversible Ratchet Head 3. Major Scale 5. Locking Collar 7. Anti-slip Handle 2. Wrench Body 4. Minor Scale 6. Ratchet Drive REPLACEMENT PARTS AVAILABLE AS: RSC5 End Cap RSTW12RH2HRP Head Repair Kit for TW12RH2 RSTW12RH2CS Blow Mold Case for TW12RH2 No other internal parts are available due to the sensitivity of this professional model. - Page 4 REPLACING THE HEAD KIT (CONT.) Step 2: Apply grease on the drive, where shown. (fig. 2) Fig. 2 Step 3: Place the pawl with heart spring on the drive. Fig. 3 fig. 3) Step 4: Place the drive spring in the screw hole on the driver.
- Page 5 REPLACING THE HEAD KIT (CONT.) Step 5: Place the direction plate onto the ratchet head making sure the pin on the bottom of the direction plate hooks into the cusp at the bottom of the heart spring. See arrows in fig. 6. Fig.
-
Page 6: Operation
OPERATION 1. To unlock the handle, hold the body firmly and pull and Minor Scale hold down the locking collar (A). This will allow you to rotate the handle clockwise or counter clockwise to your desired torque measurement. 2. Set the desired torque by rotating the wrench body clockwise or counter clockwise. -
Page 7: Especificaciones
TW12RH2 TW12RH2 Torquímetro Tipo "Clicker" de Cabeza Redonda 1/2" ESPECIFICACIONES ADVERTENCIA Rango de Torsión 1/2" ......30 N-m / 250 libras-pie sieMpre leA lAs Precisión de Torsión. - Page 8 ADVERTENCIA - ¡SIGA LAS REGLAS PARA UNA OPERACIÓN SEGURA! HACER CASO OMISO A ESTAS ADVERTENCIAS PODRÍA OCASIONAR LESIONES • No use ningún torquímetro para aflojar los esTe Manual insTrucTiVo conTiene inforMacÓn sujetadores. iMporTanTe de seguridad. lea esTe Manual insTrucTiVo cuidadosaMenTe y coMprenda Toda • El torquímetro debe mandarse a ser calibrado una la inforMaciÓn anTes de operar esTa vez al año, o cada 5,000 ciclos para ser recalibrado.
- Page 9 CARACTERíSTICAS Y FUNCIONES Equipo de reparación de cabeza 1. Cabeza de trinquete reversible 3. Escala mayor 5. Cuello que bloquea 7. Mango anti-deslizante 2. Cuerpo 4. Escala menor 6. Encaje de trinquete LAS PARTES DE REPUESTO DISPONIBLES COMO: RSC5 Tapa terminal RSTW12RH2HRP Equipo de reparación de cabeza para TW12RH2 RSTW12RH2CS...
- Page 10 REPOSICIÓN DEL EqUIPO DE CABEzA Paso 2: Aplique la grasa en el encaje, según se ilustra. Fig. 2 (fig. 2) Paso 3: Coloque el trinquete con el resorte tipo corazón en Fig. 3 el encaje. (fig. 3) Paso 4: Coloque el resorte conductor en el agujero del Fig.
- Page 11 REPOSICIÓN DEL EqUIPO DE CABEzA Paso 5: Coloque la placa de arrastre en la cabeza de carraca, asegurándose que el pasador en la parte inferior de la placa de arrastre se enganche en el vértice en la parte inferior del resorte tipo corazón. Ver las flechas en la fig.
-
Page 12: Operación
OPERACIÓN 1. Para abrir la manija, lleve a cabo el cuerpo firmemente cuando ha terminado de usar el torquímetro. Así se y tire y mantenga el cuello que bloquea (a). Esto le asegurará que el resorte interno del cuerpo mantenga una permitirá...
Need help?
Do you have a question about the Carlyle TW12RH2 and is the answer not in the manual?
Questions and answers