
Related Manuals for Jazz JAZZ DV153


Summary of Contents for Jazz JAZZ DV153
- Page 2 Please read this Instruction Manual fully in order to become familiar with your camera; enjoy maximum performance and preserve its service life. SD cards must NOT be exposed to heat, moisture or strong magnetic field as the memory could be lost or damaged.
- Page 3 FCC Statement. FCC part 15.21 Warning: Changes or modifications to this unit not expressly approved by the party responsible for compliance could void the user’s authority to operate the equipment. FCC part 15.105 Note: This equipment has been tested and found to comply with the limits for a Class B digital device, pursuant to Part 15 of the FCC Rules.
-
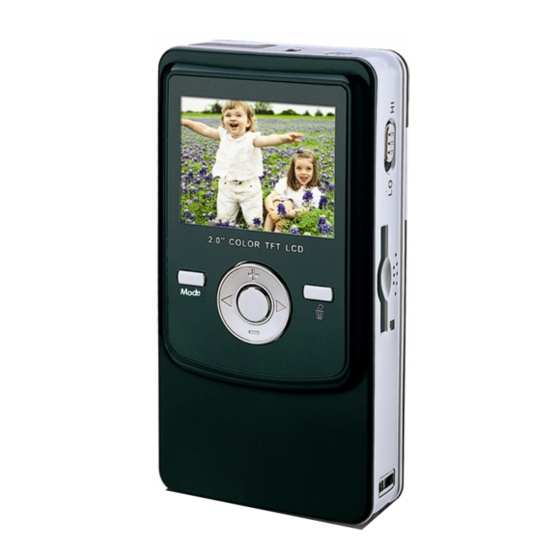
Page 4: Appearance And Buttons
Appearance And Buttons USB Connector Power Key TV Out Port Microphone Resolution Switch Lens LED Light USB Switch Speaker SD/MMC Card Slot Battery Cover Strap Holder Battery Lid Switch Tripod... -
Page 5: Using Your Camcorder
Using Your Camcorder Shutter / OK Button Up Button 1. Press this button to start Video Press to zoom IN. l In Pan mode, press this recording or take a Still picture. 2. Press this button again to stop Video button to shift zoomed recording. - Page 6 Note: Please insert two fresh AA batteries and SD card to operate the camera • Installing Batteries Slide the Battery Lid Switch to “unlock” position. Press / slide down the Battery Cover and insert two new AA alkaline batteries. Align with correct polarity of battery terminals.
- Page 7 Recording / taking pictures Press the Shutter Button to Start / Stop recording in Video recording mode Press the Shutter Button to take a picture in Still picture mode Playback When you select the Playback mode, you will see the last record: video or a picture. Press LEFT / RIGHT button to review taken pictures (see JPEG icon on the left down corner) or recorded video (see the video icon).
- Page 8 Connect To PC, Download Video/ Photos and TV Output Please install bundled programs from supplied installation CD before connecting camcorder with PC for the first time 1. Insert supplied CD into computer CD ROM 2. Follow instruction and install programs; see more information inside “How to upload your video clips to YouTube”.
-
Page 9: How To Upload Your Video Clips To Youtube
4. Set TV to Video Input (see your TV Manual for instructions) and watch Video or still pictures on TV screen. How to upload your video clips to YouTube 1. Install the ArcSoft MediaImpression program computer Insert the CD-ROM into the CD-ROM drive. - Page 11 ArcSoft MediaImpression icon will appear on computer’s desktop when installation is complete.
- Page 12 2. Using ArcSoft MediaImpression Connect your camcorder to the computer. Double click MediaImpression icon on the Desktop. The MediaImpression software main screen will open on the computer’s desktop: Import Option on the main screen and enter into “Import” screen. Then select the files in the camcorder Click that you want to upload to the computer and click Option.
- Page 13 on the “Importing…”window and enter into After importing the file has been completed, click “MediaBrowser” window. Note: On the main screen, you can also click other options such as to enter...
- Page 14 into”MediaBrowser” window. Then select the files in the computer for uploading. Select the video you wish upload to You Tube on”MediaBrowser”screen and then click option to access your YouTube log-in screen.
- Page 15 On”Login”screen, please enter your YouTube Username and Password (you can select the corresponding option underneath to save the Username and Password so that you do not need to input these data next time). Then click option. When”Upload to YouTube”screen appears, fill in Title, Description, etc. Then click option and start uploading selected video.
- Page 16 Specifications / System Requirement Specifications: Image sensor: 300,000pixels Function mode: Recording Video, Capture Still pictures, Play back. Lens: F2.4 f=3.6mm Focus range: 1.2m (4 feet) ~infinity Digital Zoom: 4× Shutter: Electronic LCD display: 2.0 inch TFT LCD Resolution: Video: Hi 640×480, Lo 320×240, 30fps Photo: Hi 640×480, Lo 320×240 White balance: Automatic...
Need help?
Do you have a question about the JAZZ DV153 and is the answer not in the manual?
Questions and answers