Table of Contents
Advertisement
Quick Links
Advertisement
Table of Contents

Related Manuals for Ubiquiti airVision-C


Summary of Contents for Ubiquiti airVision-C
- Page 1 Network Video Recorder Model: airVision-C...
-
Page 3: Package Contents
NVR, ™ ™ model airVision-C. This Quick Start Guide is designed to guide you through the installation of the airVision NVR and show you how to configure airVision Controller using the airVision Setup Wizard. This Quick Start Guide also includes the warranty terms. -
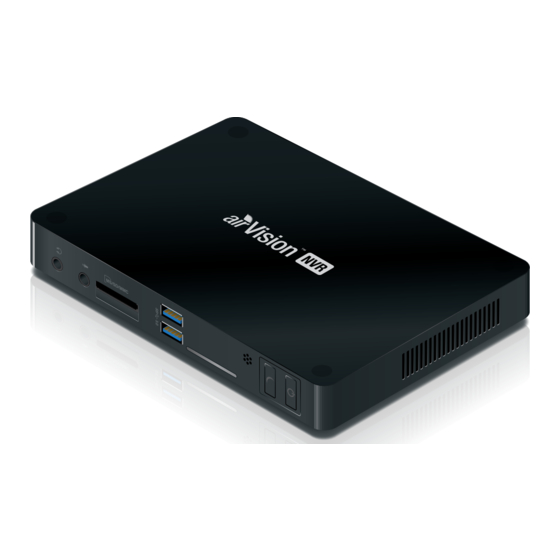
Page 4: Hardware Overview
airVision NVR Quick Start Guide ™ Hardware Overview Back Panel 10/100/1000 Ethernet Power Not used by airVision Not used Front Panel Power Button Not used by airVision Reset Button Interface Description Powers ON or OFF the airVision NVR • Power ON Press the Power button to turn on the airVision NVR and start all services. -
Page 5: Hardware Installation
Hardware Overview Hardware Installation The small form factor of the airVision NVR allows it to be placed vertically or horizontally on any flat surface. Vertical Placement Place the airVision NVR in the narrow opening of the Vertical Support Stand. -
Page 6: Horizontal Placement
airVision NVR Quick Start Guide ™ Horizontal Placement Place the four Magnetic Rubber Feet on the bottom of the airVision NVR case. - Page 7 Connecting the airVision NVR Connecting the airVision NVR 1. Connect an Ethernet cable from your LAN to the Ethernet port. 2. Connect the Power Adapter to the Power port.
- Page 8 Online Registration The simplest method for airVision NVRs connected to a DHCP-enabled LAN with Internet access. Ubiquiti Device Discovery Tool • For users with a DHCP-enabled LAN that do not wish to register or do not have Internet access.
- Page 9 2. Launch the Ubiquiti Device Discovery Tool. 3. A list of Ubiquiti devices on the network will appear. Locate airVision NVR under Product Name and double-click it. 4. Click Web UI on the right.
- Page 10 airVision NVR Quick Start Guide ™ Direct Connection to airVision NVR 1. Connect the Ethernet cable from the airVision NVR directly to your computer. 2. Press the Power button on the airVision NVR, and wait about one minute for it to fully boot up and start all services. 3.
- Page 11 Accessing the airVision Configuration Portal Configuring the airVision Controller 1. The airVision Configuration Portal will appear in your browser. Click airVision Controller. Note: Advanced configuration options, such as network settings, may be accessed in Device Configuration. 2. The airVision Setup Wizard will appear: a.
- Page 12 airVision NVR Quick Start Guide ™ 3. Enter an administrator email address, name, and password to use when accessing the airVision Controller Interface. Confirm your password. Click Next. 4. Choose one of the following: • To set up this NVR as a new airVision Controller, airVision select Create a new Controller.
- Page 13 Accessing the airVision Configuration Portal 5. Select your desired management settings. To enable automatic airCam management, enter the airCam login username and password. Click Next. 6. Review your settings. Click Finish to save your settings, or click Back to make changes. When finished, the airVision Controller Interface will launch.
-
Page 14: Specifications
airVision NVR Quick Start Guide ™ 7. A login screen will appear for the airVision Controller Interface. Enter the email address and password that you created, and click Login. For detailed information on using airVision software, download the airVision User Guide at documentation.ubnt.com/airvision Specifications airVision NVR Dimensions... -
Page 15: Safety Notices
Safety Notices Safety Notices Read, follow, and keep these instructions. Heed all warnings. Only use attachments/accessories specified by the manufacturer. WARNING: Do not use this product in location that can be submerged by water. WARNING: Avoid using this product during an electrical storm. There may be a remote risk of electric shock from lightning. -
Page 16: Limited Warranty
(VI) has no original Ubiquiti MAC label, or is missing any other original Ubiquiti label(s). In addition, the above warranty shall apply only if: the product has been properly installed and used at all times in accordance, and in all material respects, with the applicable Product documentation;... -
Page 17: Limitation Of Liability
DELIVERY FAILURES, DATA LOSS, CONTENT CORRUPTION, PACKET LOSS, OR OTHER DAMAGE RESULTING FROM ANY OF THE FOREGOING. In addition, UBIQUITI NETWORKS does not warrant that the operation of the Products will be error-free or that operation will be uninterrupted. In no event shall UBIQUITI NETWORKS be responsible for damages or claims of any nature or description relating to system performance, including coverage, buyer’s... -
Page 18: Industry Canada
airVision NVR Quick Start Guide ™ Compliance Changes or modifications not expressly approved by the party responsible for compliance could void the user’s authority to operate the equipment. This device complies with Part 15 of the FCC Rules. Operation is subject to the following two conditions: This device may not cause harmful interference, and This device must accept any interference received, including interference... -
Page 19: Rohs/Weee Compliance Statement
Compliance CE Marking CE marking on this product represents the product is in compliance with all directives that are applicable to it. RoHS/WEEE Compliance Statement English European Directive 2002/96/EC requires that the equipment bearing this symbol on the product and/or its packaging must not be disposed of with unsorted municipal waste. - Page 20 airVision NVR Quick Start Guide ™ Español La Directiva 2002/96/CE de la UE exige que los equipos que lleven este símbolo en el propio aparato y/o en su embalaje no deben eliminarse junto con otros residuos urbanos no seleccionados. El símbolo indica que el producto en cuestión debe separarse de los residuos domésticos convencionales con vistas a su eliminación.
-
Page 21: Declaration Of Conformity
UBIQUITI NETWORKS device, megfelel a vonatkozó alapvetõ [Hungarian] követelményeknek és az 1999/5/EC irányelv egyéb elõírásainak. Íslenska Hér me l sir UBIQUITI NETWORKS yfir ví a UBIQUITI NETWORKS device, er í samræmi vi grunnkröfur og a rar kröfur, sem ger ar eru í [Icelandic] tilskipun 1999/5/EC. - Page 22 NVR Quick Start Guide ™ Latviski Ar o UBIQUITI NETWORKS deklar , ka UBIQUITI NETWORKS device, atbilst Direkt vas 1999/5/EK b tiskaj m pras b m un citiem ar to saist [Latvian] tajiem noteikumiem. Lietuviškai UBIQUITI NETWORKS deklaruoja, kad šis UBIQUITI NETWORKS įrenginys atitinka esminius reikalavimus ir kitas 1999/5/EB...
- Page 24 Support support.ubnt.com Wiki Page wiki.ubnt.com Support Community community.ubnt.com Downloads downloads.ubnt.com w w w . u b n t . c o m © 2013 Ubiquiti Networks, Inc. All rights reserved.
Need help?
Do you have a question about the airVision-C and is the answer not in the manual?
Questions and answers