Page 1
UND EMPFEHLUNGEN FÜR GEBRAUCH UND INSTANDHALTUNG INDUKTIONSKOCHFELD INSTRUCTIONS POUR L’INSTALLATION ET RECOMMANDATIONS D’UTILISATION ET D’ENTRETIEN PLAQUES À INDUCTION IR 631 - IT 631 - IR 641 - IT 641 - IRC 631 IR 630 - IT 630 - IR 831...
Page 2
Introduction / Allgemeines / Présentation vom Hersteller entsprechend gekennzeich- net, jedoch ist dies keine Garantie dafür, Notes about the cookware to be used with dass das Geschirr vom Kochfeld erkannt your induction hob. wird oder dass die Leistung der Kochzonen effektiv ausgenutzt werden...
Page 3
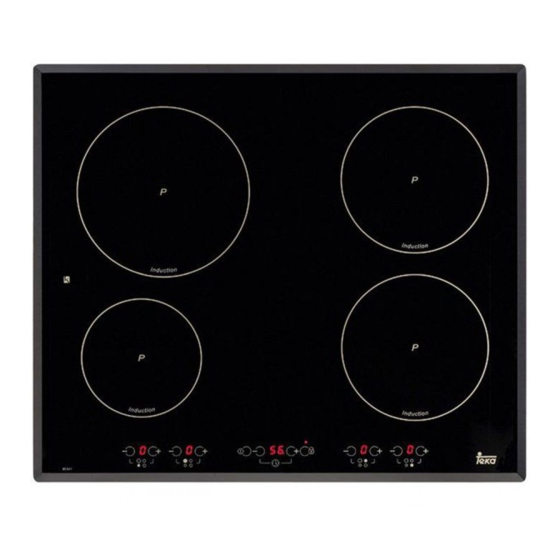
Model IR 641 / IT 641 1 2,100/3,000* W. induction hotplate. 2 1,600/2,300* W. induction hotplate. 3 1,100/1,800* W induction hotplate. 4 1,600/2,300* W. induction hotplate. * Induction power with the Power function enabled. - Residual heat indicator ( - Maximum electric power: 6,400 W. - Supply power: 230 Volts.
Page 4
Model IR 631 / IT 631 1 2,100/3,000* W. induction hotplate. 2 1,500/1,800* and 2,400/3,200* W. dou- ble induction hotplate. 3 1,100/1,800* W induction hotplate. * Induction power with the Power function enabled. - Residual heat indicator ( - Maximum electric power: 6,400 W.
Page 5
Models IR 630 / IT 630 1 1,600/2,300* W. induction hotplate. 2 1,500/1,800* and 2,400/3,200* W. double induction hotplate. 3 1,100/1,800* W. induction hotplate. * Induction power with the Power function ena- bled. - Residual heat indicator ( - Maximum electric power: 6,100 W. - Supply power: 230 Volts.
Page 6
Modelo IR 831 Models IRC 631 1 2,100/3,000* W. induction hotplate. 1 1,600/2,300* W. induction hotplate. 2 1,100/1,800* W. induction hotplate. 2 1,500/1,800* and 2,400/3,200* W. double 3 1,500/1,800* and 2,400/3,200* W. double induction hotplate. induction hotplate. 3 1,100/1,800* W. induction hotplate. * Induction power with the Power function * Induction power with the Power function ena- enabled.
Page 7
Likewise, any internal work on the hob should only be done by TEKA’s Before installing and using it, we would technical staff, including the change of the ask that you read this Manual carefully and flexible supply cable of the appliance.
If a fan oven is being installed, please remember that this hob has only been cer- The dimensions L and W are shown in the table tified to work with TEKA brand ovens. "Dimensions and characteristics" of the Technical Information section.
100ºC. securing; insert them in the circular holes of the bracket. The thread of this hole will be TEKA assumes no responsibility made when the screw is inserted inside of it. for any malfunction or damage caused The thread should be made before faste- by faulty installation.
Page 10
TEKA’s official service. The input cable should not be in contact either with the body of the hob or with the body of the oven, if the oven is installed in the same unit. When using the hob for the first...
Technical Information Technical details Class 3 hob. Dimensions and characteristics IR 630 Model IR 831 IR 631 IR 641 IRC 631 IT 630 IT 631 IT 641 GKI 630 Hob dimensions Height (mm) Length (mm) Width (mm) Dimensions of the placement in the unit...
Use and Maintenance Before starting for the Touch control user first time instructions Before connecting the hob to the electrical CONTROL PANEL ELEMENTS (see fig. 3) network, verify that the tension (voltage) and the frequency of the hob correspond On/off sensor. to the voltage and frequency indicated on Hotplate indicators.
Page 13
SWITCHING THE APPLIANCE ON SWITCHING THE HOTPLATES OFF 1 Touch the on sensor (1) for at least With the sensor (4), lower the power to level 0. one second. The Touch Control will acti- vate, you will hear a beep and the indi- cators will turn on.
To activate or deactivate the function, The time for detecting the container is 3 simply keep pressing the sensor minutes. If three minutes go by without for about 1 second. When the function is having placed a container on the hotplate active, the pilot light (10) turns on.
have its power limited to the remaining Power function power up to a total of 3,200 Watts. If the power level on this plate is too high, the This function makes it possible to give a touch control will automatically reduce it to plate "extra"...
Page 16
Table 2 Take into account that this safety function is activated even though the Power MAXIMUM OPERATION TIME Touch Control is turned off! selected (in hours) Do not leave any objects down on the Touch Control! Clock (except models …630) The top is fitted with a clock that can be used for two different functions: as a plate timer or as a countdown chronometer.
Page 17
the clock. tor (7) will start to blink. If, while the clock is working as a count- 4 You have a further 5 seconds to select down chronometer, at some point the the time required, simply by touching the induction plates are set at power level sensors (11) or (12) on the...
In the next 5 seconds, touch one of the minutes to cool the electronics if you sensors (4) or (5) corresponding switch the cooker off when the fan is swit- to the plate that you wish to time or alter. ched on.
* Avoid spilling sugar, or products contai- Light soiling ning sugar, on the glass, since these may react with the hot glass and dama- Light, non-sticky, soiling can be cleaned ge the surface. with a damp cloth and a soft detergent or warm, soapy water.
Page 20
- you could break the glass injury! ceramic. If you do not use the scraper pro- TEKA INDUSTRIAL S.A. reserves the perly, the blade could break and pieces right to alter its manuals in any way it may get stuck between the decorative deems necessary or useful while not alte- side-piece and the glass.
If something doesn’t work Before calling the Technical Service, please make the following checks: Fault Possible cause Possible solution The induction zones are not heating up The pan is unsuitable (it Check that the pan base does not have a ferromag- reacts to a magnet, or use a netic base or it is too larger pan.
Page 22
Fault Possible cause Possible solution The hob suddenly starts to bleep Remove any object covering There is a cloth, container or liquid on the Touch the Touch Control and/or Control. clean any liquid that might have been spilt on it. The timer was activated Touch the clock sensor to and the preset time has...
Need help?
Do you have a question about the IR 631 and is the answer not in the manual?
Questions and answers