Table of Contents
Advertisement
Quick Links
Advertisement
Table of Contents

Related Manuals for Sanyo DMP-P1


Summary of Contents for Sanyo DMP-P1
-
Page 2: Table Of Contents
TABLE OF CONTENTS IMPORTANT SAFETY INSTRUCTION.....................3 PREPARATION FOR USE........................5 NAMES AND CONTROLS........................7 GENERAL FUNCTIONS...........................9 TUNER MODE............................11 iPod MODE……………………………......................12 AUX-IN MODE............................13 CLEANING AND MAINTENANCE......................13 TECHNICAL INFORMATION........................13 INFORMATION............................14... -
Page 3: Important Safety Instruction
IMPORTANT SAFETY INSTRUCTIONS 1.) Read these instructions. Keep these instructions. Follow all instructions. Heed all warnings. 2.) Install this unit in accordance with the manufacturer’s instructions. 3.) Only use attachments / accessories specified by the manufacturer. 4.) Use only with the cart, stand, tripod, bracket, or table specified by the manufacturer, or sold with the unit. - Page 4 22.) Do not destruct the safety purpose of the polarized or grounding-type plug. A polarized plug has two blades with one wider than the other. A grounding type plug has two blades and a third grounding prong. The wide blade or the third prong is provided for your safety. If the provided plug does not fit into your outlet, consult an electrician for replacement of the obsolete outlet.
-
Page 5: Preparation For Use
PREPARATION FOR USE Before Setting Up The Unit • Operate controls and switches as described in the manual. • Before turning on the power, make certain that the power cord is properly installed. • When moving the unit, be sure to first disconnect the AC power cord. •... - Page 6 Power Source This product is designed to operate on normal 240V 50Hz AC power only. Do not attempt to operate the unit on any other power source. You could cause damage to the product that is not covered by your warranty. AC Plug AC Outlet AC Power Supply Connection 1.
-
Page 7: Names And Controls
Battery Precautions Follow these precautions when using batteries in this device: 1. Use only the size and type of batteries specified. 2. Be sure to follow the correct polarity when installing the batteries as indicated in the battery compartment. Reversed batteries may cause damage to the device. 3. - Page 8 REAR VIEW BOTTOM VIEW LCD DISPLAY...
-
Page 9: General Functions
GENERAL FUNCTIONS Switching On and Off 1. The unit will automatically switch to standby mode once the AC power source is connected 2. Switch on the device from standby mode by pressing the STANDBY/ON/FUNCTION button. 3. Switch the device to standby mode by pressing and holding the STANDBY/ON/FUNCTION button. - Page 10 2. The HOUR digits will flash, press TUNE/SKIP button on the unit to set the HOUR, press MEMORY/ALARM SET button to confirm the HOUR. 3. The MINUTE starts to flash, press TUNE/SKIP button to set the MINUTE and press MEMORY/ALARM SET button to confirm the MINUTE.
-
Page 11: Tuner Mode
1. Press the SLEEP / CLOCK SET button to select the sleep time in operation mode. 2. The sleep time cycles by pressing the SLEEP / CLOCK SET button repeatedly. The cycle goes 120 -> 90 -> 60 -> 30 -> 15 -> 10 -> 5 -> off. -
Page 12: Ipod Mode
In radio mode, press and hold the MEMORY/ALARM SET button until the preset channel appears on the display to enter into preset mode and press the TUNE/SKIP button to select the preset stations. Note: The saved preset stations will be lost if the AC power is interrupted and the backup battery is not installed. -
Page 13: Aux-In Mode
AUX-IN MODE Connect the Audio Output jacks of your auxiliary sound source (TV, VCR, DVD Player, Cassette Deck, Mini Disc player, etc., etc.,) to the AUX IN jack on the back panel of the unit. The auxiliary function will only activate when the aux in jack is fitted with connection cable. -
Page 14: Information
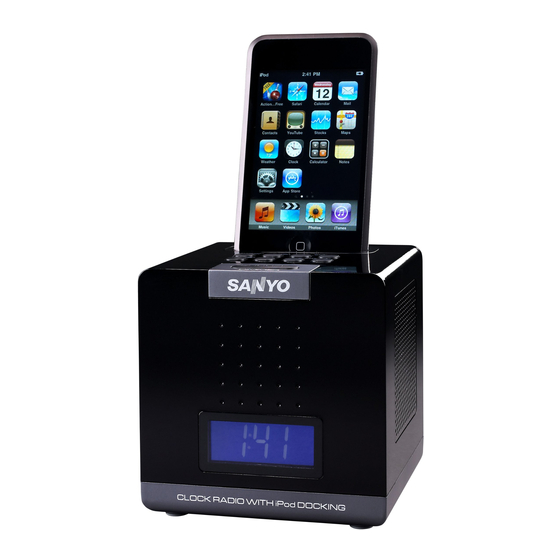
INFORMATION Troubleshooting If a fault occurs, first refer to this information before you take the device for repair. If you are unable to rectify the fault using the information given here, contact Customer Support for advice. Under no circumstances should you attempt to repair the device yourself, as this would invalidate the warranty. - Page 15 Touch 2nd Gen Audio Thank-you for choosing the SANYO DMP-P1 Single alarm clock PLL radio with iPod. Designed specifically to work with your docking iPod, this system provides high quality audio and radio performance that brings out the best in your music. An auxiliary input enables connection of a non-iPod.
Need help?
Do you have a question about the DMP-P1 and is the answer not in the manual?
Questions and answers