
Subscribe to Our Youtube Channel
Related Manuals for Nikon DS-U1


Summary of Contents for Nikon DS-U1
- Page 1 M330E 04.2.CF.1 DS Camera Control Unit DS-U1 DS Camera Head DS-5M DS Cooled Camera Head DS-5Mc < Instructions >...
- Page 3 Thank you for purchasing the Nikon products. This instruction manual has been prepared for users of the DS Camera Control Unit DS-U1, DS Camera Head DS-5M, and DS Cooled Camera Head DS-5Mc. To ensure correct use, please read this manual carefully before using these products.
- Page 4 Do not bend or twist the cables with undue force. Doing so may damage the cables and result in fire. • Do not place a cloth or paper on the DS-U1. Doing so may cause heat to collect inside the equipment, resulting in fire. - ii -...
- Page 5 Doing so may result in fire or malfunction. • When used for an extended period of time, the DS-U1 may become hot. Do not place the DS-U1 on a surface that cannot withstand heat (such as vinyl or plastic). Always install the equipment with a surrounding clear area of 100 mm or more.
-
Page 6: Table Of Contents
Components of the Equipment ..............1 Peripheral Equipment ................2 Names of Parts and Their Functions............4 1 DS Camera Control Unit DS-U1 ..............4 2 DS Camera Head DS-5M / DS Cooled Camera Head DS-5Mc ......6 Connecting and Installing the Equipment ............ 7 1 Connection Diagrams ................ - Page 7 CONTENTS 4 Overall Specifications ................40 - v -...
-
Page 8: Components Of The Equipment
Check to see that all the items listed below are provided in the package. If any items are missing, contact your nearest Nikon representative immediately. DS Camera Control Unit DS-U1 DS Camera Head DS-5M or DS Cooled Camera Head DS-5Mc... -
Page 9: Peripheral Equipment
Peripheral Equipment (1) Personal computer (PC) The DS-U1 is connected to a PC via a USB2.0 interface. The DS-U1 can perform the following operations via the application software on the PC connected to the DS-U1. The application software is sold separately. - Page 10 If you purchased the Nikon 80i Microscope equipped with a digital imaging head or model 90i, you can connect the DS-U1 to your microscope via the USB interface. The DS-U1 lets you control microscope operations and display microscope status using PC application software. To connect your Nikon 80i/90i Microscope to the DS-U1, use the USB cable provided with the microscope.
-
Page 11: Names Of Parts And Their Functions
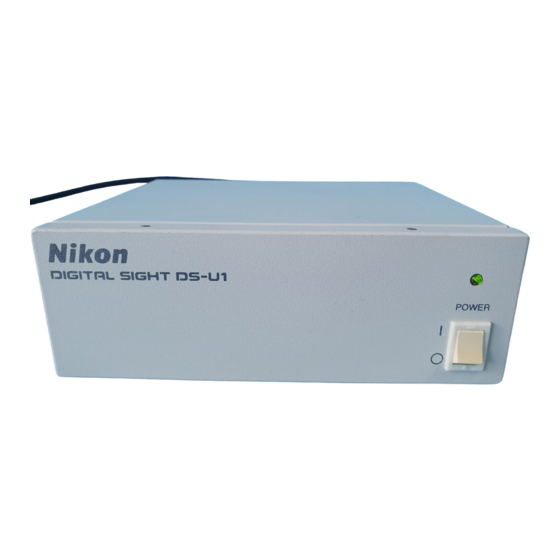
Chapter 3 Names of Parts and Their Functions 1 DS Camera Control Unit DS-U1 Names of Parts and Their Functions DS Camera Control Unit DS-U1 External appearance of the DS-U1 Ventilation hole (on the rear side): For internal cooling Ventilation hole... - Page 12 Chapter 3 Names of Parts and Their Functions 1 DS Camera Control Unit DS-U1 Rear side of the DS-U1 Camera connector Connect the DS Camera Head DS-5M or DS Cooled Camera Head DS-5Mc to this connector. Be sure to turn off power before connecting or disconnecting the connector.
-
Page 13: Ds Camera Head Ds-5M / Ds Cooled Camera Head Ds-5Mc
Chapter 3 Names of Parts and Their Functions 2 DS Camera Head DS-5M / DS Cooled Camera Head DS-5Mc DS Camera Head DS-5M / DS Cooled Camera Head DS-5Mc Tripod mount This mount can be used to mount the camera head on a tripod, etc. Rear Bottom C mount cap... -
Page 14: Connecting And Installing The Equipment
Chapter 4 Connecting and Installing the Equipment 1 Connection Diagrams Connecting and Installing the Equipment Connection Diagrams Schematic diagram DS-U1 Nikon DIGITAL SIGHT DS-U1 POWER Nikon 80i/90i upright microscope DS-5M / DS-5Mc - 7 -... - Page 15 Chapter 4 Connecting and Installing the Equipment 1 Connection Diagrams Connectors · DS-U1 Rear AC IN USB(H) CAMERA USB(D) Power cord USB 2.0 cable ↓ ↓ Connected to a power outlet USB cable provided DS camera cable with the microscope ↓...
-
Page 16: Installing The Ds-U1
Chapter 4 Connecting and Installing the Equipment 2 Installing the DS-U1 Installing the DS-U1 Install the DS-U1 on a flat surface. Leave a clearance of about 100 mm around the DS-U1 to prevent heat from collecting near the equipment. Nikon DIGITAL SIGHT DS-U1... -
Page 17: Connection Methods
(3) Connecting the Nikon 80i/90i Microscope Connect the digital imaging head mounted on the 80i microscope or the 90i microscope to the USB-H connector of the DS-U1. Be sure to use the USB cable provided with the microscope. - 10 -... - Page 18 To prevent electric shock, turn off the power for the DS-U1 before making any connections. Complete all other connections before plugging into a power supply. When connecting the DS-U1 to a power supply, always use the specified power cord. Using the wrong power cord may lead to a fire or other dangerous conditions.
-
Page 19: Microscope Adjustment
Chapter 5 Microscope Adjustment Microscope Adjustment When the camera head is mounted on a microscope, adjust the microscope as described below. (1) Use the Appropriate Filters When capturing a color image: Insert the NCB filter into the optical path. When capturing a black & white image: Insert the appropriate filter into the optical path, depending on the photographic purpose. - Page 20 Chapter 5 Microscope Adjustment (2) Adjusting the Field Diaphragm Adjust the field diaphragm so that it circumscribes the viewfield. The field diaphragm has a significant impact on contrast, especially for fluorescent specimens against dark backgrounds. Make sure you adjust the field diaphragm correctly. For details on adjustment, refer to your microscope’s instruction manual.
- Page 21 Chapter 5 Microscope Adjustment (6) Adjusting the Exposure Time Use an ND filter to adjust the illumination for the microscope to a level that yields a suitable exposure time (generally 1/15 to 1/250 s). You can also adjust the camera sensitivity. Terms What is an ND filter? An ND filter is a filter that affects only the amount of light passed, not the color balance of...
-
Page 22: Installing The Device Driver
1 Preparation Installing the Device Driver The following section describes how to install the device driver for the DS-U1. The explanations cover both Windows 2000 and Windows XP. While most procedures are the same for Windows 2000 and Windows XP, depending on the OS type and version, the appearance of the screen and the specific steps may vary slightly from those shown in the manual. - Page 23 Chapter 6 Installing the Device Driver 1 Preparation u [Control Panel] window Double-click the [System] icon to open the [System Properties] dialog box. [System] icon u [System Properties] dialog box Click the [General] tab. Check the amount of RAM. Click the [OK] or [Cancel] button to close the [System Properties] dialog box.
-
Page 24: Checking Free Hard Disk Space
Chapter 6 Installing the Device Driver 1 Preparation Checking Free Hard Disk Space You can check the free hard disk space via the [My Computer] window. If the hard disk lacks sufficient free space, delete any unnecessary applications to increase the available space. [Hard disk] 100 MB or more (Note that the free disk space required to run the application depends on image size.) Operating procedures... -
Page 25: Updating The Usb Device Driver
1 Preparation Updating the USB Device Driver Before installing the device driver for the DS-U1, update the PC's USB controller device driver to Microsoft's standard device driver. The DS-U1 device driver has been confirmed to operate properly when used in combination with Microsoft's standard device driver. -
Page 26: Installing The Ds-U1 Driver
Chapter 6 Installing the Device Driver 2 Installing the DS-U1 Driver Installing the DS-U1 Driver Before installing the DS-U1 driver, close all resident programs such as screen savers or virus checkers. NOTE: To install the DS-U1 driver, you must log in as the Administrator. -
Page 27: Starting The Setup Program
To install the software, start the setup program and follow the instructions displayed in the dialog box. NOTE: To install the software, you must log in as the Administrator. To uninstall the DS-U1 driver, refer to "2.3 Uninstalling the DS-U1 Driver." Operating procedures u Startup screen for the Setup wizard Turn on the PC to start Windows. - Page 28 Chapter 6 Installing the Device Driver 2 Installing the DS-U1 Driver Click on the [Next] button. Click here. After the installation is completed, click the [Close] button to close the setup program. Click here. Click the [x] button at the upper right corner of the window to close the window.
-
Page 29: Connecting The Ds-U1
2 Installing the DS-U1 Driver Connecting the DS-U1 After the DS-U1 driver is installed, connect the DS-U1. When the DS-U1 is connected to the PC for the first time, install the driver by the procedure given below. Operating procedures u Connecting the USB connector... - Page 30 Chapter 6 Installing the Device Driver 2 Installing the DS-U1 Driver Click and select [Appropriate drive is selected for device (Recommended)]. 1. Click here. 2. Click here. Uncheck all checkboxes, then click [Next (N)]. 1. Uncheck here. 2. Click here.
- Page 31 Chapter 6 Installing the Device Driver 2 Installing the DS-U1 Driver Click [Yes (Y)]. Click here. The folder in which the driver is to be installed must be specified. Check that the system folder is indicated. If the system folder is not specified as the file location, click [Browse].
- Page 32 Chapter 6 Installing the Device Driver 2 Installing the DS-U1 Driver Click [Yes (Y)]. Click here. The folder in which the driver is installed must be specified. Check that the system folder is indicated. If the system folder is not specified as the file location, click [Browse].
-
Page 33: Checking The Camera Connection
Chapter 6 Installing the Device Driver 2 Installing the DS-U1 Driver Checking the Camera Connection Do the following to make sure that the camera is properly connected. Operating procedures u [My Computer] menu Right-click the [My Computer] icon and select [Properties]. - Page 34 Chapter 6 Installing the Device Driver 2 Installing the DS-U1 Driver Make sure that the imaging device section includes the following two devices: [Nikon USB DS Camera] and [Nikon USB Eclipse-i Microscope] Check here. - 27 -...
-
Page 35: Uninstalling The Ds-U1 Driver
Chapter 6 Installing the Device Driver 2 Installing the DS-U1 Driver Uninstalling the DS-U1 Driver To delete the DS-U1 driver from the hard disk, use [Add or Remove Programs] in [Control Panel]. Operating procedures u [Start] menu Click the [Start] button, then select [Settings]. -
Page 36: After Installation
Chapter 6 Installing the Device Driver 3 After Installation After Installation Now, install the separately sold PC application software to connect to the DS-U1. Launching this software enables the DS-U1 to perform the following functions. Display images captured by the microscope on the PC monitor Confirm and change DS-U1 settings (photographing conditions, etc.) -
Page 37: Care And Maintenance
Care and Maintenance Cleaning the System • Use a soft cloth to wipe away dirt from the DS-U1, and the cables. • Before cleaning the camera head, first attach the C mount cap. Then use a soft cloth to wipe away dirt. -
Page 38: Troubleshooting
• Make sure the power cord is plugged firmly into an AC outlet at one The power does not end and the AC-IN connector on the DS-U1 main unit on the other. come on. • Use the power cord supplied with the system. -
Page 39: Image Output
Windows 2000, Service Pack 4 (SP4) or later Windows XP, Service Pack 1 (SP1) or later • Make sure the PC is installed with the DS-U1 driver. The DS-U1 driver is provided on the CD-R disc supplied with the product. - Page 40 Chapter 8 Troubleshooting 2 Image Output Symptom Corrective action • Set the contour emphasis properly using the application software. The image is out of => To make settings, see the instructions for the application software. focus. • Turn off the electronic zoom using the application software. =>...
- Page 41 Chapter 8 Troubleshooting 2 Image Output Symptom Corrective action • Set the tone appropriately using the application software. The contrast is low. => To make settings, see the instructions for the application software. • Set the black level to the appropriate value using the application software.
-
Page 42: Camera Control From The Pc
Windows 2000, Service Pack 4 (SP4) or later Windows XP, Service Pack 1 (SP1) or later • Make sure the DS-U1 driver is installed on the PC. The DS-U1 driver is provided on the CD-R disc supplied with the product. -
Page 43: Microscope Control From The Pc
• Wait until the microscope is ready for operation. It takes about 30 seconds for the microscope to be ready. • Connect the USB cable securely between the DS-U1 to the digital imaging head on the 80i or the 90i microscope. -
Page 44: Specifications
Chapter 9 Specifications 1 DS Camera Control Unit DS-U1 Specifications DS Camera Control Unit DS-U1 Camera control Exposure control Program AE, shutter speed priority AE, focus AE, manual, with AE lock function Photometry Average photometry, peak hold photometry, photometry area size (3 steps) - Page 45 Chapter 9 Specifications 1 DS Camera Control Unit DS-U1 Interface USB1.1 host interface Connects to the Nikon 80i Microscope equipped with the Digital Imaging Head, or the Nikon 90i Microscope. USB2.0 device Supports Vendor Unique class. Connects to control PC.
-
Page 46: Ds Camera Head Ds-5M
Chapter 9 Specifications 2 DS Camera Head DS-5M DS Camera Head DS-5M Image pickup device 2/3-inch square, 5,240,000-pixel IT-CCD Frame rate 3.75 fps (5M Interlace Mode), 7.5 fps (1.3M Progressive Mode), 6.8 fps (1.3M Interlace Mode), 15 fps (Center Scan Mode) Quantization 12 bits Sensitivity... -
Page 47: Overall Specifications
Chapter 9 Specifications 4 Overall Specifications Overall Specifications Operating environment Temperature 0° to 40° C Humidity 85%RH max. (No condensation) Altitude 2000 m max. Pollution Degree 2 Installation Category 2 Protection class Class I Indoor use only Storage environment Temperature –20°...
Need help?
Do you have a question about the DS-U1 and is the answer not in the manual?
Questions and answers