Advertisement
Quick Links
This section describes procedures for installation, connection, and startup of the DS-L3 based on the standard configuration.
1
1
1
Set the DS-L3 at the desired position.
Install the DS-L3 on a level surface of a desk, etc., with its stand
arm open, and adjust the stand arm angle.
Adjust the angle
of the stand arm.
Using the stand arm
2
2
2
Connect the DS-L3 with peripheral devices.
Connect a DS camera head and the AC adapter to the DS-L3,
and insert a CF card or USB memory stick.
DS camera
DS camera
cable
head
Connecting the DS-L3 and peripheral devices
Note: When plugging the power cord, be sure that:
• all other connections are setup; and
• the power cord is connected directly to the AC socket
(100-240 VAC).
Q
u
Q
u
DS Camera Head DS-Fi2 / DS-Fi1 / DS-Vi1
DS Cooled Camera Head DS-Qi1Mc / DS-Fi1c / DS-Ri1
S
e
t
u
p
S
e
t
u
p
C F C
A R D
DS-L3
To AC socket
AC adapter
i
c
k
R
e
f
e
r
e
n
c
i
c
k
R
e
f
e
r
e
n
a
n
d
S
t
a
r
t
u
p
o
f
a
n
d
S
t
a
r
t
u
p
o
f
3
3
3
Switch on the power to the DS-L3.
Push the POWER switch on the front of the DS-L3 to turn it on.
When the power is on, the POWER indicator lights up, and the
start screen is displayed on the monitor for a few seconds.
CF card
4
4
4
USB
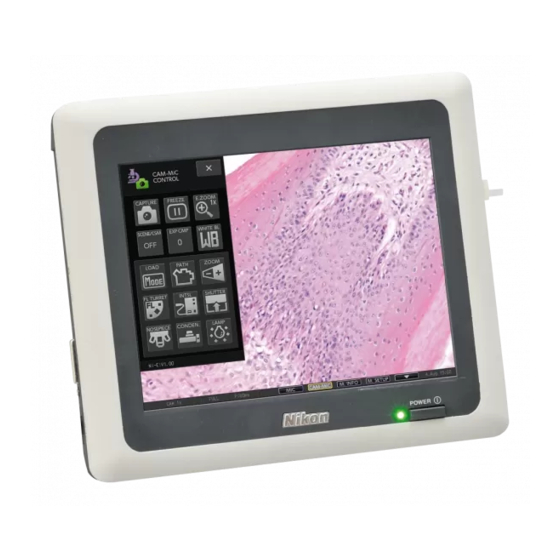
Check the monitor for the live image.
memory
stick
After the start screen, the task bar and the live image from the
DS camera head are shown on the monitor.
Note: The live image may be unclear depending on the
settings or conditions of the optical device.
1
e
c
e
D
S
-
L
3
D
S
-
L
3
Operating the POWER switch
Start screen
Live image on the monitor
M555 E
11.9.NF.1 (2/3)
Check for the live image.
Task bar
Advertisement

Subscribe to Our Youtube Channel
Related Manuals for Nikon DS-L3


Summary of Contents for Nikon DS-L3
- Page 1 DS Camera Head DS-Fi2 / DS-Fi1 / DS-Vi1 DS Cooled Camera Head DS-Qi1Mc / DS-Fi1c / DS-Ri1 This section describes procedures for installation, connection, and startup of the DS-L3 based on the standard configuration. Set the DS-L3 at the desired position.
- Page 2 This section describes a simple procedure to capture and view an image. Open the [CAMERA MENU: CAMERA] screen. Select a scene mode. [CAMERA MENU] is used for image capture operation. Select a scene mode for the subject. Select a scene mode. Press the [SCENE/CSM] button and select the desired mode.
- Page 3 < > < > Set the white balance. Capture an image. (for a color DS camera head only) Press the [CAPTURE] button to save the displayed image. Prepare an evenly white subject such as a You hear a capture sound when capturing an image. When the sheet of paper.
- Page 4 This section describes how to overlay scales and annotations with text or straight/curved lines to the image. Open the [TOOL MENU] screen. Select a registered calibration setting. [TOOL MENU] is used for annotation operation. Select a calibration setting. Open the [CAMERA MENU: CAMERA] Press the [CALIB] button screen.
- Page 5 < > < > Straight line and arrow Operate scales and annotation functions. A straight line or arrow can be Note: Color for drawing can be selected from black, red, drawn on the screen. yellow, green, blue, and white. Scales XY measurement Movable two cross lines are Pen drawing...
- Page 6 This section describes how to measure a length, angle, diameter or circumference of a circle, or polygon area, etc. on the monitor. Open the [TOOL BAR] screen. Select a registered calibration setting. [TOOL BAR] is used for measurement. Open the [TOOL BAR] window. Press the [T.BAR] button on the Select a registered task bar to open [TOOL BAR].
- Page 7 < > < > Use the [TOOL BAR] buttons to perform Pitch length measurement on the monitor. Measures the length of several perpendicular lines drawn from Note: Color for drawing can be selected from black, red, desired points (e.g., C, D) to a yellow, green, blue, or white.
- Page 8 This section describes the initial setting procedure in minimal steps. Perform the procedure when you use the DS-L3 for the first time. Set the current date and image save Open the [SETUP MENU: MAIN] screen. destination. [SETUP MENU] is used for initial settings.
Need help?
Do you have a question about the DS-L3 and is the answer not in the manual?
Questions and answers