
Related Manuals for Nikon D90


Summary of Contents for Nikon D90
- Page 1 Hugyfot camera housings Nikon D90 User manual Hugyfot Housing for Nikon D90 User manual...
- Page 2 Hugyfot brand known throughout the world. Underwater photography is our life. Happy Diving! Hugyfot nv - Industrielaan 30 Zuid III - 9320 Erembodegem - Belgium All rights are reserved for HUGYFOT. Also on all copies. Hugyfot Housing for Nikon D90 User manual...
-
Page 3: Table Of Contents
Contents Preface ..................................Techical information ..........................Hugyfot for Nikon D90 ........................... Opening and closing the housing ....................Port with bayonet catch ........................Flash connections ............................Mounting the camera .......................... Operation of the HugyCheck system .................. Maintenance and service ........................ 10. Photo practice .............................. -
Page 4: Preface
First dive is a checkdive without the camera in the housing. Check all buttons under water. Hugyfot Housing for Nikon D90 User manual... -
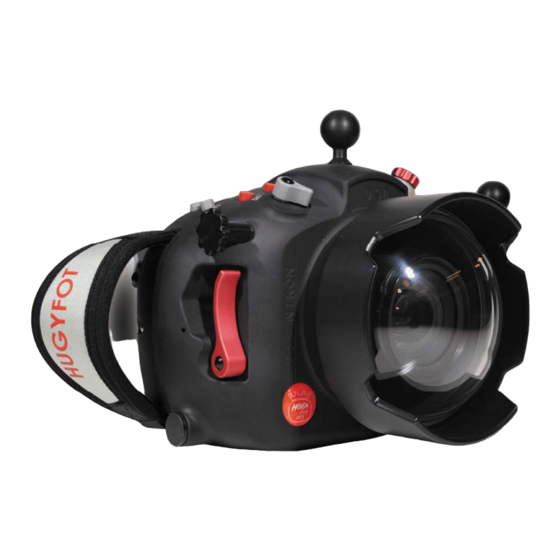
Page 5: Techical Information
13. Back shell - 14. Countersunk bolt - 15. Mode dial - 16. Push buttons (Exposure com- pensation/AF settings/...) - 17. Shutter speed control - 18. AF lock - 19. Menu push buttons - 20. LCD screen - 21. Viewfinder Hugyfot Housing for Nikon D90 User manual... -
Page 6: Hugyfot For Nikond90
Nothing is as simple as taking pictures with the automatic settings of the Nikon D90. One can choose to take control himself and set each para meter to his own preference. The sensitive exposure lever is integrated in the front shell which is a part of the patented Hugyfot-grip. -
Page 7: Opening And Closing The Housing
4. Opening and closing the housing The HUGYFOT Nikon D90 housing is opened and closed by means of 2 built-in countersunk bolts. This guarantees the safest way of clo- sing. Only with the right key you can open and close the housing. A curi- ous buddy cannot open the housing by accident. -
Page 8: Port With Bayonet Catch
5. Port with bayonet catch The front port bayonet catch is a secure and fast method to connect the dif- ferent ports to the HUGYFOT Nikon D90 housing. The port has a mark which has to be positioned opposite to the mark at the left of the housing when mounting and demounting the port. -
Page 9: Flash Connections
Keep the inside of the plug dry and clean. The o-rings, the plug and the thread need to be clean and slightly greased. DO NOT use the housing with an open multiple socket: this can cause leakage and corrosion! Hugyfot Housing for Nikon D90 User manual... -
Page 10: Mounting The Camera
After appr. 5 dives, remove the main o-ring with a clean cloth by pressing it out of his groove. Clean the o-ring, the groove and the sealing surface. Hugyfot Housing for Nikon D90 User manual... - Page 11 Remove the back shell gently from the front shell. When resistance occurs while opening see to it that the cause of this resistance is put right before continuing. If not, damage to the housing or the camera may occur. Hugyfot Housing for Nikon D90 User manual...
-
Page 12: Operation Of The Hugycheck System
J1 connecter SW1 switchboard J3 connecter (strobe socket 1) J4 connecter (strobe socket 2) J8 Power socket (3 Volt only) Buzzer J5 connecter (TTL converter) J6 connecter (TTL converter) 10. Connecter for leakage alarm. Hugyfot Housing for Nikon D90 User manual... - Page 13 The J1 connecter is used when strobes are used in manual mode or when strobes are used that are fully iTTL or eTTL compatible (e.g. Nikon SB 800, Canon 580 EX, Subtronic dttl, …) Next to J1 is a switchboard SW1 which contains...
- Page 14 Hugyfot Housing for Nikon D90 User manual...
- Page 15 Hugyfot Housing for Nikon D90 User manual...
- Page 16 When the camera hot shoe is connected to J1 and when fully iTTL or eTTL compatible strobes are used (e.g. Nikon SB 800, Canon 580 EX, Subtronic dttl, …) all the switches on SW1 have to be switched on as the strobes will need all the data on all the lines. Please note that in this case only one strobe can be connected to the housing as most of these strobe systems require a master and slave strobe.
- Page 17 Insert the plug on the electrical vacuum pump into the one-way valve and press the button on the pump. One way valve installed in 3rd bulkhead One way valve installed in manifold (only on new models). (old models which only have 2 bulkheads). Hugyfot Housing for Nikon D90 User manual...
- Page 18 We strongly recommend to start the vacuum procedure at least 30 minutes prior to the dive. When opening the housing after a dive, the under pressure first has to be released by unscrewing the one way valve from the bulkhead. Hugyfot Housing for Nikon D90 User manual...
- Page 19 - remove the HugyCheck calibration jumper on J2 (convert); - install the hot shoe cable on the Hugycheck system (J1 or J2); - install the battery in the camera support. The system in now ready to be used at altitude. Hugyfot Housing for Nikon D90 User manual...
- Page 20 (< 1.015 hPa) may be so low that the pump will not reach the required underpressure in the housing to acivate the green LED. In this case the red LED will keep on blinking rapidly. Hugyfot Housing for Nikon D90 User manual...
-
Page 21: Maintenance And Service
Never put the housing in the sun. Aside from the mentioned maintenance commands, the HUGYFOT Nikon D90 housing is fairly simple to maintain. Some issues however should be kept in mind: When finishing a dive one has to rinse the closed housing with a closed flash connection (plug or protection cap) under the shower or in a rin- sing tub. - Page 22 When the control switches are mounted you may mount the camera into the housing. Now check all the controls on their proper function- ing. Always perform a pressure test after removing/installing control switches or perform a testdive without camera inside the housing. Hugyfot Housing for Nikon D90 User manual...
-
Page 23: Photo Practice
10. Photo practice With a Nikon D90 camera in a HUGYFOT housing one can take pictures almost completely automated. To use the camera with all its possibilities one has to beware of some basic principles. These basic principles are explained in the following chapter. - Page 24 TTL flashes: using this mode, camera and flash communicate and set the right values of diaphragm and shutter speed to obtain the correct amount of light needed for the shot. This mode can only be obtained by using a Nikon D90 compatible flash or by installing the optional TTL converter.
-
Page 25: Accessories
(diameter 25mm). These arms can be connected by means of clamps that are tightened on the ball-and- socket joints. This provides a flexible system that can be moved and locked Hugyfot Housing for Nikon D90 User manual... - Page 26 TTL converter Available for Nikon and Canon Viewfinder: Hugyfot housings can be equipped with a 45° viewfinder which rotates 360°. This viewfinder enlarges the image of the camera viewfinder and al- lows shots close to the bottom.
Need help?
Do you have a question about the D90 and is the answer not in the manual?
Questions and answers