
Related Manuals for Geller ET-6800


Summary of Contents for Geller ET-6800
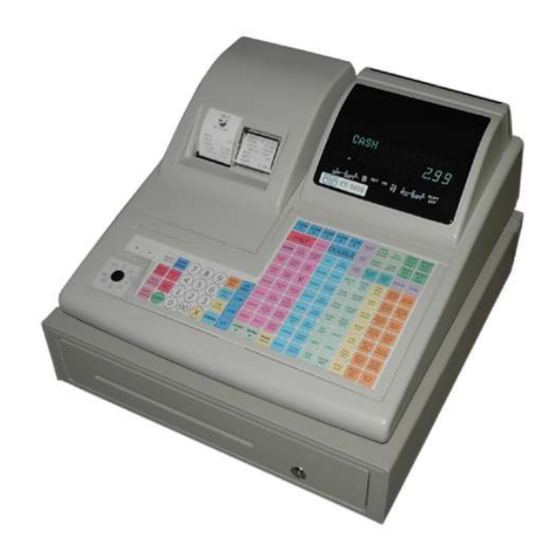
- Page 1 ET- - - - 6800 6800 6800 6800 USER GUIDE Hospitality / Retail Operations Guide January 2006...
-
Page 2: Feature Guide
ET- - - - 6800 6800 6800 6800 Feature Guide 299 Departments 15000 PLUs 44mm Receipt & Journal Printers 50 Clerk Interrupt Holds With Auto Store After Pre Set Time Limit PC Link for easy programming and advanced sales reporting Scanning with Easy Programming, Price Check, PLU Delete and re-ordering features Menu Windows allowing more keyboard space... -
Page 3: Table Of Contents
CONTENTS Page Description FEATURE GUIDE GETTING STARTED PAPER ROLLS Installing the Paper Rolls Installing the Receipt Roll Installing the Journal Roll THE MAIN POWER SWITCH THE COTROL LOCK THE DISPLAY THE CASH DRAWER BASIC PROGRAMMING PROGRAMMING TIPS PROGRAMMING THE DATE PROGRAMMING THE TIME Image –... - Page 4 RETAIL SCANNING – Deleting a Redundant PLU SETTING UP YOUR SYSTEM SETTING UP YOUR DEPARTMENTS SETTING UP OPEN DEPARMENTS CASH REGISTER REPORTS SETTING UP YOUR GROUPS DEPARTMENT WORKSHEET GROUP WORKSHEET EXTRA WORKSHEET SUPPLIER WORKSHEET REPORT WORKSHEET NEW ITEM WORKSHEET TAKING REPORTS AVAILABLE REPORTS FULL DAILY SALES REPORT PLU SALES PRODUCT REPORT...
-
Page 5: Getting Started
GETTING STARTED GETTING STARTED GETTING STARTED GETTING STARTED Paper Rolls Installing the Paper Rolls Your cash register features 2 thermal printers which use two rolls of 44mm standard bond paper; one roll (left side) is for the customer receipt and the other roll is for the journal record (right side). -
Page 6: Installing The Receipt Roll
Installing the Receipt Roll Ensure the Control Lock is in the ‘R’ (Register) position Lift up the printer cover from the rear Insert a new paper roll and sit it in the paper cradle Push the paper through the open paper slot If necessary press the RF button to advance the paper automatically Replace the printer cover and tear off any excess paper Installing the Journal Roll... -
Page 7: The Main Power Switch
GETTING STARTED GETTING STARTED GETTING STARTED GETTING STARTED The Main Power Switch The main power switch is located on the right-hand side of the ET-6800. The switch must be in the ON position before the ECR is operational... -
Page 8: The Cotrol Lock
GETTING STARTED GETTING STARTED GETTING STARTED THE CONTROL LOCK The ET-6800 should be used to make sales with the key in the ‘R’ position. The P1 and P2 positions give access to programming operations. The X1 and X2 positions are used to read sales reports. -
Page 9: The Display
GETTING STARTED GETTING STARTED GETTING STARTED GETTING STARTED THE DISPLAY The customer display screen can be rotated and lifted for the best viewing angle By programmable option the control lock position can be temporarily displayed and a warning tone sounded each time the key position is changed... -
Page 10: The Cash Drawer
GETTING STARTED GETTING STARTED GETTING STARTED GETTING STARTED THE CASH DRAWER It is possible to program the ECR so that it cannot be used for transactions when the drawer is open A delay can be set so that if the drawer is left open for more than a designated number of seconds, an alarm will sound Whenever the ECR is not in use (i.e. -
Page 11: Basic Programming
BASIC PROGRAMMING BASIC PROGRAMMING PROGRAMMING TIPS Programming on the ET-6800 can be accessed through the P1 & P2 positions on the control lock. We strongly recommend users not to access the P2 position unless trained by a suitable engineer. This function has been reserved for engineer features. -
Page 12: Programming The Date
BASIC PROGRAMMING BASIC PROGRAMMING BASIC PROGRAMMING BASIC PROGRAMMING PROGRAMMING THE DATE Turn the key lock position to P1 Press: followed by the • or the button START ON/OFF Enter the date using the numeric keyboard following the format: YYYYMMDD Example: 20061012 = 12th October 2006 Press the INPUT The option for changing time... -
Page 13: Programming The Time
BASIC PROGRAMMING BASIC PROGRAMMING BASIC PROGRAMMING BASIC PROGRAMMING PROGRAMMING THE TIME Turn the key lock position to P1 Press followed by the Or the button START ON/OFF Enter the time using the numeric keyboard following the format: HHMM Example: 1800 = 6pm Press the INPUT The display will show the message... -
Page 14: Image - Flat Programming Layout
BASIC ROGRAMMING BASIC ROGRAMMING BASIC ROGRAMMING BASIC ROGRAMMING FLAT PROGRAM LAYOUT This is the programming layout for the ET-6800 Flat ECR... -
Page 15: Image - Raised Programming Layout
BASIC PROGRAMMING BASIC PROGRAMMING BASIC PROGRAMMING BASIC PROGRAMMING RAISED PROGRAM LAYOUT This is the programming layout for the ET-6800 Raised ECR... -
Page 16: Plu Price Change
BASIC PROGRAMMING BASIC PROGRAMMING BASIC PROGRAMMING BASIC PROGRAMMING PLU PRICE CHANGE It is possible to change the Prices of the PLUs by using the Price change button. It can be used to change the prices of products on the keyboard, Modified products ie halves and doubles and products that are used on different shift levels, ie Happy Hour products. -
Page 17: Plu Name Change
BASIC PROGRAMMING BASIC PROGRAMMING BASIC PROGRAMMING BASIC PROGRAMMING PLU NAME CHANGE It is possible to change the Names of the PLUs by using the Name change button. It can be used to change the names of products on the keyboard. Turn the key lock position to ‘V’... -
Page 18: Cash Register Operation
CASH REGISTER OPERATION CASH REGISTER OPERATION CASH REGISTER OPERATION CASH REGISTER OPERATION GENERAL OPERATION Entering an Item To enter an item simply press the appropriate button on the keyboard For example BREAD ROLLS The item name, and price will appear on the display. Further items can be entered in the same way If required use the table function to enter items in a restaurant application. -
Page 19: General Operation - Entering Multiple Items
CASH REGISTER OPERATION CASH REGISTER OPERATION CASH REGISTER OPERATION CASH REGISTER OPERATION GENERAL OPERATION Entering Multiple Items If more than one item of the same type is sold, the quantity function can be used Key in the quantity to be sold followed by the quantity button For example Select an item... -
Page 20: General Operation - No Sale
CASH REGISTER OPERATION CASH REGISTER OPERATION CASH REGISTER OPERATION CASH REGISTER OPERATION GENERAL OPERATION No Sale To make a ‘No Sale’, (i.e. open the drawer to give change), finalise the current transaction and do the following: SALE Press: The drawer will open The operator will be identified on the audit roll and the No Sale counter will be... -
Page 21: General Operation - Voiding The Last Item Entered
CASH REGISTER OPERATION CASH REGISTER OPERATION CASH REGISTER OPERATION CASH REGISTER OPERATION GENERAL OPERATION Voiding The Last Item Entered During a transaction, the most recently entered item can be voided out Immediately after entering the item, ERROR Press the button CORRECT The item will be subtracted from the total and will be shown as a voided item on... -
Page 22: General Operation - Voiding An Item Without A Transaction
CASH REGISTER OPERATION CASH REGISTER OPERATION CASH REGISTER OPERATION CASH REGISTER OPERATION GENERAL OPERATION Voiding An Item Within A Transaction The void function allows any item to be voided from within the current transaction. This function can be put under management control if required Before the transaction is finalised press the... -
Page 23: General Operation - Voiding An Item After Tendering
CASH REGISTER OPERATION CASH REGISTER OPERATION CASH REGISTER OPERATION CASH REGISTER OPERATION GENERAL OPERATION Returning an Item after Tendering If you need to refund an item after a transaction has ended, turn the key lock to the ‘V’ position on the control lock Void the item by pressing the appropriate item button Enter the method of payment the customer... -
Page 24: General Operation - Cancel Transaction
CASH REGISTER OPERATION CASH REGISTER OPERATION CASH REGISTER OPERATION CASH REGISTER OPERATION GENERAL OPERATION Cancel Transaction If multiple products have been entered in a transaction and the whole transaction needs to be voided, it is possible to cancel the transaction After the items have been entered, simply press: CANCEL... -
Page 25: General Operation - Entering A Method Of Payment
CASH REGISTER OPERATION CASH REGISTER OPERATION CASH REGISTER OPERATION CASH REGISTER OPERATION GENERAL OPERATION Entering A Method Of Payment Once all items have been entered press the button. TOTAL The sub-total button can be made compulsory if required If the exact money is tendered press the appropriate method of payment button. -
Page 26: General Operation - Printing A Receipt After Sale
CASH REGISTER OPERATION CASH REGISTER OPERATION CASH REGISTER OPERATION CASH REGISTER OPERATION GENERAL OPERATION Printing A Receipt After Sale It is possible to print out a duplicate receipt after a transaction has been completed After tendering Press: RECEIPT A duplicate receipt will be printed. The receipt will detail the items sold during the last transaction, the method of payment... -
Page 27: General Operation - Using Quick Menus
CASH REGISTER OPERATION CASH REGISTER OPERATION CASH REGISTER OPERATION CASH REGISTER OPERATION GENERAL OPERATION Using Menus These menus give fast, simple and logical entry of preset items. On the keyboard it is possible to have a mixture of fast ‘one shot’ buttons for popular items such as beers and menu buttons for items sold in different types and / or sizes. -
Page 28: General Operation - P2 Reset
P2 control lock position. A flag may be set to allow this function in the ‘R’ position. Wait for 10 seconds Hold down the key and turn the ET-6800 ON at the main power switch After five seconds Release the... -
Page 29: Hospitality Operation - Clerk Interrupt
CASH REGISTER OPERATION H REGISTER OPERATION H REGISTER OPERATION H REGISTER OPERATION HOSPITALITY OPERATION Clerk Interrupt In a busy environment one clerk can interrupt another by pressing his/her own clerk button. The original clerk is automatically stored. For example: Clerk 1 (with the items vodka and Malibu stored) &... -
Page 30: Hospitality Operation - Modifiers (Halves And Doubles)
CASH REGISTER OPERATION CASH REGISTER OPERATION CASH REGISTER OPERATION CASH REGISTER OPERATION HOSPITALITY OPERATION Modifiers (Halves & Doubles) The half or double function Note: The quantities will be calculated correctly Eg for a Half Pint the Note: Is often used in a Hospitality situation Press the button followed... -
Page 31: Hospitality Operation - Opening/Storing Tables
CASH CASH REGISTER OPERATION REGISTER OPERATION CASH CASH REGISTER OPERATION REGISTER OPERATION HOSPITALITY OPERATION Opening / Storing Tables After signing on a clerk, press the table number. For example followed The Table is stored with the balance held in memory. It TABLE by the button... -
Page 32: Hospitality Operation - Scrolling Up/Down A Table
CASH REGISTER OPERATION CASH REGISTER OPERATION CASH REGISTER OPERATION CASH REGISTER OPERATION HOSPITALITY OPERATION Scrolling Up/Down a Table You can scroll through all items listed on a table (for example, in the event of a query) SCROLL SCROLL Use the DOWN buttons to scroll through the contents of a table... -
Page 33: Hospitality Operation - Paying Off A Table
CASH REGISTER OPERATION CASH REGISTER OPERATION CASH REGISTER OPERATION CASH REGISTER OPERATION HOSPITALITY OPERATION Paying Off a Table A previously stored table can be re-opened in order to add additional items, or to pay off the balance Enter the number of the table followed by the button TABLE Enter the amount tendered using... -
Page 34: Hospitality Operation - Printing A Bill
CASH REGISTER OPERATION CASH REGISTER OPERATION CASH REGISTER OPERATION CASH REGISTER OPERATION HOSPITALITY OPERATION Printing A Bill A bill can be produced without being finalised (the bill can be amended at any time until it is cashed off, using a method of payment) Press the table number. -
Page 35: Hospitality Operation - Understanding Bill Prints
CASH REGISTER OPERATION CASH REGISTER OPERATION CASH REGISTER OPERATION CASH REGISTER OPERATION HOSPITALITY OPERATION Understanding Bill Prints... -
Page 36: Hospitality Operation - Transferring Tables
CASH REGISTER OPERATION CASH REGISTER OPERATION CASH REGISTER OPERATION CASH REGISTER OPERATION HOSPITALITY OPERATION Transferring Tables • You can transfer items to a table from another location such as the bar (Clerk Interrupt) After signing on and entering some items, key in the table number, followed by the transfer button. -
Page 37: Retail - Scanning An Item
OPERATION Items entered in this way will appear on reports as named items within a department or, group. If an unprogrammed item is scanned, the ET-6800 will prompt the user by displaying the word Price? When programmed items are scanned, the price and description will appear on the display. -
Page 38: Retail - Manual Entry Of Non-Scanned Items
CASH REGISTER OPERATION CASH REGISTER OPERATION RETAIL - MANUAL ENTRY OF NON- SCANNED ITEMS If necessary sign on to the ET-6800 by entering the clerk number You can sell an item by keying in the price followed by the relevant department key placed on the keyboard. -
Page 39: Retail - Price Override
CASH REGISTER OPERATION CASH REGISTER OPERATION CASH REGISTER OPERATION CASH REGISTER OPERATION RETAIL - PRICE OVERRIDE It is possible to sell an item at a price that is different to the pre-programmed amount Enter in the new (temporary price) Press: OVER-RIDE Scan the item. -
Page 40: Retail - Plu Price Check
CASH REGISTER OPERATION CASH REGISTER OPERATION CASH REGISTER OPERATION CASH REGISTER OPERATION RETAIL - PLU PRICE CHECK If you want to find out the price of a scanned item, press PRICE CHECK This function can be used within a transaction Scan the item The price of the item will be displayed but will not register. -
Page 41: Retail - Using The Hold Function
CASH REGISTER OPERATION CASH REGISTER OPERATION CASH REGISTER OPERATION CASH REGISTER OPERATION RETAIL - USING THE HOLD FUNCTION The hold facility will temporarily hold a sale in the ECR. For example £1.50 STATIONERY Press the sale HOLD is held in memory. Another transaction can be started and finalised HOLD Press... -
Page 42: Retail Scanning Adding A New Product
CASH REGISTER OPERATION CASH REGISTER OPERATION CASH REGISTER OPERATION CASH REGISTER OPERATION RETAIL SCANNING Adding A New Product Turn the key lock position to P1 Press RECEIPT ON/OFF The display will show: SCAN BAR CODE Scan the bar code of the new item... - Page 43 CASH REGISTER OPERATION CASH REGISTER OPERATION CASH REGISTER OPERATION CASH REGISTER OPERATION RETAIL SCANNING Adding A New Product Cont.. At the ‘Enter Name’ prompt, type in the name of the item using the alpha numeric keypad (see page 14 ) Press CASH on the keyboard layout...
- Page 44 CASH REGISTER OPERATION RETAIL SCANNING Adding A New Product Cont.. At the prompt, key in the ENTER DEPT NO. number of the department (1-99) you wish to link the new item to Press: or the key on INPUT CASH the keyboard layout At the prompt key ENTER...
- Page 45 CASH REGISTER OPERATION CASH REGISTER OPERATION CASH REGISTER OPERATION CASH REGISTER OPERATION RETAIL SCANNING Adding A New Product Cont.. At the prompt, key in the STARTING STOCK number of items you have in stock, (if required) Press: CASH On the keyboard layout The display will read ‘Scan Bar Code.’...
-
Page 46: Retail Scanning - Plu Name Change For Scanned Items
CASH REGISTER OPERATION CASH REGISTER OPERATION CASH REGISTER OPERATION CASH REGISTER OPERATION RETAIL SCANNING PLU Name Change For Scanned Items Turn the key to the P1 position Press: followed by or the START RECEIPT ON/OFF key on the keyboard layout Scan the item Enter the new Name using the alpha-numeric keyboard... -
Page 47: Retail Scanning Plu Price Change For Scanning
CASH REGISTER OPERATION CASH REGISTER OPERATION CASH REGISTER OPERATION CASH REGISTER OPERATION RETAIL SCANNING PLU Price Change For Scanning Turn the key to the P1 position Press: followed by or the START RECEIPT ON/OFF key on the keyboard layout Scan the item Enter the new Price using the alpha-numeric keyboard and press... -
Page 48: Retail Scanning - Checking Stock Levels
CASH REGISTE CASH REGISTE R OPERATION R OPERATION R OPERATION RETAIL SCANNING Checking Stock Levels The ET-6800 allows you to view the current level of a product RECEIPT ON/OFF Scanning the item automatically displays the desired product ITEM The product quantity and description are displayed... -
Page 49: Retail Scanning - Adding Stock To An Existing Stock Item
CASH REGISTER OPERATION RETAIL SCANNING Adding Stock To An Existing Stock Item When the stock level becomes low it is possible to add additional stock to this product Press: START followed by or the ON/OFF key on the keyboard layout Scan the item that requires additional stock Enter the quantity of the additional stock using the numeric keyboard... -
Page 50: Retail Scanning - Reducing Stock From An Existing Stock Item
CASH REGISTER OPERATION CASH REGISTER OPERATION CASH REGISTER OPERATION CASH REGISTER OPERATION RETAIL SCANNING Reducing Stock From An Existing Stock Item It is possible to reduce the stock level of a product. Examples may be faulty goods, or the user has entered too many stock items in error Press: START... -
Page 51: Retail Scanning - Adding An Un-Programmed Product During Registration
CASH REGISTER OPERATION CASH REGISTER OPERATION CASH REGISTER OPERATION CASH REGISTER OPERATION RETAIL SCANNING Adding An Un-programmed Product During Registration If a product scanned at point of sale, has been programmed - ‘Price?’, will be displayed. It is possible to quickly add the product and sell the item. -
Page 52: Retail Scanning - Adding To The Re-Order List
CASH REGISTER OPERATION CASH REGISTER OPERATION CASH REGISTER OPERATION CASH REGISTER OPERATION RETAIL SCANNING Adding To The Re-Order List There are two manager passwords This function can be used within a transaction to add an item to the re-order list RE-ORDER Press: Scan the item you wish to re-order... -
Page 53: Retail Scanning Deleting A Redundant Plu
which are available for security measures. CASH REGISTER OPERATION CASH REGISTER OPERATION CASH REGISTER OPERATION CASH REGISTER OPERATION RETAIL SCANNING Deleting A Redundant PLU You can delete PLU items from the system if required. All PLU sales data must be cleared first through the Z1 and Z2 reports before deletion can occur To Program the X Manager Password Turn the keylock position to the ‘V’... -
Page 54: Setting Up Your Departments
SETTING UP YOUR SYSTEM SETTING UP YOUR DEPARTMENTS PLUs must be linked to departments. The ET-6800 allows a maximum of 299 departments. The name for each one should be relevant to the PLUs linked to it. This makes the reports easy to understand... -
Page 55: Setting Up Open Deparments
SETTING UP YOUR SYSTEM SETTING UP YOUR SYSTEM SETTING UP YOUR SYSTEM SETTING UP YOUR SYSTEM SETTING UP OPEN DEPARTMENTS Open buttons can be placed on your keyboard. These will allow you to enter the price of an item directly into a department. Depending on your keyboard layout, up to 99 departments can be displayed as open buttons. -
Page 56: Cash Register Reports
CASH REGISTER REPORTS SETTING UP YOUR GROUPS PLUs can also be linked to groups. The ET-6800 allows a maximum of 99 groups. The name for each one should be relevant to the PLUs linked to it. This makes the reports easier to understand. -
Page 57: Department Worksheet
DEPARTMENT WORKSHEET Enter the Names of all Departments below Photocopy this sheet for your records NO. DEPARTMENT DEPARTMENT NO. DEPARTMENT NAME NAME NAME... -
Page 58: Group Worksheet
GROUP WORKSHEET Enter the Names of all Groups below Photocopy this sheet for your records NO. GROUP NAME GROUP NAME NO. GROUP NAME... -
Page 59: Extra Worksheet
EXTRA WORKSHEET Enter the Names of all Groups below Photocopy this sheet for your records NO. GROUP NAME GROUP NAME NO. GROUP NAME... -
Page 60: Supplier Worksheet
SUPPLIER WORKSHEET If you wish the re-order list to group items by supplier, list all Suppliers names on the table below. Photocopy this sheet for your records SUPPLIER SUPPLIER SUPPLIER NAME NAME NAME... -
Page 61: Report Worksheet
REPORT WORKSHEET Tick each Report that you would like included as a pre-set button on your keyboard AS PRESET BUTTON ON REPORT TYPE KEYBOARD Full Financial Report *PLU Inventory Report Best Sellers Quantity Best Sellers (Price) Worst Sellers Quantity Worst Sellers (Price) Non-movers Re-order List Clerk Report... -
Page 62: New Item Worksheet
NEW ITEM WORKSHEET Enter the details of any new and un-programmed items as they are sold ITEM NAME PRICE DEPT GROUP SUPPLIER QTY NEW NAME/NO. STOCK... -
Page 63: Taking Reports
CASH REGISTER REPORTS CASH REGISTER REPORTS CASH REGISTER REPORTS TAKING REPORTS The ET-6800 cash register offers a wide range of standard and advanced reports. For a list of the main types of reports see ‘Available Reports’ on page 64 The reports can be accessed in the X1, X2, Z1 and Z2 positions. -
Page 64: Available Reports
CASH REGISTER REPORTS CASH REGISTER REPORTS CASH REGISTER REPORTS CASH REGISTER REPORTS AVAILABLE REPORTS The following reports are all available on the ET-6800 ECR Reports on all sales grouped by Full financial report departments includes voids, discounts, net sales, tax etc... -
Page 65: Full Daily Sales Report
CASH REGISTER REPORTS CASH REGISTER REPORTS CASH REGISTER REPORTS CASH REGISTER REPORTS FULL DAILY SALES REPORT A full sales report will detail the sales of all departments, including the quantity of items sold and the amount of money taken Turn the control lock to the ‘Z1’ position FULL Press: CASH... -
Page 66: Plu Sales Product Report
CASH REGISTER REPORTS CASH REGISTER REPORTS CASH REGISTER REPORTS CASH REGISTER REPORTS PLU SALES PRODUCT REPORT A PLU sales report will detail the sales of all PLUs, including the quantity of individual items sold and the amount of money taken Turn the control lock to ‘Z1’... -
Page 67: Best/Worst Sellers Report
CASH REGISTER REPORTS CASH REGISTER REPORTS CASH REGISTER REPORTS BEST/WORST SELLERS REPORT The ET-6800 allows you to take best and worst seller reports (by quantity and price) These reports are individual to each ECR and cannot be consolidated through Inter Register Communication... -
Page 68: Printing Re-Order Lists
CASH REGISTER REPORTS CASH REGISTER REPORTS PRINTING RE-ORDER LIST The ET-6800 allows you to print a list of items to be re-ordered see ‘Adding to the Re-Order List’ page 52 The items can be grouped by supplier. Note: if the report groups items by supplier,... -
Page 69: Non-Movers Report
CASH REGISTER REPORTS CASH REGISTER REPORTS NON-MOVERS REPORT The ET-6800 cash register allows you to report on items which have had no sales This report uses the ‘X2’ PLU sales data and must be carried out before a Z2 of PLU sales. -
Page 70: Glossary
GLOSSARY GLOSSARY GLOSSARY GLOSSARY The following list describes the ET-6800’s general terms and explanations for the functionality of the machine DEPARTMENT A department can be used for grouping purposes. When a product is sold, it will report under the heading of the designated department that the product is linked to ie Stationery. - Page 71 CLERK ID Each user (Clerk) can have their own unique password for operating the Cash register. This is useful for security and for reporting purposes. CLERK HOLD This will allow a clerk to hold their sale in the ECR while another Clerk carries out a transaction.
- Page 72 X-TIME The X-Time key is used for multiplication. Example 2) (X/TIME) (1.00) (DPT 1) would register a sale of 2.00 in Dept 1. The key is also used for displaying the current time on the display The FC key is used for tendering in a foreign currency for example the Euro.
- Page 73 The Error Correct key will void the last item that was registered. Simply press the EC key to void the last item VOID The Void key is used for voiding any item in the current transaction. Example Press Void – 1.00 – DPT 1 or Press Void – Press/Scan PLU RETURN The Return key is used for voiding any item that was registered in a previous transaction.
- Page 74 FLAGS This is for the Engineers use. Flags are settings of the ET-6800 and can change the way the machine works. Please do not alter these without consulting your Geller dealer. INITIALISE If in the unlikely event the ECR is in a “Lock up situation” i.e. not able to produce a transaction or the machine is continuously bleeping then an initialisation is required.
Need help?
Do you have a question about the ET-6800 and is the answer not in the manual?
Questions and answers