Table of Contents
Advertisement
Quick Links
T
ABLE OF
ABOUT THIS GUIDE .................................................................................. 4
1. INTRODUCTION ..................................................................................... 5
.................................................................................... 6
............................................................................... 6
..................................................................................... 7
V
............................................................................................. 8
2. HARDWARE INSTALLATION ........................................................... 10
........................................................................ 10
.................................................................. 11
3. USING THE UTILITIES ....................................................................... 12
.......................................................................... 12
................................................................................................. 14
Installing PS-Utility ................................................................................ 14
Using PS-Utility ...................................................................................... 15
................................................................................................. 18
4. PRINTING IN MAC OS......................................................................... 21
MAC OS 10.2 ......................................................... 21
For MAC OS X User ............................................................................... 24
For MAC OS 9 User ............................................................................... 27
- 2 -
C
ONTENTS
................................................... 24
Advertisement
Table of Contents

Related Manuals for TRENDnet TEW P21G


Summary of Contents for TRENDnet TEW P21G
-
Page 1: Table Of Contents
ABLE OF ONTENTS ABOUT THIS GUIDE .................. 4 1. INTRODUCTION ..................5 ..................6 ACKAGE ONTENTS ................6 YSTEM EQUIREMENTS ..................7 ENERAL EATURES ..................... 8 RODUCT 2. HARDWARE INSTALLATION ............10 ................ 10 ETWORKING PPLICATION ..............11 NSTALLING THE RINT ERVER 3. -
Page 2: About This Guide
5. WEB CONFIGURATION..............30 BOUT THIS UIDE ..............30 ONFIGURATION TILITY .................... 31 ANAGEMENT Management System ................32 Management Wireless ................ 33 Management Network................. 34 Management User ................36 This manual provides instructions and illustrations on how to use your .................. -
Page 3: Introduction
Package Contents Unpack the package and check all the items carefully, and be certain NTRODUCTION that you have: ♦ One Wireless Print Server. ♦ One AC Power Adapter suitable for your country’s electric power service. Congratulations on purchasing your Wireless Print Server, the easiest ♦... -
Page 4: General Features
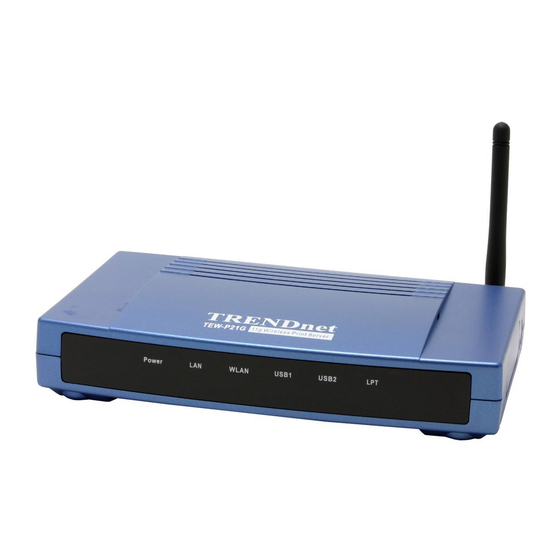
General Features Product View ♦ Equipped with 1 parallel port and 2 USB ports allows user to share This section describes the externally visible features of the print three printers on LAN simultaneously. server. ♦ Compliant with USB 2.0 High-speed printing. ♦... -
Page 5: Hardware Installation
LEDs Description Power Steady light confirms that the Print Server is powered on. USB1 When it blinks, the printer connected is printing. ARDWARE When it blinks, the printer connected is printing. USB2 When it blinks, the printer connected is printing. NSTALLATION Steady light confirms that the print server has a good connection to your network. -
Page 6: Installing The Print Server
Installing the Print Server Follow these steps for a trouble-free start of print server operations with your Wireless Print Server. SING TILITIES 1. Confirm proper operation of the printer to be connected to the print server. 2. When you have confirmed proper operation of the printer, turn off the power. -
Page 7: Ps-Utility
• User's Guide – click to preview the User's Guide in PDF format for detailed information of the Wireless Print Server. PS-Utility • Install Utility – click to install PS-Utility. Please refer to the next section for detailed information on installing the utility. To avoid the conflict in your network, you can use PS-Utility to •... -
Page 8: Using Ps-Utility
3. The InstallShield Wizard starts to install the software, and the 2. The main screen will appear as below, and it starts to search the Progress bar indicates the installation is proceeding. connected print server within the network. 4. When completed, click Finish. Your print server After installing the utility, the application program for the print server is automatically installed to your computer, and creates a folder in... -
Page 9: Ps Wizard
Show Web Setup: Click this button to open your web browser and launch the Configuration Utility. Alternately, PS Wizard you can double-click the print server in the Device List to launch the Configuration Utility. PS Wizard is a convenient utility that allows you to set up the print Factory Reset: Click this button to reload the factory settings server’s port connection. - Page 10 2. In the following window, select one printer in the Printer List to 4. The configuration is completed, click Reboot and then Yes to set up port connection, and then click Next >. restart the system. Choose one connected printer within the network. After rebooting, PS Wizard will help you to complete the port connection automatically.
-
Page 11: Printing In Mac Os
1. Launch Print Center. Press and hold the Option key, click the Add button. MAC OS RINTING IN 2. Select Rendezvous from the pop-up menu. Rendezvous Uses in MAC OS 10.2 The latest version of MAC OS provides a new feature that is called Rendezvous. -
Page 12: Setting Up Apple Talk/Lpr Printing
4. Select the desired printer, and the following pop-up menu displays the printer’s manufacturer. Select Generic. Setting Up Apple Talk/LPR Printing For MAC OS X User With MAC OS X, you can use AppleTalk or LPR printers to print through the print server. Follow the instructions below for setting up the print server: 1. - Page 13 - AppleTalk: After selecting AppleTalk, the Port Name of the 3. To print, open a document and select File > Print from the menu. print server will be displayed. Select the Port to which the post-script printer is connected. Then, select the printer model from the dialog box.
-
Page 14: For Mac Os 9 User
For MAC OS 9 User To print from MAC OS Client Workstations: The actual settings of selecting a PostScript printer connected to your If you use MAC OS 9, you can use the AppleTalk network protocol print server may be different from the instructions provided in this for network communications over standard Ethernet or Fast Ethernet section, depending on the devices and the software you are using. -
Page 15: Web Configuration
4. If you have not previously set this printer as the default, your computer will prompt you for a PostScript Printer Description file. Choose Select PPD. ONFIGURATION You can access and manage the Wireless Print Server through: 1) the enclosed software PS-Utility, and 2) a web browser. This chapter describes the second method –... -
Page 16: Management
The Management screen displays the basic information of the print Management server, including the following four categories: System Wireless Network User Management System As shown above, the System displays the status of your print server, printer, and network. Clicking Refresh will update the information. Device Status The information about the print server, including the firmware version, MAC/IP address, and up time, can be found in this field. -
Page 17: Management Wireless
Management Network Management Wireless Click the Network item to display the information of the LAN. Clicking Refresh will update the information. Click the Wireless item in the left column to display the information of the wireless LAN. Clicking Refresh will update the information. Wireless Status The items in this field display the information of the wireless LAN, such as the connection mode (Infrastructure or Ad-Hoc), SSID,... -
Page 18: Management User
Auto IP Management User This field contains the current settings of TCP/IP, including Click the User item in the left column to display the user(s) DHCP/BOOTP, UPnP, and MAC Rendezvous. The items in this information. field are configured in Configuration > Network > TCP/IP. TCP/IP Printing In this field, you can monitor the status of your printing tasks through TCP/IP. -
Page 19: Configuration
Admin Contact (optional): Assign the Admin Contact’s name for the print server. Configuration Password: Enter the Administrator password (3-8 characters). To set up the password, please enter the password in the New Password box, and then enter the same one again in the Confirm Configuration System Again box. -
Page 20: Configuration Wireless
available wireless AP within the network, click the Site Survey Configuration Wireless button. Wireless Channel: Select the channel from the pull-down menu. The default setting is 11. Transmission Rate: Select the data transmit rate from the pull- down menu. The default setting is Fully Automatic. WEP Encryption This field allows you to configure the settings of data encryption. -
Page 21: Configuration Network
TCP/IP Configuration Network This field contains three options that allow you to configure the TCP/IP setting: IP Address, UPnP, and MAC Rendezvous. IP Address: This option allows you to set the IP address manually or automatically. When you choose Manually Assign, you should enter the related information in the following boxes, including IP Address, Subnet Mask, and Default Gateway. -
Page 22: Configuration User
Configuration User Configuration E-mail Printing Control By configuring the Enable User Printing Control option (Yes or No), the user in the User List is permitted to access the print server or not. For the user(s) who is not in the User List, you can also limit E-mail Account the access right by setting the Allow Undefined Users Printing option to Yes or No. -
Page 23: Configuration Snmp
E-mail Notification Configuration SNMP You can set the print server to send an alter message when the printer status changes through E-mail. To enable this function, set the Enable e-mail notification for printer status changing option to Yes. Then, input the administrator’s E-mail address in the Admin E- mail Address box. -
Page 24: Tools
Tool E-mail Tools Tool Print Test Test E-mail Account Click Test to send a test E-mail to the given administrator’s E-mail address. Receive E-mail Print Test Choose one of the print ports and click Test to print a test page. Click Yes to immediately check and receive E-mail, and then print out the mail when available. -
Page 25: Tool Reset
Tool Reset Tool Factory Reset Reset Factory Reset Click Yes to immediately reset the print server. Click Yes to reload the factory settings of the print server. - 49 - - 50 -... -
Page 26: Tool Firmware Upgrade
Tool Backup Tool Firmware Upgrade Backup Device Configuration to File Firmware Upgrade Click Backup to backup your current configuration of the print When a new version of firmware is available (e.g. downloading from server to file and then save in the computer. the manufacturer’s website), you can upgrade the firmware of your print server. -
Page 27: Help
Help RODUCT PECIFICATIONS Printer Connection Printer Interface: Two USB ports, compliant with USB 2.0 Hi-speed standard. Network Connection This screen displays the information of the print server. Wireless Networking Network Standards: Wireless LAN standard IEEE802.11g. Network Data Transfer Rate: 54Mbps with fallback to 48, 36, 24, 18, 12, 11, 9, 6, 5.5, 2, and 1Mbps. -
Page 28: Network Protocol Support
Network Protocol Support LEDs Transport Protocols: TCP/IP, SMB, NetBEUI, and AppleTalk. Power, LAN, WLAN, USB1, USB2, LPT. TCP/IP Protocols Support: BOOTP, SNMP, Telnet, FTP, LPD, DHCP, and IPP. Environmental and Physical Power Supply: 5VDC. Hardware Operating Temperature: 0°C to 50°C. SDRAM: 8MB. -
Page 29: Limited Warranty
WARRANTIES EXCLUSIVE: IF THE TRENDWARE PRODUCT DOES NOT Limited Warranty OPERATE AS WARRANTED ABOVE, THE CUSTOMER’S SOLE REMEDY SHALL BE, AT TRENDWARE’S OPTION, REPAIR OR REPLACEMENT. THE FOREGOING WARRANTIES AND REMEDIES ARE EXCLUSIVE AND TRENDware warrants its products against defects in material and ARE IN LIEU OF ALL OTHER WARRANTIES, EXPRESSED OR IMPLIED, workmanship, under normal use and service, for the following lengths of time EITHER IN FACT OR BY OPERATION OF LAW, STATUTORY OR... -
Page 30: Technical Support
TRENDware website. TRENDware provides FREE technical support for all customers for the duration of the warranty period on this product. TRENDware Technical Support Tel: +1-310-626-6252 Fax: +1-310-626-6267 E-mail: support@trendware.com www.TRENDnet.com Monday ~ Friday, 7:30AM ~ 6:00PM Pacific Standard Time (Except holidays)
Need help?
Do you have a question about the TEW P21G and is the answer not in the manual?
Questions and answers