TRENDnet TEW-P1PG User Manual
54mbps 802.11g wireless parallel print server
Hide thumbs
Also See for TEW-P1PG:
- User manual (87 pages) ,
- Quick installation manual (15 pages) ,
- Faq (12 pages)
Table of Contents
Advertisement
Quick Links
Download this manual
See also:
User Manual
T
ABLE OF
ABOUT THIS GUIDE .................................................................................. 4
1. INTRODUCTION ..................................................................................... 5
.................................................................................... 6
............................................................................... 7
..................................................................................... 8
V
........................................................................................... 10
2. HARDWARE INSTALLATION ........................................................... 11
....................................................................... 11
.................................................................. 12
3. USING THE UTILITIES ....................................................................... 13
.......................................................................... 13
................................................................................................. 15
Installing PS-Utility ................................................................................ 15
Using PS-Utility ...................................................................................... 16
................................................................................................. 19
4. PRINTING IN MAC OS......................................................................... 22
MAC OS 10.2 ......................................................... 22
For MAC OS X User ............................................................................... 25
- 2 -
C
ONTENTS
................................................... 25
Advertisement
Table of Contents

Related Manuals for TRENDnet TEW-P1PG


Summary of Contents for TRENDnet TEW-P1PG
-
Page 1: Table Of Contents
ABLE OF ONTENTS ABOUT THIS GUIDE .................. 4 1. INTRODUCTION ..................5 ..................6 ACKAGE ONTENTS ................7 YSTEM EQUIREMENTS ..................8 ENERAL EATURES ................... 10 RODUCT 2. HARDWARE INSTALLATION ............11 ............... 11 ETWORKING PPLICATION ..............12 NSTALLING THE RINT ERVER 3. -
Page 2: About This Guide
For MAC OS 9 User ................27 For MAC OS 9 User ................28 BOUT THIS UIDE 5. WEB CONFIGURATION..............31 ..............31 ONFIGURATION TILITY This manual provides instructions and illustrations on how to use your .................... 32 ANAGEMENT 802.11g Wireless Pocket-size Print Server, including: Management System ................ -
Page 3: Introduction
Package Contents Unpack the package and check all the items carefully, and be certain that you have: NTRODUCTION ♦ One 802.11g Wireless Pocket-size Print Server. ♦ One AC Power Adapter suitable for your country’s electric power service. ♦ One Quick Installation Guide. Congratulations on purchasing the 802.11g Wireless Pocket-size Print ♦... -
Page 4: System Requirements
System Requirements General Features ♦ Operating System: ♦ Compact pocket size. ♦ Compliant with bi-directional 36-pin parallel port. This IEEE Microsoft Windows 95/98/98SE/ME/NT/2000/XP/2003. 1824 standard bi-directional communication allows collection of Microsoft Windows NT (3.51 or later). information for attached printer's status. Apple Mac OS (with Apple Talk support). -
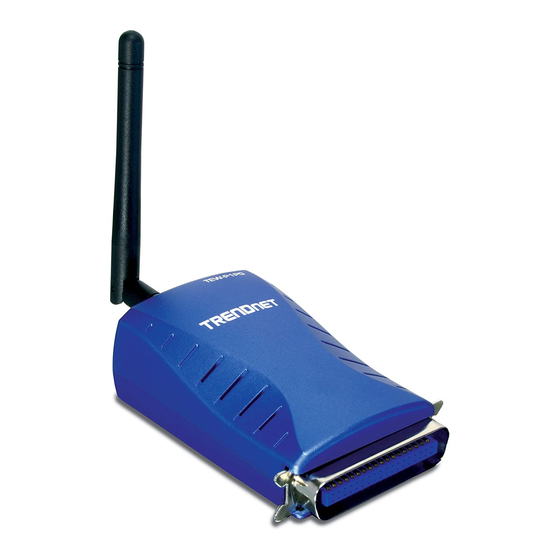
Page 5: Product View
♦ Ability to save print server configuration into hard drive for easy Product View access and backup without the hassle to reconfigure if setting is altered. This section describes the externally visible features of the print ♦ Support IPP for Windows 2000/XP server. -
Page 6: Hardware Installation
Installing the Print Server Follow these steps for a trouble-free start of operations with your print server. ARDWARE 1. Confirm proper operation of the printer to be connected to the print server. NSTALLATION 2. When you have confirmed proper operation of the printer, turn off the power. -
Page 7: Using The Utilities
• User's Guide – click to preview the User's Guide in PDF format for detailed information of the Print Server. • Install Utility – click to install PS-Utility. Please refer to the next section for detailed information on installing the utility. •... -
Page 8: Ps-Utility
3. The InstallShield Wizard starts to install the software, and the PS-Utility Progress bar indicates the installation is proceeding. 4. When completed, click Finish. To avoid the conflict in your network, you can use PS-Utility to change the related settings of your print server (such as the IP address) after finishing the installation. - Page 9 2. The main screen will appear as below, and it starts to search the Show Web Setup: Click this button to open your web connected print server within the network. browser and launch the Configuration Utility. Alternately, you can double-click the print server in the Device List to launch the Configuration Utility.
-
Page 10: Ps Wizard
2. In the following window, select one printer in the Printer List to set up port connection, and then click Next >. PS Wizard PS Wizard is a convenient utility that allows you to set up the print server’s port connection. To launch PS Wizard: 1. -
Page 11: Printing In Mac Os
4. The configuration is completed, click Reboot and then Yes to restart the system. MAC OS RINTING IN Rendezvous Uses in MAC OS 10.2 The latest version of MAC OS provides a new feature that is called Rendezvous. Rendezvous is a revolutionary networking technology standard that lets you create an instant network of computers and After rebooting, PS Wizard will help you to complete the port devices, which can be used throughout Mac OS 10.2 to provide... - Page 12 4. Select the desired printer, and the following pop-up menu displays 1. Launch Print Center. Press and hold the Option key, click the the printer’s manufacturer. Select Generic. Add button. 2. Select Rendezvous from the pop-up menu. 5. The printer is installed into the system successfully. 3.
-
Page 13: Setting Up Apple Talk/Lpr Printing
3. To print, open a document and select File > Print from the menu. Setting Up Apple Talk/LPR Printing For MAC OS X User With MAC OS X, you can use AppleTalk or LPR printers to print through the print server. Follow the instructions below for setting up the print server: Select this option. -
Page 14: For Mac Os 9 User
- AppleTalk: After selecting AppleTalk, the Port Name of the For MAC OS 9 User print server will be displayed. Select the Port to which the post-script printer is connected. Then, select the printer If you use MAC OS 9, you can use the AppleTalk network protocol model from the dialog box. - Page 15 To print from MAC OS Client Workstations: 4. If you have not previously set this printer as the default, your computer will prompt you for a PostScript Printer Description file. The actual settings of selecting a PostScript printer connected to your Choose Select PPD.
-
Page 16: Web Configuration
Management ONFIGURATION You can access and manage the Print Server through: 1) the enclosed software PS-Utility, and 2) a web browser. This chapter describes the second method – the Web Configuration Utility, and explains how to set up your print server with the web browser. Web Configuration Utility First, launch your web browser (such as the Internet Explorer 6.0 used in this manual). -
Page 17: Management System
The Management screen displays the basic information of the print Management Wireless server, including the following four categories: System, Wireless, Network, and User. Click the Wireless item in the left column to display the information of the wireless LAN. Clicking Refresh will update the information. Management System As shown above, the System displays the status of your print server,... -
Page 18: Management Network
Auto IP Management Network This field contains the current settings of TCP/IP, including Click the Network item to display the information of the LAN. DHCP/BOOTP, UPnP, and MAC Rendezvous. The items in this Clicking Refresh will update the information. field are configured in Configuration > Network > TCP/IP. TCP/IP Printing In this field, you can monitor the status of your printing tasks through TCP/IP. -
Page 19: Management User
Management User Configuration Click the User item in the left column to display the user(s) information. Configuration System Users Printing Log The items in this field display the user(s) information, which include System Device the user(s) MAC address, IP address, name, and status of printing tasks. -
Page 20: Configuration Wireless
Port Settings Configuration Wireless In this field, you can assign the Port Name for the print server, and the description for the LPT port. It also allows you to select the PJL Printer setting (Yes or No). NOTE: PJL (Print Job Language) has certain job requirements that must be met to work correctly. -
Page 21: Configuration Network
available wireless AP within the network, click the Site Survey TIP: Once you have changed the settings in each option, click Save button. to store the settings, or Cancel to abandon. Wireless Channel: Select the channel from the pull-down menu. Configuration Network The default setting is 11. -
Page 22: Configuration User
you should enter the related information in the following boxes, Configuration User including IP Address, Subnet Mask, and Default Gateway. DNS Server Address: DNS (Domain Name System) server is an Internet service that translates domain names into IP addresses. Enter at least one DNS IP Address in this field. UPnP: This option allows you to enable or disable UPnP mode. -
Page 23: Configuration E-Mail
E-mail Notification Configuration E-mail You can set the print server to send an alter message when the printer status changes through E-mail. To enable this function, set the Enable e-mail notification for printer status changing option to Yes. Then, input the administrator’s E-mail address in the Admin E- mail Address box. -
Page 24: Configuration Snmp
Configuration SNMP Tools Tool Print Test SNMP Management SNMP (Simple Network Management Protocol) is a set of protocols for managing complex networks Print Test Community 1/2/3: Enter a name in the Name box, and configure the Access Right by selecting Read Only or Read/Write from the Click Test to print a test page. -
Page 25: Tool E-Mail
Tool E-mail Tool Reset Test E-mail Account Reset Click Test to send a test E-mail to the given administrator’s E-mail Click Yes to immediately reset the print server. address. Receive E-mail Click Yes to immediately check and receive E-mail, and then print out the mail when available. -
Page 26: Tool Factory Reset
Tool Factory Reset Tool Firmware Upgrade Factory Reset Firmware Upgrade Click Yes to reload the factory settings of the print server. When a new version of firmware is available (e.g. downloading from the manufacturer’s website), you can upgrade the firmware of your print server. -
Page 27: Tool Backup
Tool Backup Help Backup Device Configuration to File Click Backup to backup your current configuration of the print server to file and then save in the computer. This screen displays the information of the print server. Restore Device Configuration from File You can reload a configuration that you saved before. -
Page 28: Product Specifications
Network Protocol Support Transport Protocols: TCP/IP, SMB, NetBEUI, and AppleTalk. TCP/IP Protocols Support: BOOTP, SNMP, Telnet, TFTP, FTP, LPD, RARP, DHCP, and IPP. RODUCT PECIFICATIONS Hardware SDRAM: 8MB. Flash ROM: 2MB. Printer Connection WLAN: Built-in 802.11g wireless module. Printer Interface: One bi-directional 36-pin parallel port. Operating System Support Network Connection - Windows 95/98/98SE/ME/2000/XP/2003, Windows NT;... -
Page 29: Limited Warranty
LEDs Limited Warranty Lk (Link/Act) TRENDware warrants its products against defects in material and workmanship, under normal use and service, for the following lengths of time from the date of purchase. Pw (Power) Wireless Print Server – 3 Years Warranty If a product does not operate as warranted above during the applicable warranty period, TRENDware shall, at its option and expense, repair the Environmental and Physical... -
Page 30: Technical Support
INTENDED USE, OR BY ACCIDENT, FIRE, LIGHTNING, OR OTHER E-mail: support@trendware.com HAZARD. www.TRENDnet.com LIMITATION OF LIABILITY: TO THE FULL EXTENT ALLOWED BY LAW Monday ~ Friday, 7:30AM ~ 6:00PM Pacific Standard Time TRENDWARE ALSO EXCLUDES FOR ITSELF AND ITS SUPPLIERS ANY...
Need help?
Do you have a question about the TEW-P1PG and is the answer not in the manual?
Questions and answers