Table of Contents
Advertisement
Quick Links
Parts checklist
User's manual
VM311/VM311-13/VM311-2/
VM311-23
TM
Safe & Sound
Full Color Video and Audio
Monitor
BC
Install the battery
You can power up the parent unit by connecting
it to AC power or to the rechargeable battery
Congratulations
provided. Even if the parent unit is connected
to AC power, we recommend you also
on purchasing your new VTech product.
install the battery. This guarantees continual
Before using this product, please read
operation in case of a power outage.
Important safety instructions.
Install the battery as shown below.
For support, shopping, and everything new at
VTech, visit our website at
1.
Slide and lift to open the battery compartment
www.vtechphones.com.
cover.
Register online to get an additional
3-month warranty!
Visit www.vtechphones.com.
Registration
2.
Plug the battery connector securely into
Register your product online for
the socket.
enhanced warranty support.
Product news
Learn about the latest VTech
products.
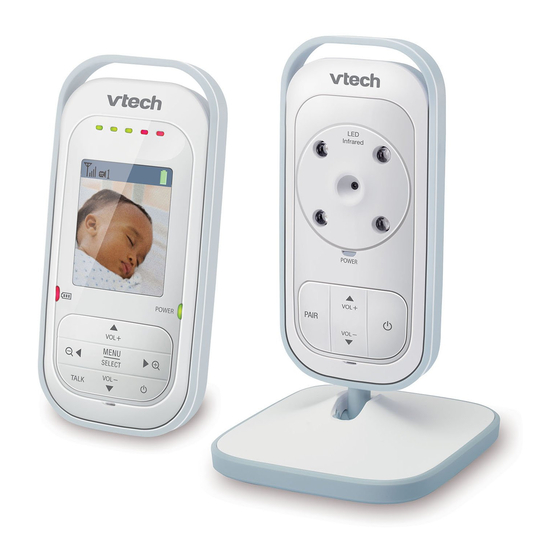
Parent unit overview
5
Control key panel
/VOL +
•
Press to increase the speaker volume.
•
While in the menu, press to scroll up.
•
While viewing a zoomed image,
press and hold to move the image
upward.
MENU/SELECT
•
Press to enter the menu.
•
While in a menu, press to choose an
item, or save a setting.
/VOL-
1
Visual sound indicator
•
Press to decrease the speaker
volume.
Visual sound indicator shows the sound
•
While in the menu, press to scroll
level detected from baby unit. It also
down.
shows the volume level during speaker
•
While viewing a zoomed image,
volume setting.
press and hold to move the image
Sound level detected from the baby unit
downward.
is independent from the volume level
/
set at the parent unit.
•
While in a menu, press to choose the
•
Green lights
option on the left side.
indicate a moderate sound level
•
While viewing a zoomed image, press
detected from the baby unit; or
to zoom out; or
Level 1 to Level 3 of the speaker
press and hold to move the image
volume setting.
leftward.
•
Red lights indicate
/
a higher sound level detected from the
•
While in a menu, press to choose the
baby unit; or
option on the right side.
Level 4 to Level 5 of the speaker
•
While viewing image, press to zoom in.
volume setting.
•
While viewing a zoomed image,
2
Battery level indicator
press and hold to move the image
•
Light On when the parent unit battery
rightward.
is being charged.
TALK
•
Light Flashes when the parent unit
battery is low and needs charging.
While viewing image, press and hold to
talk to the selected baby unit.
•
Light Off when the parent unit battery
is fully charged, or when no battery is
(On/off)
installed.
•
Press and hold to turn on or off.
3
POWER on/off indicator
•
Press to turn on or off the screen.
•
On when the parent unit is turned on.
6
Slot for portable use
•
Flashes when in pairing process, or
7
Stand
when connecting to baby unit while
the baby unit is not available.
8
Battery compartment cover
4
Power jack
Make sure the supplied rechargeable
battery with the label THIS SIDE UP
facing up.
THIS SIDE UP
3.
Align the battery compartment cover flat
against the battery compartment, then
place down and slide it towards the center
of the parent unit until it clicks into
place.
Replace the battery
1 set for
VM311/VM311-13;
To replace the battery, pull the battery out of
2 sets for
the battery compartment and unplug the battery
VM311-2/VM311-23
connector from the socket, then follow the steps
above to install the battery.
•
The operating time for using the
rechargeable battery is short. If you want
to monitor your baby for a long time, we
recommend you connect the parent unit
to AC power.
•
If the parent unit will not be used for a long
time, disconnect and remove the battery to
prevent possible leakage.
Connect and charge the
battery
•
Use only the battery supplied with this
product.
•
Use only the parent unit power adapter or
the baby unit power adapter supplied with
this product.
•
The parent unit power adapter and
baby unit power adapter are intended
to be correctly oriented in a vertical or
floor mount position. The prongs are not
designed to hold the plug in place if it is
plugged into a ceiling, under-the-table or
cabinet outlet.
•
Make sure the parent unit, the baby unit
and the power adapter cord are out of
reach of children.
Parent unit display icons
Connection status
-
displays when strong signal
strength is detected between the
baby unit and the parent unit.
- ,
or
displays when moderate
signal strength is detected between
the baby unit and the parent unit.
-
displays when the link between the
baby unit and the parent unit is lost.
-
displays when the parent unit is
searching for a baby unit.
Current view status
x
- Display the number of the baby unit
(x:1-4)
that is being viewed.
Zoom
- Display when the camera at the
baby unit has zoomed in.
Volume off
- Display when the volume is turned off.
Sound activation
- Display when the sound activation
is on. The baby unit detects the
sound in the baby room, and it
automatically goes on to show the
baby on the video display.
Battery status
-
animates
when the
battery is charging.
- displays solid when the battery is fully
charged.
- displays when the battery is low and
needs charging.
- displays when no battery is installed
but operates using AC power, or the
battery has been installed incorrectly.
Parent unit main menu icons
Camera selection
•
You can select the screen to view
images from a particular baby unit,
or view all baby units in Patrol Mode.
Brightness
•
You can change the brightness of
the screen.
Sensitivity
•
This feature monitors the microphone
sensitivity of the baby unit through
the parent unit. The higher the
sensitivity level, the more sounds it
picks up in your baby's room.
Connect the baby unit
Charge the parent unit battery
Once you have
installed the parent unit and
its battery, press and hold
Power outlet not
battery icon indicates the battery status (see
controlled by a wall switch
the table below). The parent unit battery is fully
charged after 12 hours of continuous charging.
The standby time varies depending on the
Baby unit power adapter
sensitivity level you set, your actual use and
the age of the battery.
When the parent unit is operating in battery
mode and the battery is low, you need to
charge the parent unit without interruption for at
least 30 minutes to give the parent unit enough
Self-adhesive
charge to use for a short time. When operating
strap
in low battery condition, the parent unit displays
.
The
light on the parent unit flashes and
the
parent unit plays short beeps to alert you.
The following table summarizes the battery
charge indicators and actions to take.
Baby unit
Battery
Battery
indicators
status
Connect the parent unit
The battery
No battery
icon is off and
is installed
Power outlet not controlled
displays.
but operates
by a wall switch
using AC
power, or the
Parent unit power adapter
battery has
been installed
incorrectly.
Self-adhesive
strap
The screen
The battery
displays
.
has very little
The
light
charge and
flashes.
may be
for only a
short time.
The battery
The battery is
icon becomes
fully charged.
solid .
When you charge the battery initially or it is
not used for a long period of time, charge
it for 12 hours continuously. It takes longer
to charge the battery when the parent unit
is turned on. To shorten the charging time,
turn the parent unit off while charging.
3.
Press
or
to adjust the brightness.
Sound activation
4.
Press
/SELECT to confirm your selection.
MENU
•
Automatically turns on the parent
unit screen when a sound is
Adjust the sound sensitivity of the baby unit
detected in your baby's room. When
no sound is detected, the screen is
You can use the parent unit to change the
off to save power.
sound sensitivity level of the baby units from
Pairing
Level 1 to Level 5. The higher the sound
•
The baby units and parent unit
sensitive is set, the more sensitive the baby
provided are already paired. You can
unit is in detecting sounds for transmitting to the
add or replace baby units (VM310/
parent unit.
VM310-13 purchased separately) to
your baby monitor system.
1.
Press MENU/
SELECT
not in use.
2.
Press
or
to scroll to
Using the baby monitor
3.
Press
or
to adjust the sensitivity level.
4.
Press
/SELECT to confirm your selection.
MENU
Power on or off the baby unit
•
Press and hold
to turn on the baby unit.
Turn on or off the sound activation
The POWER light turns on.
The parent unit continuously monitors the
•
Press and hold
again to turn off the baby
sound level in your baby's room. When the
unit. The POWER light turns off.
sound activation mode is on, the parent unit
Power on or off the parent unit
screen only turns on when the baby unit picks
•
Press and hold
to turn on the parent unit.
up a sound. As long as no sound is detected
The screen turns on.
within 50 seconds, the parent unit screen is off
•
Press and hold
again to turn off the
to save power.
parent unit. The screen turns off.
1.
Press MENU/
SELECT
is not in use.
Turn on or off the parent unit screen
2.
Press
or
to scroll to
You can turn on or off the parent unit screen
3.
Press
or
to select
without power off the parent unit. You can still
to turn off sound activation.
hear sound from the baby unit.
4.
Press
/SELECT to confirm your selection.
MENU
•
Press
on the parent unit at any time.
•
If you mute the speaker while sound
activation is on, then you hear a beep
Adjust the speaker volume for baby unit
sound whenever the screen turns on.
You can adjust the speaker volume.
•
If you want to turn on the parent unit
•
Press / VOL + or / VOL- on the baby unit
screen continuously while the sound
at any time.
activation is on, then set the sound
sensitivity to Level 5.
Adjust the speaker volume for parent unit
Select the camera
You can adjust the speaker volume from
You can select the screen to view images from
Volume 1 to Volume 5, or turn it off.
a particular baby unit, or view all baby units in
•
Press / VOL + or / VOL- on the parent
Patrol Mode.
unit when it is not in use.
If you select Patrol Mode to view the images,
When the speaker volume is set to off, the
the screen switches to view another baby unit
screen displays
.
automatically after some time. The switching is
in chronological order:
Adjust the LCD brightness of the parent unit
1.
Press MENU/
You can adjust the brightness of the parent
SELECT
not in use.
unit screen from Level 1 to Level 5. The LCD
2.
Press
or
to scroll to
brightness is preset to Level 3.
3.
Press
or
to select the desired baby unit
1.
Press MENU/
when the parent unit is
SELECT
(1, 2, 3 or 4) or Patrol Mode ( ).
not in use.
4.
Press
/SELECT to confirm your selection.
MENU
2.
Press
or
to scroll to
.
Before use
to turn it on. The
You may test the baby monitor before initial
use, and at regular times thereafter.
To test your video and audio monitor:
1.
Place the parent unit and the baby units in
the same room to test the product. Make
sure the baby units are at least 3 feet away
from the parent unit.
2.
Press and hold
on
the baby units until
the POWER light turns on.
3.
Press and hold
on the parent unit until
the POWER light turns on.
I
f both units are not connected, the parent
unit displays
while searching for a baby
unit. If no baby unit is found after a while,
it displays
.
Positioning the baby monitor
Action
Place the parent unit within the operating range
of the baby unit. We recommend the parent
Install the
unit is at least 3 feet away from the baby unit
parent unit
to avoid audio feedback. If you still experience
battery.
audio feedback, move the parent unit and the
Charge
baby unit farther apart.
without
For better image quality, do not place the
interruption
baby unit too far away from your baby.
(at least 30
For desktop usage and/or wall mounting the
minutes).
baby unit, you can refer to Installation guide.
Charge
Operating range
without
interruption
The operating range of the baby monitor is up
used
(about 30
to 1,000 feet outdoors or 150 feet indoors. The
minutes).
actual operating range may vary depending
on the environmental conditions and other
interferences such as walls, doors and other
To keep
obstructions.
the battery
charged,
connect it to
AC power
when not in
use.
Zoom
You can zoom in or out while viewing image
from baby unit.
•
Press
to zoom in.
•
Press and hold , ,
or
to move the
zoomed image upward, downward, leftward
or rightward correspondingly.
•
Press
to zoom out.
Talk function
when the parent unit is
You can use the TALK function of the parent
unit to talk and comfort your baby.
.
•
Press and hold TALK when the parent
unit is viewing particular baby unit. Speak
towards the microphone on the parent unit.
Your voice is broadcast to the baby unit.
Night vision
The baby unit has infrared LEDs that allow
you to see your baby clearly at night or in a
dark room. When the baby unit detects low
light levels, the infrared LEDs are switched on
automatically.
When the infrared LEDs are on, the image
is in black and white. This is normal due to
when the parent unit
external light sources.
Pair and replace extra new baby unit (VM310/
.
VM310-13)
to turn on, or
The baby units and parent unit provided are
already paired. You can add or replace any
baby units (VM310/VM310-13 purchased
separately) to your video and audio monitor
system.
You can pair a maximum of four baby units
to your parent unit.
Each new baby unit must
be paired to the parent unit before use.
To pair and replace a baby unit:
1.
Press MENU/
when the parent unit is
SELECT
not in
use.
2.
Press
or
to choose
.
3.
Press
or
to choose a desired baby unit
slot, then press
/SELECT. The screen
MENU
displays
.
If you choose an occupied baby unit slot,
the new baby unit will replace the existing
to
.
baby unit.
when the parent unit is
4. Turn on the new baby unit, and then
immediately press and hold PAIR until the
POWER light turns on.
.
When pairing is successful, the screen displays
, and then the image from the newly paired
baby unit.
Overview
Baby unit overview
1
Camera
2
Infrared LEDs
Backup light for night vision.
3
POWER on/off indicator
•
On when the baby unit is powered on
and currently linked to parent unit.
•
Flashes when the baby unit is not
linked to a parent unit; or
the pairing process is in progress; or
the parent unit is not viewing this baby
unit.
Power jack
4
5
Control key panel
/VOL +
Press to increase the listening volume.
/VOL-
Press to decrease the listening volume.
PAIR
Press and hold to pair to the parent unit.
(On/Off)
Press and hold to turn on or off.
6
Microphone
7
Stand
Tilt to adjust the camera angle.
8
Rim
9
Base
•
If pairing fails, the screen displays . Try
the pairing process again.
•
Only one baby unit can be paired at a time.
To unpair a baby unit:
Make sure you power on the baby unit and
the parent unit before unpairing the baby unit.
1.
Press MENU/
when the parent unit
SELECT
is not in
use.
2.
Press
or
to scroll to
.
3.
Press
or
to select the desired baby unit
(1, 2, 3 or 4).
4.
Press and hold TALK until
and
display.
5.
Press
or
to select
to cancel, or
to
confirm the unpair process.
6.
Press
/SELECT to confirm your selection.
MENU
When unpairing is successful, the POWER
light on the selected baby unit flashes. The
parent unit displays
for a while, and then the
image from the baby unit previously viewing.
Portable use of parent unit
(optional)
Sling is not included. You may need to buy
a sling for portable usage.
1.
Make sure battery is installed and charged.
Unplug the power adaptor.
2.
Pinch the end of the sling and insert it into
the slot on the top of the parent unit.
3.
Insert the one end of the sling into the
other end of the sling, and fasten it.
General product care
To keep this product working well and looking good,
follow these guidelines:
•
Avoid putting it near heating appliances and
devices that generate electrical noise (for example,
motors or fluorescent lamps).
•
DO NOT expose it to direct sunlight or moisture.
Advertisement
Table of Contents

Related Manuals for VTech VM311


Summary of Contents for VTech VM311
- Page 1 AC power, we recommend you also incorrectly. minutes). Self-adhesive baby unit, you can refer to Installation guide. on purchasing your new VTech product. • If the parent unit will not be used for a long Power jack install the battery. This guarantees continual...
- Page 2 Pour l’empêcher de surchauffer, berceau ou du parc de bébé. Ne jamais couvrir What will VTech do if the Product is not free from user’s manual - a check of the Product’s controls and d’une supervision responsable et adéquate par un ne bloquez sous aucun prétexte ces ouvertures...
Need help?
Do you have a question about the VM311 and is the answer not in the manual?
Questions and answers