Table of Contents
Advertisement
Quick Links
Advertisement
Table of Contents

Related Manuals for Motorola CB3000


Summary of Contents for Motorola CB3000
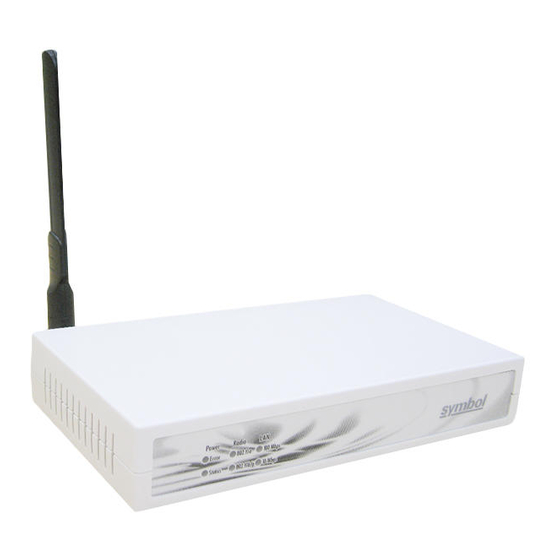
- Page 1 CB3000 Client Bridge Quick Install Guide...
- Page 2 © 2009 Motorola, Inc. All rights reserved. MOTOROLA and the Stylized M Logo are registered in the US Patent & Trademark Office. Symbol is a registered trademark of Symbol Technologies, Inc. All other product or service names are the property of their respective owners.
-
Page 3: Table Of Contents
Configuring CB3000 Basic Encryption ........ - Page 4 CB3000 Client Bridge Quick Install Guide...
-
Page 5: Chapter 1: Document Conventions
Document Conventions To the Installer This guide is intended for the technician responsible for installing the CB3000 Client Bridge. It is assumed that the technician is familiar with Ethernet LAN-based networking concepts. The purpose of this document is to provide specifications, features and guidelines for use during default device installation and configuration. - Page 6 1-2 CB3000 Client Bridge Quick Install Guide...
-
Page 7: Chapter 2: Cb3000 Overview
TCP/IP stack to provide a reliable data transport mechanism. It can initiate up to 16 client connections (including one POS device connection) to your server or accept datagrams from multiple sources. Use the CB3000 to network devices that do not have PC Card or PCI card slots (printers, scanners, etc.). Before Installing the CB3000 Before installing the CB3000, review the guidelines in the following sections: •... -
Page 8: Prerequisite Requirements
Verifying the Installation Site Mounting options for the CB3000 include table top, wall or under a counter mounting using the keyholes and mounting hardware provided with the unit. Before installing CB3000, verify the installation site meets the following requirements: •... -
Page 9: Installing The Cb3000
Installing the CB3000 2-3 Installing the CB3000 Cable and test the CB3000 before moving it to its table top, wall or under a counter operational location. To cable the CB3000: NOTE: A cross-over cable is not required to directly connect the CB3000 to a PC. - Page 10 2-4 CB3000 Client Bridge Quick Install Guide The CB3000 Power, Radio and LAN LEDs provide the following functionality: Power LEDs Activity Description Error No errors detected Error Orange ON Hardware error Status Power OFF Status Green ON Power ON/Device ready...
-
Page 11: Displaying The Cb3000 User Interface
Netscape Navigator 6.0 or later. To launch the CB3000 Web interface: 1. If you know the DHCP assigned IP address for the CB3000, enter it in the browser. If no DHCP services are available, enter the default IP address of https://10.10.1.1. -
Page 12: Connecting To The User Interface Using The Discovery Tool
The Information screen displays high level device name and network address information. The page is read- only with no configurable data fields. The CB3000 is now ready to have its WLAN settings configured, then its Ethernet Settings. For more information, see sections... - Page 13 4. Double-click on one of the CB3000s listed within the Discovery Tool window. If the IP address of the CB3000 is not in the same subnet as your PC’s IP address, change the CB3000’s IP address to be within the PC’s subnet.
-
Page 14: Configuring Cb3000 Wlan Settings
The Information screen displays high level device name and network address information. The page is read- only with no configurable data fields. The CB3000 is now ready to have its WLAN settings configured, then its Ethernet Settings. For more information, see sections... - Page 15 ESSID or use the drop-down menu to select the ESSID. The list of ESSIDs available to the CB3000 from the drop- down menu does not automatically refresh as devices come and...
- Page 16 5. Click View to display the Available Networks screen.Use this screen to view a list of available ESSIDs (networks) available to the CB3000 for connection. Select the checkbox to the left of the target ESSID and click the Connect button to associate with that ESSID (Infrastructure mode) or networked peer (Ad Hoc mode).
-
Page 17: Configuring Cb3000 Ethernet Settings
Configuring CB3000 Ethernet Settings 2-11 Configuring CB3000 Ethernet Settings Use the Ethernet Settings screen to specify the name of the CB3000 and assign network address information required as part of the CB3000 basic configuration: To configure required Ethernet settings for the CB3000: 1. - Page 18 The CB3000 is now ready to transmit and receive with a connected device in the open without security. However, Motorola recommends configuring a basic security scheme (for the purposes of our basic configuration, WEP 128) to ensure initial communication between the CB3000 and its connected device are secure.
-
Page 19: Configuring Cb3000 Security
CB3000 and its associated device or no key is used (Open System). If a shared key is used, both the CB3000 and its connected device are required to use the same key (as selected from 1 to 4) to interoperate. A shared key increases the level of security within the network as... - Page 20 WEP algorithm information between the CB3000 and its associated device. NOTE: The CB3000 and its associated device are required to use the same key and key length to inter- operate. 5. Select 128-bits from the WEP Encryption drop down menu.
-
Page 21: Testing Device Connectivity
Tools -> Trouble shooting from the CB3000 menu tree. The Trouble shooting screen displays. 2. The CB3000 can verify its link with an associated access point by sending ping packets to the device. To conduct a ping test: a. Enter the IP address of the target device. -
Page 22: Where To Go From Here
Where to Go From Here? Once basic connectivity has been verified, the CB3000 can be configured to meet the needs of the network and the users it supports. The sections referenced below are located within the CB3000 Client Bridge User Guide available on your product CDROM or from the Motorola Web site http://support.symbol.com/support/product/manuals.do... -
Page 23: Technical Specifications
Technical Specifications 2-17 Technical Specifications Weight (with antenna) 0.65 lbs (0.30 kg) Dimensions 7 in. wide x 4 in. deep x 1.2 in. high (17.78 cm. wide x 10.16 cm. deep x 3.05 cm high) excluding external antenna and foot stand Protocol Support TCP/IP, DHCP Standards Conformance IEEE 802.11... -
Page 24: Customer Support
HTML Customer Support Use the Motorola Support Center as the primary contact for any technical problem, question, or support issue involving Motorola products. Motorola Support Center responds to calls by email, telephone, or fax with in the time limits set forth in individual contractual agreements. - Page 25 Customer Support 2-19 Services Homepage http://support.symbol.com/support/mysupport/ Software Updates http://support.symbol.com/support/product/softwaredownloads.do...
-
Page 26: Regulatory Compliance
2-20 CB3000 Client Bridge Quick Install Guide Regulatory Compliance All Motorola devices are designed to be compliant with rules and regulations in locations they are sold and will be labelled as required. Local language translations are available at the following Website: http://support.symbol.com/support/products/manuals.do. -
Page 27: Wireless Devices
Regulatory Compliance 2-21 Power Supply Use only a Motorola-approved power supply (pt # 0993036903) output rated 12 Vdc and minimum 1 A. The power supply is certified to EN60950 with SELV outputs. Use of alternative power supply will invalidate any approval given to this device and may be dangerous. -
Page 28: Ce Marking And European Economic Area (Eea)
Declaration of Conformity (DoC) for details at http://www2.symbol.com/doc/. Statement of Compliance Motorola, hereby, declares that this device is in compliance with the essential requirements and other relevant provisions of Directive 1999/5/EC. A Declaration of Conformity may be obtained from http://www2.symbol.com/doc/. -
Page 29: Waste Electrical And Electronic Equipment (Weee)
Regulatory Compliance 2-23 Waste Electrical and Electronic Equipment (WEEE English: For EU Customers: All products at the end of their life must be returned to Symbol for recycling. For information on how to return product, please go to: http://www.symbol.com/environmental_compliance. Dansk: Til kunder i EU: Alle produkter skal returneres til Symbol til recirkulering, når de er udtjent. -
Page 30: China Rohs Compliance
2-24 CB3000 Client Bridge Quick Install Guide China RoHS Compliance... - Page 32 MOTOROLA INC. 1303 E. ALGONQUIN ROAD SCHAUMBURG, IL 60196 http://www.motorola.com 72E-122700-01 Revision A August 2009...
Need help?
Do you have a question about the CB3000 and is the answer not in the manual?
Questions and answers