Jackson Grills JLS700-LP Owner's Manual
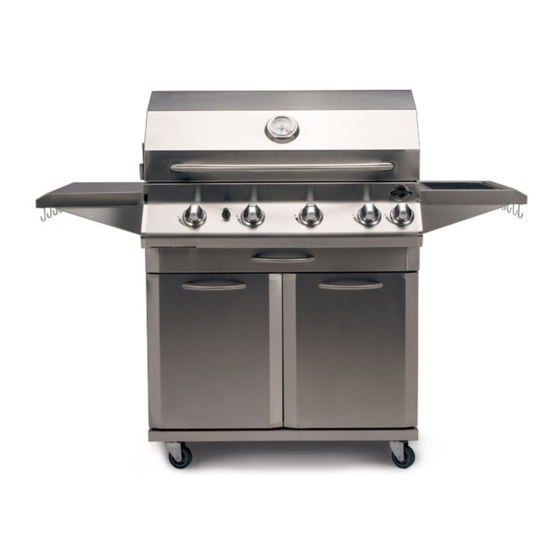
Cart models
Hide thumbs
Also See for JLS700-LP:
- Owner's manual (23 pages) ,
- Assembly, use and care manual (23 pages) ,
- Owner's manual (21 pages)

Related Manuals for Jackson Grills JLS700-LP


Summary of Contents for Jackson Grills JLS700-LP
- Page 1 OWNER’S MANUAL for LUX700 For CART Models: JLS700-LP (Liquid Propane) JLS700-NG (Natural Gas) Important Notice Please read ALL safety notices on PP.3 before assembling or operating this grill. Version: DEC13...
-
Page 2: Table Of Contents
Table of Contents: Table of Contents: Safety Warnings: Certification & Testing; Unpacking Your Grill; Parts Checklist Special Message to Owners: Contact Us: Owner Registration: Tools Required for Assembly: Assembling & Preparing your Grill: Clearance to Combustibles Propane Gas Connection: Natural Gas Connection: Leak Testing: Installer Final Checklist: Gas Conversion Kits:... -
Page 3: Safety Warnings
!SAFETY WARNINGS! IMPORTANT: Please read and understand all warnings and precautions before using your gas grill. This grill is for outside use only, and shall not be used in any home, building, garage, enclosed area or vehicle. This grill is set up from the factory for use with either Propane Gas (LP), or Natural Gas (NG). Please ENSURE that your grill is correctly configured and labeled for the gas you intend to use. -
Page 4: Certification & Testing
Certification and Testing: This appliance has been tested by Labtest Certification Inc. (LC), and has been tested to ANSI Z21.58a-1198 & CGA 16a-M98, and Certified for Canada and the USA. NOTE: The use and installation of this product must conform to local codes. In the absence of local codes, use the National Fuel and Gas Code, ANSI A223.1, Storage and Handling of Liquefied Petroleum Gasses, NFPA / ANSI 58. -
Page 5: Special Message To Owners
To obtain replacement parts for your Jackson Grill, contact your local dealer. If you have any questions please call us anytime at the number below: (Please have your model and serial number at hand) Grill Model: JLS700-LP or JLS700-NG Serial Number: ___________________ Write your serial number here for future reference. -
Page 6: Tools Required For Assembly
Tools Required for Assembly: Please use the proper tools to simplify installation and prevent injury or damage to your grill. TOOLS INCLUDED WITH YOUR GRILL: 5mm Allen Wrench (for Casters) INSTALLER SUPPLIED TOOLS: Large Phillips Screwdriver Small Phillips Screwdriver Small Crescent Wrench Large Crescent Wrench Assembling &... -
Page 7: Clearance To Combustibles
PREPARE REAR BURNER IGNITER: 1. Unscrew the plastic/rubber cap from the rear burner ignition module, and insert supplied AAA battery with the positive end facing out. (Fig. 2) 2. Re-install cap. INSTALL ROTISSERIE KIT: Figure 2 1. Carefully remove the rotisserie kit parts from the packaging. 2. -
Page 8: Propane Gas Connection
Propane Gas Connection: FUEL TYPE: The following instructions are for a Propane configured grill ONLY. Operating Pressure: 11” WC. HOSE & REGULATOR: Use only the propane hose and regulator supplied with your Propane grill. INSTALLATION CODES: The installation of this appliance must conform with local codes or, in the absence of local codes, to the National Fuel Gas Code, ANSI Z223. -
Page 9: Natural Gas Connection
CONNECTING THE GRILL TO A PROPANE CYLINDER: 1. Make sure tank valve is in its full off position (turn clockwise to stop). 2. Check tank valve to ensure that is equipped with external (male) threads (i.e. QCC-1 type connecter). 3. -
Page 10: Leak Testing
4. If the smell of gas is detected, immediately shot off gas or disconnect from source, and repair leaks before further attempts are made to use the grill. !WARNING! Propane and Natural Gas are very flammable; exercise extreme caution while checking for, and repairing gas leaks. Jackson Grills Support: 1-888-287-3333 or info@jacksongrills.com... -
Page 11: Installer Final Checklist
Installer Final Check List: Ensure that clearances to combustible materials are maintained per specifications listed in this manual. Make sure that all internal packaging has been removed. When using Natural Gas; ensure that incoming pressure is at 7” WC ... -
Page 12: Lighting Instructions
Grill Lighting Instructions: 1. BEFORE LIGHTING: Always inspect the gas supply hose before turning the gas “ON”. If there is evidence of cuts, wear, or abrasion, it must be replaced before use. Use only a manufacturer approved replacement hose. ... -
Page 13: Grilling And Rotisserie Cooking
Grilling and Rotisserie Cooking: TOTAL GAS CONSUMPTION: Total gas consumption per hour, per burner: MODEL JLS700 (ALL): Main burners: 15,000 Btu/hr. X 4 = 60,000 BTU/hr. Rear burner: 13,500 Btu/hr. X 1 = 13,500 BTU/hr. Total Potential Consumption: = 73,500 BTU/hr. !WARNING! Clean your grill often, especially the grease pan and grease cup. - Page 14 USING THE GRILLING SURFACE (Cook Grids): !WARNING! Grilling requires high heat for searing and proper browning. Do not leave grill unattended Most foods are cooked at the “HI” heat setting for the entire while cooking! Potential BURN and FIRE RISK! cooking duration.
-
Page 15: Cleaning & Maintenance
Cleaning and Maintenance: CAUTION: Keep the grill area clear and free from combustible materials, gasoline and other flammable vapors and liquids Ensure that the grill is completely cold before performing any cleaning and maintenance. Burning off deposits and soiling by turning the main burners on high for about 5 minutes after each use will keep excessive food residue from building up, but this DOES NOT replace proper cleaning and maintenance. - Page 16 TECH-TIP Do NOT turn on the rotisserie burner 3. COOKING GRID CLEANING: when the main burners are being used If the grids are heavily soiled, turn your main to clean the grill; otherwise overheat burners on high for 10 minutes to burn off excess damage to your barbecue may result.
-
Page 17: Storing Your Grill
5. INTERIOR CLEANING: Remove the cooking grid, flame diffuser and the burner from the grill. Remove excess residue using a brush, scraper and/or cleaning pad. Spray inside the firebox with oven degreaser and let stand for 5 minutes. ... -
Page 18: Trouble Shooting
Trouble Shooting: A) SPIDER AND INSECT WARNING: Spiders and insects can nest in burners during storage. This can be potentially hazardous, and has been known to cause grill fires. Remove & clean the main burners periodically, and clean them when putting the grill into storage. Closed for Nat Gas B) BURNER INSPECION: Inspect burners each time you use your grill, or immediately if one of the following occurs:... -
Page 19: Exploded Parts View
Exploded View: LUX JLS700... -
Page 20: Parts List
Parts List: LUX JLS700 Loc. DESCRIPTION Part# (Qty.) Loc. DESCRIPTION Part# (Qty.) Thermometer Bezel JT-11 Side Shelf: Right JC-11 Thermometer JT-10 Cutting Board JC-55 Hood JH-08 Side Shelf: Left JC-10 Hood Handle Insulator (Black) JH-95 (2) Utensil Hooks Hood Handle JH-67 Pedestal Back JC-36... -
Page 21: Warranty
Limited Lifetime Warranty: MODEL NO: LUX JLS700-LP & JLS700-NG Cart Type Jackson Grills warrants the following materials and Jackson Grills warrants the following materials workmanship to be free of defects for as long as and workmanship for 2 years as follows: you own the grill subject to the conditions below: 2 Year Warranty: (from date of purchase);...
Need help?
Do you have a question about the JLS700-LP and is the answer not in the manual?
Questions and answers