
Related Manuals for Kenwood Cooking Chef Major


Summary of Contents for Kenwood Cooking Chef Major
- Page 1 › Quick Start Guide › Guide de démarrage rapide › Snel Start Gids › Quick Start Guide › Guida rapida di consultazione...
- Page 3 This machine will help you to create the most basic of dishes to the most elaborated recipes. From beginners to experts, the Kenwood Cooking Chef allows you to prepare all different kinds of recipes quickly and effortlessly.
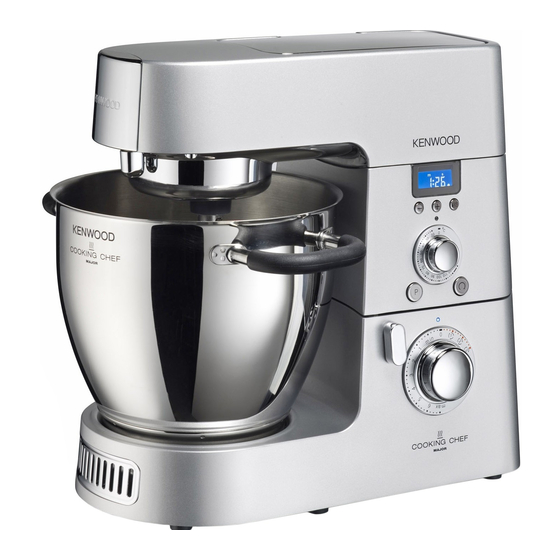
- Page 4 Discover your control panel High Speed Outlet: This outlet operates attachments that need high speed such as blending, juicing, high speed slicing and shredding. Medium speed outlet: This is for operating the food processor attachment. Slow speed outlet: This outlet operates attachments that need slow speed and power for example, mincing, pasta making, slow slicing, shredding etc.
- Page 5 Stir speed 3: This is with a slow 2½ revolutions then pauses for 30 seconds. Variable speed control: Like all Kenwood kitchen machines Cooking Chef comes with variable speed control. Ranging from 0 – max 1 being slow speed 6...
- Page 6 Get ready to cook, follow these simple steps to get started. To start Lifting the head of the Fitting the Heat Shield. Fitting a tool (K Beater). machine. To cook Plugging the machine in. Setting the temperature. Adding ingredients. To stop Turn mixing speed off.
- Page 7 For more information see: The DVD “Quick Start Guide” Chapter or visit www.kenwoodcookingchef.com Locking the bowl into Lowering the head. Fitting the Splashguard. position. Setting the mixing speed. Cooking will start. Reduce the temperature. Removing the tool. Removing the Heat Shield. Place the bowl onto the Heat Resistant Mat.
- Page 8 Safety Sensor messages Safety Sensor messages: For safety the mixer is fitted with sensors which will operate when using the mixer in cooking mode. Error codes (or E codes) will appear on the machines LCD display accompanied by a beeping sound if an item is not fitted correctly.
-
Page 9: Using The Tools
Using the tools: For best performance the Power Whisk, K Beater and Stirring Tool should be almost touching the bottom of the bowl. If necessary the tools can be adjusted. Simply use the spanner provided to adjust the height of the tool. Note: The tools need to sit roughly 5mm’s above the bottom of the bowl, ensure that the tools are not lowered too much as they may scratch the bottom of the bowl. - Page 10 Flexi Beater: Carefully fit the flexible wiper blade onto the tool by locating the base of the wiper blade into the slot, then feed the sides into the groove. Note: The wiper blade of the Flexi Beater can be removed for easy cleaning. Splashguard: The Splashguard can be used in 2 different ways.
- Page 11 Steamer Basket: The Steamer Basket comes in two parts. The metal base and the plastic outer ring with handles. This makes it much easier to clean after use. Place the plastic outer ring onto the metal base ensuring the handle supports on the ring fit next to the ‘V’ shaped cut outs in the tray. Fold out the handles and clip into place.
- Page 12 U I S S O N E N P L U S...
- Page 13 Introduction Découvrez comment utiliser votre Cooking Chef ! Ce guide vous présente votre robot en détail, les messages de sécurité qui peuvent apparaître sur l’écran, ainsi que des trucs et astuces pour vous aider à utiliser les outils et les accessoires au maximum de leurs capacités.
- Page 14 Découvrez votre robot Sortie ultra rapide: Cette sortie reçoit des accessoires qui nécessitent une grande vitesse de rotation comme le blender, la centrifugeuse ou la râpe rapide. Sortie intermédiaire: Cette sortie est idéale pour utiliser le bol Multifonction. Sortie lente: Cette sortie, plus lente permet de hacher, réaliser des pâtes fraîches, ou encore râper et émincer du fromage ou du chocolat.
- Page 15 Mélange 3: Le robot effectue 2,5 tours toutes les 30 secondes pour les préparations chaudes délicates qui nécessitent une cuisson lente et douce. Le variateur de vitesses: Comme tous les robots Chef & Major Kenwood, le Cooking Chef est doté d’un variateur de vitesses à 8 positions.
-
Page 16: Pour Commencer
Prêt à cuisiner ! Suivez les étapes. Pour Commencer Ouvrez la tête du robot. Installez la protection anti- Installez un outil (batteur K). condensation. Pour cuire Branchez le robot. Réglez la température. Ajoutez les ingrédients. Pour arrêter Remettez la vitesse à 0. Retirez le couvercle anti- Ouvrez la tête du robot. - Page 17 Pour de plus amples informations: regardez le DVD ou rendez vous sur www.kenwoodcookingchef.com Mettez le bol en position. Fermez la tête du robot. Installez le couvercle anti- éclaboussure. Choisissez la vitesse de La cuisson commence. Diminuez la température. mélange. Retirez l’outil. Retirez la protection anti- Posez le bol sur le tapis condensation.
-
Page 18: Messages D'erreur
Messages d’erreur Messages d’erreur: Ces messages, ou codes, peuvent apparaître lorsque le robot est utilisé en mode cuisson. Ils sont accompagnés d’un bip. Le robot arrête de tourner ou ne chauffe pas. E: 01 – Robot ouvert Le variateur de vitesses n’est pas en position “0”et la tête du robot est levée. Solution: Fermer la tête du robot. - Page 19 Utiliser les outils: Pour un résultat parfait, certains outils comme le Fouet, le Batteur souple et le Mélangeur doivent avoir une position parfaite dans le bol. Il est parfois nécessaire de les ajuster. Utilisez la clé fournie pour ajuster leur hauteur dans le bol. Note: Attention ! Les outils ne doivent pas toucher le fond bol, afin de ne pas le rayer.
- Page 20 Le Batteur souple: Pour des raisons d’hygiène, il est nécessaire de démonter le batteur souple après chaque utilisation. Pour cela, installez la gaine souple en bloquant une des extrémités sur la partie dure de l’accessoire. Insérez ensuite la gaine tout autour de l’accessoire et fixez la deuxième extrémité. Le couvercle anti-éclaboussure à...
- Page 21 Le panier vapeur: Le panier vapeur se compose de deux parties distinctes : la base en métal et le bord en plastique sur lequel viennent se clipser les poignées. Il est ainsi plus facile de retirer les aliments fragiles sans les casser, et de nettoyer le panier. Pour le monter, il suffit de venir poser la partie plastique sur la base métal, en faisant coïncider les petites encoches, puis de clipser les poignées.
- Page 23 Cooking Chef en de bijbehorende accessoires kunt halen. Deze machine helpt u om zowel basisgerechten als de meest uitdagende gerechten te bereiden. Van beginners tot experts, de Kenwood Cooking Chef maakt het mogelijk om een veelzijdigheid aan gerechten snel en moeiteloos te bereiden.
- Page 24 De mengkom beschikt tevens over een sensor die de veiligheidsinterlock kan activeren om de veiligheid van de gebruiker te garanderen. Inductiekoken: De Kenwood Cooking Chef maakt gebruik van inductietechnologie. Deze technologie warmt snel op en de temperatuur is zeer nauwkeurig in te stellen dankzij de twee sensoren die zich onder de mengkom bevinden.
- Page 25 22 omwentelingen per minuut. Roersnelheid 2: Interval snelheid, elke 5 seconden maakt de keukenmachine 2,5 omwenteling. Roersnelheid 3: Interval snelheid, elke 30 seconden maakt de keukenmachine 2,5 omwenteling. Variabele snelheidsregeling: Zoals alle Kenwood keukenmachines beschikt de Cooking Chef over een variabele snelheidsregeling.
- Page 26 Het koken kan bijna beginnen, volg deze simpele stappen om te beginnen. Om te beginnen Haal de kop van de machine Plaats het hitteschild. Plaats een accessoire voor de omhoog. mengkom (bijv. de K-klopper). Om te koken Doe de stekker in het Stel de temperatuur in.
- Page 27 Voor meer informatie bekijkt u het “Accessoires” deel op de DVD of bezoekt u www.cookingchef.nl Zorg ervoor dat de Haal de kop van de machine Plaats de spatdeksel. mengkom goed is geplaatst. omlaag. Stel de mengsnelheid in. Het koken zal beginnen. Verlaag de temperatuur.
- Page 28 Berichten van de veiligheidssensor Berichten van de veiligheidssensor: Tijdens het kookproces zullen foutmeldingen worden weergegeven op het display indien zich problemen voordoen. Deze berichten zorgen voor extra veiligheid en garanderen dat u het beste haalt uit uw Cooking Chef. De foutmeldingen worden tijdens het koken weergegeven.
- Page 29 Het gebruik van de accessoires: Voor het beste resultaat moeten de ballongarde, de K-klopper en het roeraccessoire de bodem van de mengkom bijna raken. Indien nodig kunnen de accessoires hierop worden aangepast. Gebruik de moersleutel die bij de accessoires wordt geleverd en pas de hoogte van het accessoire aan. Opmerking: De accessoires dienen ongeveer 5 mm boven de bodem van de mengkom te eindigen.
- Page 30 Flexi-klopper: Plaats de flexibele rubberen banden voorzichtig op het metalen accessoire, door aan de onderkant te beginnen en ze daarna bovenaan het accessoire vast te maken. Opmerking: de rubberen banden kunnen gemakkelijk verwijderd worden om schoon te maken. De spatdeksel kan op twee manieren worden gebruikt. Het kan gebruikt worden als deksel Spatdeksel: voor de mengkom, waarbij de vulopening gebruikt kan worden om ingrediënten toe te voegen of als een deksel tijdens het koken -net zoals de deksel van een pan- om de stoom in de mengkom te behouden.
- Page 31 Stoommand: De stoommand wordt in twee delen geleverd. De metalen basis en de kunststof ring met handvatten. Dit vergemakkelijkt het reinigen. Plaats de kunstof ring op de metalen onderkant en zorg ervoor dat de handvatten precies in de daarvoor bestemde uitsparingen vallen. Klap de handvatten uit en klik ze vast.
- Page 33 Einleitung Der ‘Quick Start Guide’ hilft Ihnen, sich schnell mit Ihrer KENWOOD Cooking Chef vertraut zu machen und sie leicht und problemlos in Betrieb zu nehmen. Die Küchenmaschine zeichnet sich durch ihre sichere und einfache Bedienung aus. In dieser Kurzanleitung werden sämtliche Produkteigenschaften sowie die Sicherheitssensor-...
-
Page 34: Das Bedienfeld
über einen Sensor aktivierte Verriegelungssystem sorgt für eine sichere und gefahrlose Bedienung, auch bei großen Mengen. Kochen mit Induktionstechnik: Die KENWOOD Cooking Chef bedient sich modernster Induktionstechnologie. Das Induktionskochfeld heizt sich sehr schnell auf. Dank der beiden Messfühler unter der Schüssel lässt sich die... - Page 35 Rührstufe 3: Intervallrühren: 2½ Umdrehungen alle 30 Sekunden. Stufenlose Geschwindigkeitsregulierung: So wie alle KENWOOD-Küchenmaschinen, zeichnet sich auch die Cooking Chef durch eine stufenlose Regulierung der Geschwindigkeiten im Bereich von 0 - Max.aus, wobei Stufe 1 für niedrige Geschwindigkeit und Stufe 6 für hohe Geschwindigkeit steht.
- Page 36 Vorbereitungen zum Kochen - Befolgen Sie bitte die nachstehenden, einfachen Schritte. Vorbereitung Rührarm anheben. Wärmeschutz anbringen. Rührelement einsetzen (K-Haken). Kochen Kabel einstecken. Temperatur einstellen. Zutaten zugeben. Kochvorgang beenden Rührgeschwindigkeit wieder Spritzschutz entfernen. Rührarm anheben. auf ‘0’ setzen.
- Page 37 Weitere Informationen entnehmen Sie der DVD oder besuchen Sie uns unter www.kenwoodcookingchef.com Schüssel einrasten lassen. Rührarm senken. Spritzschutz aufsetzen. Rührgeschwindigkeit Kochvorgang startet. Temperatur reduzieren. einstellen. Rührelement entfernen. Wärmeschutz abnehmen. Rührschüssel auf hitzebeständige Unterlage setzen.
- Page 38 Sicherheitssensor-Meldungen Sicherheitssensor-Meldungen: Zu Ihrer Sicherheit ist die Cooking Chef mit Sicherheitssensoren ausgestattet. Bei nicht gesicherten Anschlüssen stehen bestimmte Maschinenfunktionen, selbst bei Auswahl, nicht zur Verfügung. Es folgt ein akustisches Warnsignal und eine Fehlermeldung im Display (z. B. E:01). Die Maßnahmen zur Beseitigung der Fehler finden Sie im Anschluss.
- Page 39 Gebrauch der Rührelemente: Die beste Leistung mit Profi-Ballonschneebesen, K-Haken und Koch-Rührelement erzielen Sie, wenn diese den Boden der Schüssel fast berühren. Verändern Sie bei Bedarf die Höhe der Rührelemente mit Hilfe des im Lieferumfang enthaltenen Schraubenschlüssels. Hinweis: Die Rührelemente sollten sich ein paar Millimeter über dem Schüsselboden befinden. Sie dürfen nicht zu tief hängen, da sie sonst den Boden der Schüssel verkratzen.
- Page 40 Flexi-Rührelement/Profi-Patisserie Haken: Den Gummiflügel am oberen Ende des Rührelements anbringen und die Seiten vorsichtig in die dafür vorgesehene Rille drücken. Hinweis: Das/der Flexi- Rührelement / Profi-Patisserie Haken lässt sich Dank des abnehmbaren Gummiflügels problemlos reinigen. Der Spritzschutz lässt sich auf zweierlei Arten nutzen: Er dient zum Einen als Abdeckung, Spritzschutz: um ein Herausspritzen von Zutaten zu verhindern.
- Page 41 Dampfgareinsatz: Der Dampfgareinsatz kommt als zweiteiliges Set: zum einen der Edelstahlboden sowie der äußere Kunststoffring mit Haltegriffen. Dadurch lässt er sich nach dem Gebrauch problemlos reinigen. Setzen Sie den äußeren Kunststoffring auf den Edelstahlboden. Dabei sollten die Griffhalterungen auf dem Ring in die “V”-förmigen Aussparungen im Einsatz passen. Griffe aufklappen und einrasten lassen.
- Page 43 Introduzione Questa Guida rapida di consultazione ti servirà per imparare in poco tempo ad utilizzare con facilità il tuo Kenwood Cooking Chef. La macchina è sicura e molto semplice da usare. Basta seguire questi primi veloci consigli per conoscere le potenzialità del prodotto, come funziona e cosa significano i messaggi che appaiono sul display.
- Page 44 Vedi libro Per le attrezzature opzionali Kit di miscelazione: Kenwood Cooking Chef, come tutte le kitchen machine Kenwood, è un’impastatrice con movimento planetario. Questo consiste in un sistema di miscelazione costituito da due distinti e combinati movimenti rotatori eseguiti dalla frusta che gira sul proprio asse (primo movimento).
- Page 45 Velocità di rimescolamento 3: movimento in cottura per 2 giri e ½ con intervallo di 30 secondi. Selettore delle velocità di lavorazione: Come tutte le kitchen machine, anche Kenwood Cooking Chef ha un selettore delle velocità, selezionabili in continuo da un minimo di 0 fino ad un max di 6.
- Page 46 E adesso si cucina! Segui questi semplici passaggi per iniziare: Per iniziare Alzare la testa della macchina. Fissare la protezione termica. Inserire uno degli utensili di miscelazione (Frusta a K, ...). Per cuocere Inserire la spina. Selezionare la temperatura. Aggiungere gli ingredienti. Per spegnere Riportare la manopola di Rimuovere il paraschizzi.
- Page 47 Per maggiori informazioni, puoi guardare direttamente il DVD allegato oppure visita il sito www.kenwoodcookingchef.com Posizionare la ciotola. Abbassare la testa. Inserire il paraschizzi. Selezionare la velocità. Inizia la cottura. Abbassare la temperatura. Togliere l’utensile per Rimuovere la protezione Appoggiare la ciotola sopra mescolare.
-
Page 48: Messaggi Di Sicurezza
Abbassare la testa. Portare il selezionatore delle velocità a ‘0’ e iniziare di nuovo. E: 02 – La ciotola Il messaggio E:02 appare quando la ciotola di Kenwood Cooking Chef non è inserita correttamente. Soluzione: Sistemare la ciotola, facendo attenzione che il logo sia sempre sul fronte della macchina. - Page 49 Per usare il kit di miscelazione: Per poter utilizzare al meglio la Frusta a filo grosso, la Frusta a K e il Gancio con spatola a spirale, è consigliabile che la punta dell’accessorio sfiori il fondo della ciotola. Per fare questo viene data in dotazione una brugola.
- Page 50 Per inserire le alette flessibili separabili è sufficiente inserire la Gancio a mezzaluna per la cottura: base delle alette nel solco della frusta. Inoltre, viene fornito in dotazione anche uno scovolino per pulire all’interno delle alette. Attenzione: le alette flessibili sono removibili per una miglior pulizia. Il Paraschizzi può...
- Page 51 Il Cestello è formato da 2 parti: la base in metallo e l’anello in Cestello per la cottura a vapore: plastica con in manici. Questo semplifica l’uso e la pulizia. L’anello di plastica va posizionato inserendolo nella base in metallo, facendo attenzione che i manici siano infilati negli appositi punti “V” per fissarli correttamente.
- Page 52 www.kenwoodcookingchef.com www.kenwoodworld.com...
Need help?
Do you have a question about the Cooking Chef Major and is the answer not in the manual?
Questions and answers
Do you have parts for Kenwood Cooking Chef KM080 Series?