Advertisement
Quick Links
Contents
Inspect the packaging carton. Make sure the H.264 HD-SDI DVR is properly delivered. Remove all
items from the box and make sure the box contains the following items.
Contents
Inspect the packaging carton. Make sure the H.264 HD-SDI DVR is properly delivered. Remove all
items from the box and make sure the box contains the following items.
H.264 HD-SDI DVR
H.264 HD-SDI DVR
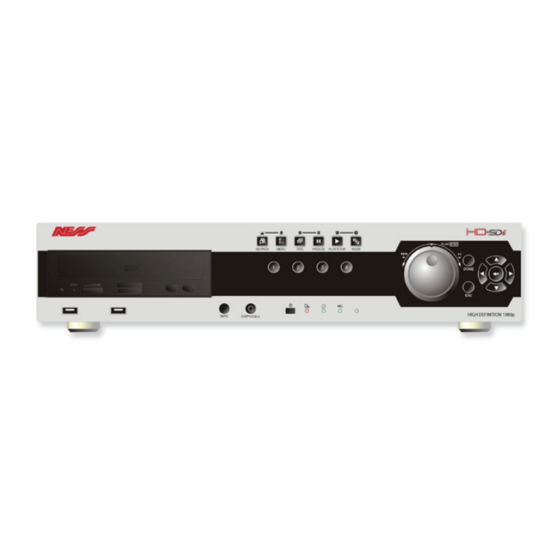
Front Panel
Front Panel
12
12
1
DOME
2
SEQ
3
MODE
1
DOME
4
MENU
2
SEQ
3
MODE
5
Channels
4
MENU
6
Alarm LED
5
Channels
7
Record LED
8
Network LED
6
Alarm LED
7
Record LED
9
Direction Keys
8
Network LED
10
Shuttle/ Jog
9
Direction Keys
00P5DG800Z1SEA1
10
Shuttle/ Jog
H.264 HD-SDI DVR
Setup Guide
H.264 HD-SDI DVR
Setup Guide
SATA Cable
SATA Cable
Mounting Kit
Mounting Kit
5
13
Press this key to enter Dome Camera Control mode.
Press this key to start automatic sequence display of cameras.
Press this key to view in full-screen or multiple window modes.
Press this key to enter Dome Camera Control mode.
Press this key to enter the OSD setup menu.
Press this key to start automatic sequence display of cameras.
1. In Live and Playback modes, press any key to view the corresponding
Press this key to view in full-screen or multiple window modes.
video in full-screen.
2. In input interface, 1~4 can be used for direct input of numbers 1~4.
Press this key to enter the OSD setup menu.
3. In Dome Camera Control mode, 1 is for entering the Set/ Go preset
1. In Live and Playback modes, press any key to view the corresponding
menu.
video in full-screen.
It lights up when an alarm is triggered.
2. In input interface, 1~4 can be used for direct input of numbers 1~4.
3. In Dome Camera Control mode, 1 is for entering the Set/ Go preset
It blinks when videos are being recorded.
menu.
It lights up when network is connected. In addition, it blinks when data is
It lights up when an alarm is triggered.
being transmitted via the network.
1. In Zoom mode, these keys function as normal direction keys.
It blinks when videos are being recorded.
2. In the OSD setup menu, the direction keys are used to move the
It lights up when network is connected. In addition, it blinks when data is
cursor to previous or next fields. To change the value in the selected
being transmitted via the network.
field, press UP / DOWN keys.
1. In Zoom mode, these keys function as normal direction keys.
This is used to control playback operations.
2. In the OSD setup menu, the direction keys are used to move the
cursor to previous or next fields. To change the value in the selected
field, press UP / DOWN keys.
This is used to control playback operations.
Ness H.264 HD-SDI DVR
Setup Guide
Remote Controller
Remote Controller
Software CD-CMS
Software CD-CMS
4
2
3
16
14 15
11
6
8
7
Power Cord
Power Cord
User's Manual
User's Manual
1
17
10
18
9
1
Advertisement

Subscribe to Our Youtube Channel
Related Manuals for Ness 104-440


Summary of Contents for Ness 104-440
- Page 1 Ness H.264 HD-SDI DVR H.264 HD-SDI DVR Setup Guide Setup Guide H.264 HD-SDI DVR Contents Setup Guide Inspect the packaging carton. Make sure the H.264 HD-SDI DVR is properly delivered. Remove all items from the box and make sure the box contains the following items.
- Page 2 1. Press this switch to power on the DVR. The LED will be lightened up. Power Switch 2. Press and hold this key to quick shutdown the DVR. The LED will blink when the power source is still available. The USB 2.0 ports allow users to connect an external USB device to the USB 2.0 Ports unit, such as a USB ThumbDrive©...
- Page 3 The USB 2.0 port locates on the rear panel is for users to connect USB 2.0 Port external USB devices to the unit, such as ThumbDrive® or a USB mouse. Pin Definition of Audio I, Alarm I/O & RS-485: Pin Definition Pin Definition Pin Definition Pin Definition...
- Page 4 Basic Setup Enter the OSD main menu and setup some basic configuration of the DVR. The basic configuration can be set via either the DVR or DVRRemote, the remote software. Enter OSD Main Menu: • Press MENU to enter the OSD main menu. •...
- Page 5 Dome Camera Control Dome Camera Connection & Settings: • See section Pin Definition of Audio In, Alarm I/O & RS-485 for RS-485 port pin definition. • Refer to the following figure. Connect the R+, R− terminals on the dome camera to the D+, D− terminals on the RS-485 port by RS-485 cable respectively.
- Page 6 Basic Playback Operation Search By Time: • Press SEARCH to enter the Search menu. • Move the cursor to “From” and press ENTER will start playing recorded video from the specified “From” time. • Move the cursor to “End” and press ENTER will start playing recorded video from the specified “End”...
-
Page 7: Button Description
Smart Search: • Press SEARCH to enter the Search menu. • Move the cursor to <Smart Search> and press ENTER. The Smart Search menu will show up. • Specify the From/End time to search for recorded video within the period. •... - Page 8 DVR Status Bar Icons Icons that will be displayed in the status bar are listed in the following table with their descriptions. Item Icon Description Item Icon Description Main Monitor Quick Export Call Monitor Stamp A Monitor Active / Inactive Stamp B Sequence Lock...
- Page 9 Connect the DVR via the Remote Software Setup Requirements: • Make sure the PC is connected to the Internet. • Obtain IP address of the H.264 HD-SDI DVR. To check the DVR’s IP address, press MENU on the front panel and select <System Setup> <Network Setup>...
- Page 10 The following picture shows the display window of the DVRRemote: Refer to the table below for brief description of functional items: Item Description Item Description Instant Recording 10 Setup Menu 11 Search Event List Deflicker On/Off at Playback 12 Capture Snapshot Smoothen the Image Audio On/Off 13 4:3 Viewing Aspect...
- Page 11 DVRRemote Playback Playback Remote Video: • Click <Play> on the main window toolbar, and then <Remote Playback> tab. • The <From> and <To> on top of the screen display the date and time from which recorded video is available for playback. •...
- Page 12 All rights reserved. No part of this publication may be reproduced, transmitted or stored in a retrieval system in any form or by any means, electronic, mechanical, photocopying, recording, or otherwise, without the prior written permission of Ness. Ness reserves the right to make changes to features and specifications at any time without prior notification in the interest of ongoing product development and improvement.
Need help?
Do you have a question about the 104-440 and is the answer not in the manual?
Questions and answers