Table of Contents
Advertisement
Quick Links
Advertisement
Table of Contents

Related Manuals for Pace DSL4000


Summary of Contents for Pace DSL4000
- Page 1 ® DSL4000 Set-top Box User Guide...
-
Page 2: Your Remote Control
YOUR REMOTE CONTROL The remote control supplied with your DSL4000 set-top box is shown below. You use certain buttons to control the Web browser when ‘surfing the Web’. For more details, please see later sections of this Guide. Light Standby... -
Page 3: Table Of Contents
CONTENTS Safety first! ..................... 2 Using equipment safely ..................2 Connecting to the mains supply ..............3 Electrical information (UK and Eire only) ............3 Welcome! ......................4 About this User Guide ..................4 The Internet comes to your TV! ............... 4 Never used the Internet before? .............. -
Page 4: Safety First
SAFETY FIRST! Using equipment safely This set-top box has been manufactured to meet international safety standards, but you must take care to operate it safely. It is important that you read these safety instructions. If you have any doubts about the installation, operation or safety of this set-top box, please consult your supplier. -
Page 5: Connecting To The Mains Supply
Connecting to the mains supply Electrical information On either the rear panel or the base of the set-top box, (UK and Eire only) there is a label which specifies the correct mains supply for the set-top box. Do not connect the set-top box to Mains plug and its fuse any supply other than this. -
Page 6: Welcome
WELCOME! About this User Guide This Guide is mainly written with your remote control in mind, when you control your set-top box (see inside the front cover). However, there may come a time when you want to use other means of control, such as a mouse and/or a keyboard. -
Page 7: Keeping Up-To-Date
NOTE Because of the almost infinite number of ways that Web pages can be designed, not all Web pages on the Internet may display properly on your TV screen. You may also see error messages from time to time (example on page 16) which appear because the Web browser cannot find the requested Web page, or because the page itself contains errors. -
Page 8: Untangling The Web
UNTANGLING THE WEB This part of the Guide describes the Internet and some of its main features. If you are already familiar with the Internet, you can move straight on to the section ‘Take control!’, on page 8. What is the Internet? The Internet is millions of computers around the world, linked together by various means, including telephone lines. - Page 9 Surfing the Web There are several ways in which you can get to a Web site. (This section refers to certain commands you can select when you use your set-top box’s Web browser). • If you know the Web site’s URL address, you can select ‘Go to...’ and type in the URL to display the first page (known as the Home page) of the Web site immediately.
-
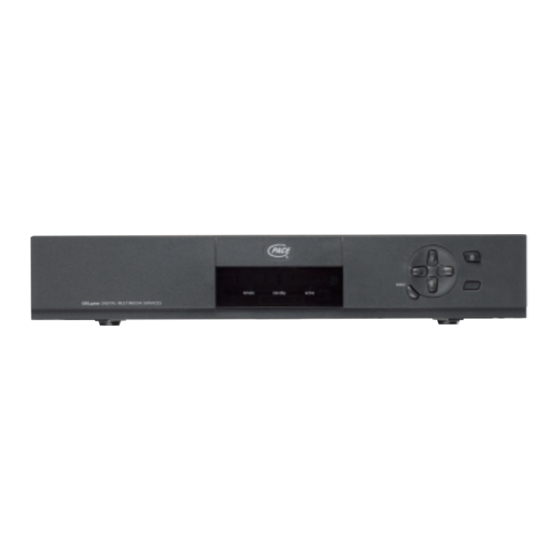
Page 10: Take Control
(e.g. receiving Web pages). The light goes out when your box on and off set-top box is switched to ‘standby’. select remote standby active DSL4000 DIGITAL MULTIMEDIA SERVICES ‘remote’ ‘standby’ ‘active’ ‘select’ arrow buttons Reset... -
Page 11: Just Browsing
JUST BROWSING! The Web browser When you first switch on your set-top box, you will see your service provider’s ‘Home’ page. The screen shown below is just an example – it is very likely that the actual screen will be quite different. -
Page 12: Basic Browsing Techniques
Basic browsing techniques Highlighting Generally, whenever you display a page in the Web browser, one item on the page (a word, phrase or picture) will be highlighted by having a coloured box around it. Items which can be highlighted are called links. When a link is a word in a passage of text, it is a different colour from the text around it, and may also be underlined. -
Page 13: Toolbar 1
Toolbar 1 Home To go to the ‘Home’ Change toolbar Up arrow To move Down arrow To move down page. This is a Web page (three horizontal arrows) up the current Web the current Web page one address (URL) chosen by To select toolbar 2 page one screen at a screen at a time. -
Page 14: First Steps
‘Home’ page of Pace Micro Technology plc will appear on your TV screen. Congratulations! You have now completed the exercise. If you wish, you can now explore the Pace Web site by highlighting and selecting the various links. -
Page 15: Toolbar 2
Toolbar 2 Favourites History Change toolbar Up arrow See ‘Toolbar 1’ Down arrow See ‘Toolbar 1’ See page 14. See page 15. (three horizontal arrows) on page 11. on page 11. To select toolbar 3 (see below). Options Save To add the title of the Cog wheels See See page 24. -
Page 16: Favourites
Edit favourites CNN Home Page CNN Technology News Disney Home Page Pace Home Page Edit favourites To show your ‘Favourites’ list, highlight the Favourites icon in toolbar 2 and then press Select. To show a Web page listed in your ‘Favourites’ list, highlight the Web page title and then press Select. -
Page 17: History
To show a Web page listed in the ‘History’ list, highlight the Web page title and then press Select. A-Z list Welcome to NCFresco Pace Home Page Alta Vista: Main Page Zoological Society of London Disney.com – Where the magic lives online! A-Z list To view the ‘History’... -
Page 18: Error Messages
Error messages Occasionally, a message box may appear, similar to the one shown below. This may happen, for example, if you select a link to a Web page which no longer exists. To remove the message box from the screen, simply highlight the Continue button and then press Select. -
Page 19: Write On
WRITE ON! The on-screen keyboard You can make a keyboard appear on the screen by pressing the red button on your remote control. You need a keyboard to type words, numbers and punctuation marks etc. when you write e-mails or complete a form, to specify a Web page address to go to, or perhaps to enter your name and a password in a request box. -
Page 20: A Plug-In/Wireless Keyboard
A plug-in/wireless keyboard You can use a PS/2 keyboard (not supplied) to control your set-top box through a cable, or by means of a wireless (infra-red) transmitter. See ‘Optional equipment’ on page 28. A PS/2 keyboard layout is very similar to the ‘QWERTY’ layout of the on-screen keyboard (see page 17). -
Page 21: Bells And Whistles
BELLS AND WHISTLES! Further browsing techniques List boxes Instead of typing your own text, you may be - select - given a fixed list of options to choose from. You First Box will see a grey box with a menu button Products its right-hand side. - Page 22 Frame navigation graphics Some Web pages are made up of adjoining areas called ‘frames’. Special navigation graphics (see below) appear at the frame borders; they allow you to move between frames using the arrow buttons on your remote control. When you press an arrow button to move the on-screen highlight towards a frame border graphic (blue when unhighlighted), that graphic becomes highlighted (orange).
-
Page 23: Sound Toolbar
Sound toolbar This toolbar allows you to play sounds (audio) associated with certain Web pages. The toolbar will appear when you highlight, and then select, an associated link on a Web page. To hide this toolbar, press the blue button on your remote control (or press the middle mouse button). -
Page 24: Advanced Typing - Ps/2 Keyboard Shortcuts
Advanced typing – PS/2 keyboard shortcuts If you are using an optional PS/2 keyboard, you can use the following keyboard shortcuts to perform certain actions, in addition to those available when you use your remote control. Some shortcuts use more than one key, for example Ctrl-A means “while you hold down the Ctrl key, press the A key”. -
Page 25: A Plug-In/Wireless Mouse
A plug-in/wireless mouse You can use a PS/2 mouse (not supplied) to control your set-top box through a cable, or by means of a wireless (infra-red) transmitter. See ‘Optional equipment’ on page 28. Place the mouse on a flat, clean surface when you are using it. Do not use the mouse on soft furnishings or on a carpet. -
Page 26: Suits You
SUITS YOU! The Options screens From this screen you can display other screens, at which you can choose various preferences, and view copyright information and acknowledgments. Highlight and select the ‘Option’ button you want. To return to the previous Web page, highlight and select the Close button. Close Text This screen allows you to change the size of the text displayed on Web pages. -
Page 27: Printers
Printers This screen allows you to choose the type of printer you have (from those listed, or none), the printer paper size, and whether you want to print in colour or black & white. To choose an option, highlight the appropriate round button and press Select. To go to the next screen, highlight the Next... -
Page 28: Sounds
Close Copyright acknowledgments This screen displays copyright information and other acknowledgments for the DSL4000 set-top box and its software. Highlight and select the Information button you want. After reading the information, highlight and select the Close button to return to the previous screen. -
Page 29: Television
Television This screen allows you to inform your set-top box of the type of TV (normal/widescreen) you are using, and which picture format (box/zoom/stretch) you prefer. You can also choose whether or not to enable widescreen signalling: • ‘Yes’ means that your set-top box will instruct your TV to do the picture scaling – this can give a better quality picture. -
Page 30: Optional Equipment
OPTIONAL EQUIPMENT Connecting a mouse and keyboard Instead of using your remote control with the Web Browser, you can connect a PS/2-compatible mouse and/or a PS/2-compatible keyboard to the rear of your set-top box, as shown below. Alternatively, you can connect a PS/2-compatible ‘remote eye’ for use with an infra- red keyboard and mouse. -
Page 31: Remote Control
REMOTE CONTROL Programming your remote control Your DSL4000’s remote control is capable of controlling the volume and mute functions of most TVs available today. If you want to take advantage of this, follow the instructions below. Look through the ‘setup codes’ (see next page) for the brand of your TV. There will either be a list of numbers or one single 3-digit number next to the maker’s name. -
Page 32: Setup Codes For Your Remote Control
SETUP CODES FOR YOUR REMOTE CONTROL Brand of TV Setup codes Brand of TV Setup codes Akai 102 104 112 114 116 239 Memorex Akura 117 118 147 207 217 239 Mitsubishi 154 190 204 228 239 Alba 133 207 Amstrad Nikkai Beko... -
Page 33: Don't Panic
DON’T PANIC! Troubleshooting guide Before calling for assistance, make a few simple checks by going through the list of possible problems below. If you still cannot solve your problem, then contact your service provider for assistance. Problem Probable Cause Suggested Remedy No display on your TV Incorrect connection to TV. - Page 34 Problem Probable Cause Suggested Remedy You cannot find the The page may have many links, Press the arrow buttons on your remote highlight box on the Web which can make the highlight control to move the highlight until you can page you are looking at.
-
Page 35: Specifications
SPECIFICATIONS General Operating voltage: 110–240 V AC, single phase, 50/60 Hz Power consumption: 10 W (max.) Standby consumption: 8 W (max.) Weight: 3.5 kg (packed) Dimensions (W x H x D) 360 mm x 68 mm x 247 mm UHF modulator: PAL System I or B/G/H;... - Page 36 Rear panel connectors TV SCART Signal Signal Audio output right Not connected Audio output left Ground Ground Not connected Blue video output Function switching Ground Not connected Green video output Not connected Ground Ground Red video output Fast blanking Ground Ground Composite video output 20 Not connected...
- Page 37 Rear panel connectors Parallel port Signal Signal Data strobe* Data 1 Data 2 Data 3 Data 4 Data 5 Data 6 Data 7 Data 8 Acknowledge* Busy Paper error Select Auto feed* Error* Init* Select in* Ground Ground Ground Ground Ground Ground Ground...
- Page 38 NOTES...
- Page 39 NOTES...
- Page 40 ® Pace Micro Technology plc Victoria Road Saltaire Shipley West Yorkshire BD18 3LF England www.pace.co.uk Pace are trademarks of Pace Micro Technology plc. ® ® 502-1307001...
Need help?
Do you have a question about the DSL4000 and is the answer not in the manual?
Questions and answers