Advertisement
Overview

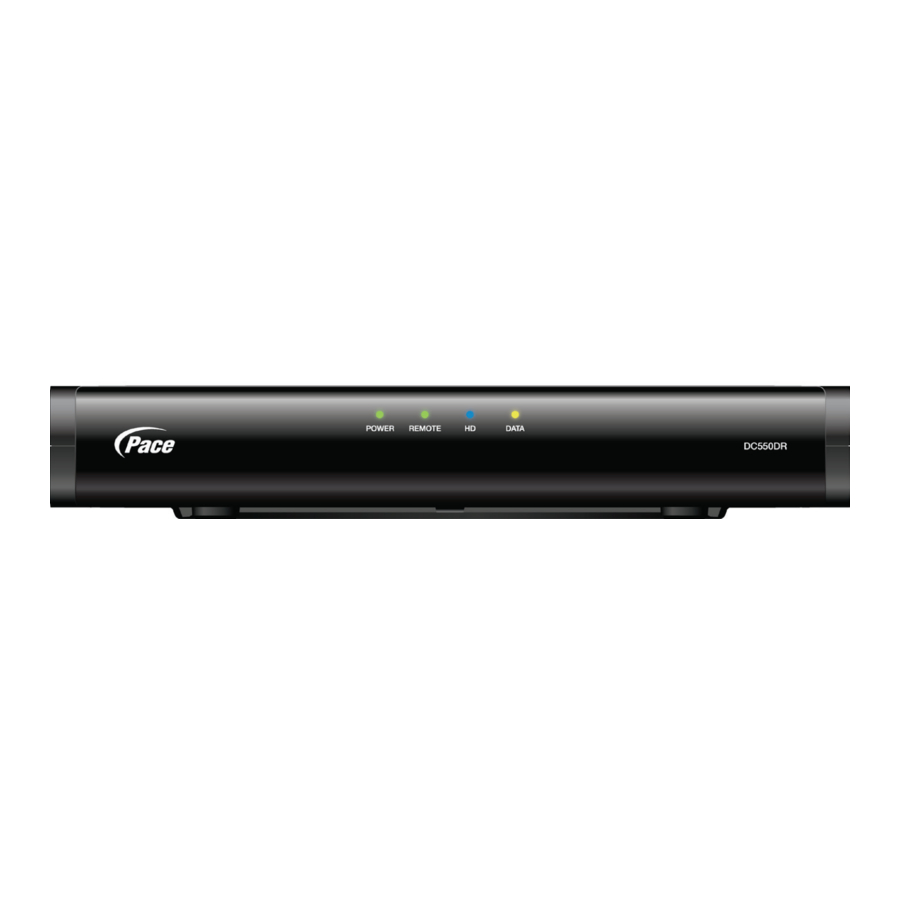
DC550DR High-definition digital set-top
POWER light
Lights green when your set-top is on; not lighted when your set-top is in standby or is disconnected from the power supply
REMOTE light
Lights green when your set-top is receiving a signal from your remote control
HD light
Lights blue when your set-top outputs High-Definition Television (HDTV) content
DATA light
Lights yellow when your set-top is receiving data and when there is an unread message

Connecting your device
- Decide which connections work best with your equipment.
Depending on the type of TV and other equipment you have, choose the connections that will provide the best quality video and audio. Refer to your equipment user manuals and the tables provided in this guide. - Connect your DC550DR to your cable service.
Connect the cable from your cable wall outlet to the CABLE IN connector on the rear panel of your DC550DR. - Connect the DC550DR to your TV and other equipment.
Once you have decided which audio and video connections you need to make, refer to the illustrations in this guide to connect your DC550DR to your TV and other A/V equipment. - Turn on your DC550DR.
Plug the 5-volt cord from the power supply unit into the power input socket (labelled DC IN +5V) on the rear panel of your DC550DR, then plug the power supply unit into the wall AC outlet using the power cord supplied.
Press the POWER button on your remote control - the DC550DR will turn on. - Enjoy digital TV!
Use the User Settings menu (see below) to fine-tune your setup. Any problems? Refer to the Troubleshooting section of this guide and to your equipment user manuals.
Standard-definition video connections (SDTV)
| Video quality | TV video input | DC550DR video output | Includes audio? |
| Standard | Composite Video | VIDEO OUT | No |
High-definition video connections (HDTV)
| Video quality | TV video input | DC550DR video output | Includes audio? |
| Top | HDMI ® | HDMI | Yes |
| DVI * | HDMI | No | |
| High | Component (YPbPr) | COMPONENT VIDEO | No |
* HDMI adapter required, or use an HDMI-to-DVI cable
Alternate audio connections
| Audio quality | Audio connections |
| Top | OPTICAL AUDIO OUT (S/PDIF) |
| High | AUDIO OUT (stereo L and R) |
Note: If you use the optional RF connections (shown by dashed lines in the setups overleaf), you must tune your TV (and VCR) to your set-top's VHF output channel (3 or 4: consult your cable service provider to find which channel it is for your location). Consult the manuals supplied with your TV and VCR for information on RF tuning.
Connections
HDTV with optional home theater

using a single video and audio connection
HDTV and home theater

using component video and digital audio connections
SDTV only

using composite video and audio connections
SDTV and VCR/DVD recorder

using composite video and audio connections
Note: Video signals fed through a VCR or DVD recorder may be affected by copyright protection systems, which can cause distortion of the picture on your TV. If there is distortion when you view via the composite video path, the RF path may give a better picture.
HDTV only

using separate video and audio connections
SDTV, VCR/DVD recorder, and home theater

using composite video and audio connections
SET-TOP SETUP
You can use the PACE USER SETTINGS menu to change your set-top's setup. The settings you can change are shown in the table below.
- Make sure your set-top is turned on (the POWER light is green).
- Press the POWER button on your remote control, then press the Menu button. The USER SETTINGS menu is displayed on your screen.
- Use the
![]() ,
, ![]() ,
, ![]() , and
, and ![]() buttons to navigate the menus and the OK/Select button to confirm your choices. See the example below.
buttons to navigate the menus and the OK/Select button to confirm your choices. See the example below. - Press POWER to remove the menu and return to normal viewing.


PACE USER SETTINGS MENU
| Menu item | Description | Options* |
| TV Aspect Ratio | Choose your TV screen' s shape | 4:3 or 16:9 |
| TV Display Capability | Choose the screen resolutions your TV is capable of displaying | 1080i, 720p, 480p, 480i, 1080p24 Pass, and/or 1080p30 Pass |
| Auto Pillarbox | If your 16:9 TV doesn't automatically detect programs transmitted in 4:3, choose to have black bars added to the sides of 4:3 programs | Yes or No |
| Closed Captions | Choose to display subtitles and alerts on your TV screen | On or Off, and Configure Captions |
| Front Panel Settings | Set the brightness level of the front-panel lights (but not the POWER light) | Standby Brightness: Low, Std, or High |
| Viewing Brightness: Low, Std, or High | ||
| HDMI Settings | Choose an Audio Output Mode, and to enable or disable automatic detection of a newly connected HDTV (when using an HDMI cable) | Audio Output Mode: Auto, L-PCM, or Pass Through |
| Disable Auto Detect: Yes or No | ||
| Restore Defaults | Restore the user settings to their factory defaults | - |
*Factory default settings shown in bold.
This guide describes some on-screen displays such as menus. These may change in the future.
TROUBLESHOOTING
| Check | Suggested solution | Further checks, if there is still a problem |
Is anything lighted on your set-top's front panel  | Press the POWER button on your remote control to turn on your set-top. | Make sure that the power supply unit is properly plugged in. If there is a switch by the wall AC outlet, switch it ON. Check that the wall AC outlet is working. |
Does your remote control operate your set-top | Check if the POWER light on the front panel is green. If it is not, press POWER on your remote control to turn on your set-top. | Check that nothing is blocking the path from your remote control to the front panel. Check that your remote control is working and is set to operate your set-top. If your remote control will still not operate your set-top, replace the batteries in your remote control. |
Can you see a picture on your TV screen | Check that your TV and other equipment are plugged in and turned on. | Check that you have selected the appropriate A/V input on your TV. If you are using the HDMI connection, make sure it goes directly from your set-top to your TV. Try disconnecting and reconnecting the standard HDMI cable. Make sure the set-top's TV Display Capability settings are appropriate for your TV. Press the HD/ZOOM button until a picture appears. |
Is the picture distorted or too small  | Check that the TV Aspect Ratio and TV Display Capability, as set on your set-top, are appropriate for your TV. | If your TV is a 16:9 TV, you can use Auto Pillarbox to add black borders to 4:3 transmissions, so that the picture is not stretched. If the set-top's settings are correct, try adjusting your TV's display. |
Can you display menus and guides on the screen | If your TV is connected to the VIDEO OUT connector, you will see menus and guides only if the resolution 480i is set to "Yes" and all others are set to "No". | Change the TV Display Capability resolution settings if necessary. |
If you are still having problems, contact your cable service provider.
Documents / ResourcesDownload manual
Here you can download full pdf version of manual, it may contain additional safety instructions, warranty information, FCC rules, etc.
Download Pace DC550DR - High-Definition Digital Set-Top Quick Start Guide
Advertisement


Need help?
Do you have a question about the DC550DR and is the answer not in the manual?
Questions and answers