Petsafe Venture PDT00-11875 Operating And Training Manual
Venture series remote training
Hide thumbs
Also See for Venture PDT00-11875:
- Operating and training manual (24 pages) ,
- Operating and training manual (24 pages)
Table of Contents
Advertisement
Quick Links
PetSafe
Venture Series
®
™
Remote Training
Operating and Training Guide
PDT00-11875 – Little Dog Trainer
PDT00-11876 – Big Dog Trainer
PDT00-11877 – Long Range Trainer
PDT00-11951 – 400 Yard Little Dog Add-A-Dog
®
PDT00-11952 - 1000 Yard Big Dog Add-A-Dog
®
PDT00-11953 – 1000 Yard Add-A-Dog
®
Please read this entire guide before beginning.
Advertisement
Table of Contents

Subscribe to Our Youtube Channel
Related Manuals for Petsafe Venture PDT00-11875


Summary of Contents for Petsafe Venture PDT00-11875
-
Page 1: Operating And Training Guide
Venture Series ® ™ Remote Training Operating and Training Guide PDT00-11875 – Little Dog Trainer PDT00-11876 – Big Dog Trainer PDT00-11877 – Long Range Trainer PDT00-11951 – 400 Yard Little Dog Add-A-Dog ® PDT00-11952 - 1000 Yard Big Dog Add-A-Dog ®... - Page 2 If you are unsure whether this product is appropriate for your dog, please consult your veterinarian or certified trainer. The PetSafe Venture Series Remote Trainer is not a toy. Keep away from ®...
-
Page 3: Table Of Contents
Thank you for choosing the PetSafe brand. You and your pet deserve ® a companionship that includes memorable moments and a shared understanding together. Our products and training tools promote a lifestyle of protection, teaching, and love—essentials that influence memories for a lifetime. If you have any questions about our products or training your pet, please visit our website at www.petsafe.net or contact our Customer Care Center at 1-800-732-2677. To get the most protection out of your warranty, please register your product within 30 days at www.petsafe.net. By registering and keeping your receipt, you will enjoy the product’s full warranty and should you ever need to call the Customer Care Center, we will be able to help you faster. Most importantly, PetSafe will never give or sell your valuable information to anyone. Complete ® warranty information is available online at www.petsafe.net. Table of Contents Components ....................4 Other Items You May Need ................. 4 How the System Works ................4 Features ..................... 4 Key Definitions ..................5 Operating Guide ..................7 Prepare the Remote Transmitter............... 7 Prepare the Receiver Collar .............. -
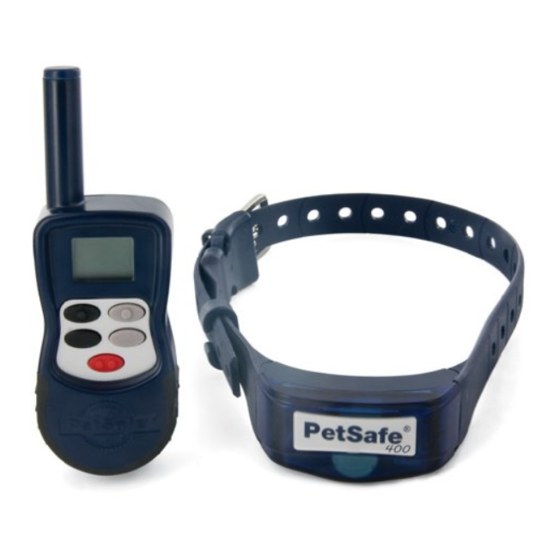
Page 4: Components
Receiver Collar Adapter Remote Transmitter Big Dog Receiver Collar Operating and Lanyard Training Guide Other Items You May Need • Scissors • Non-metallic collar and 10-foot leash for training How the System Works Now you can experience the difference a Remote Trainer can make. Spend less time training and more time enjoying your dog. The PetSafe Venture Series Remote Trainers are comfortable for your pet and ® ™ easy to use with an advanced digital display that tells you exactly what level of stimulation you are using. The Remote Trainer assists you in controlling your pet without a leash in a range of either 400 or 1000 yards. At the push of a button, your remote sends a signal activating your dog’s Receiver Collar. He receives a safe but annoying stimulation. He’ll quickly learn the association between his behavior and your correction; in no time, you’ll have a better-behaved pet. The PetSafe Venture Series Remote ® ™... -
Page 5: Key Definitions
Tone - Upper Left Button (Black): Produces a training tone from the collar. No stimulation is delivered. Stimulation - Lower Left Button (Black): Delivers continuous stimulation. Stim Up - Upper Right Button (Grey): Adjust the stimulation level UP through a range of levels. From Low-1 to High-8. Stim Down - Lower Right Button (Grey): Adjust the stimulation level DOWN through a range of levels from High-8 to Low-1. +2 Boost (Red): Delivers continuos stimulation that is 2 levels higher than the currently selected level. See Two Dog System on page 11 for Dog 2 mode. www.petsafe.net... - Page 6 Receiver Collar: Delivers stimulation or tone on a signal from the Remote Transmitter. It is waterproof. On/Off Button: Momentarily pressing and holding this button turns the Receiver Collar on and off. Contact Points: The contacts through which the Receiver Collar delivers Stimulation. Receiver Indicator Light: Indicates when the Receiver Collar has been turned on or off and also serves as a low-battery indicator. Charging Jacks: For connecting the charger. Although the Remote Transmitter and Receiver Collar are waterproof without the charger covers, keep the covers in place when not charging to keep debris out of the openings. Continuous Stimulation: Y ou control when and how long Stimulation is delivered to your dog through the Receiver Collar’s Contact Points. When a Continuous Stimulation button is pressed for 8 seconds or more, the Remote Transmitter will “time-out.” The button will need to be released and pressed again before additional Stimulation can be delivered. Positive Tone: Use the Positive Tone as a marker to reinforce positive behavior. Again, timing is critical. Praise or treat the dog immediately following the Positive Tone. Little Dog Receiver Collar Big Dog Receiver Collar Charging Jack Front View Front View (with cover) Indicator Light Back/Bottom View On/Off...
-
Page 7: Operating Guide
8 for more detailed information on the Battery Indicator. Note: Factory preset is for Dog 1 mode, you will not see the Dog 2 symbol unless the unit is programmed for Dog 2 (see Two Dog System on page 11). www.petsafe.net... -
Page 8: Prepare The Receiver Collar
Battery Indicator Battery is at ⁄ to Full capacity. Transmitter is fully functional. Battery is at ⁄ capacity. Transmitter is still fully functional. Battery is at ⁄ capacity. Transmitter will operate the Receiver, but recharge or replace Transmitter battery as soon as possible. Battery is almost dead. Transmitter is unable to operate the Receiver. When the Battery Indicator shows the low battery symbol ( ⁄ capacity), recharge your Transmitter soon. When just the battery outline is displayed, the Transmitter’s battery is unable to power transmissions to the Receiver. Transmitter must be recharged to regain operation. Remote Transmitter Functions for Dog 1 Transmitter Function Button Color Digital Display Response Upper Left Button Black Tone Only Lower Left Button Black Stimulation Only Upper Right Button Grey... - Page 9 Button To Turn the Receiver Collar Off 1. Press and hold the On/Off button until the Red LED comes on and the Receiver Collar beeps high to low. 2. Release the On/Off button. To extend the life between charging cycles, turn the Receiver Collar off when it is not in use. Approximate battery life between charges is 40-50 hours, depending on frequency of use. LED – Function and Response Receiver Function LED Response Receiver Beeper Response When the Receiver is turned “ON” Green light flashes one time Beeps low to high Unit is on Green light flashes once every five seconds None Low Battery Condition Red light flashes three times every five seconds None Good Tone Signal being received Green light flashes Good Tone Beep When the Receiver is turned “OFF” Red LED appears Beeps high to low www.petsafe.net...
-
Page 10: Fit The Receiver Collar
• You should expect hundreds of recharge cycles from your batteries. However, all rechargeable batteries lose capacity over time relative to the number of recharge cycles they experience. This is normal. If your operating time drops to half of the original life, contact the Customer Care Center. • When a battery needs replacement, contact our Customer Care Center or visit our website at www.petsafe.net. Please do not open the Receiver Collar or Remote Transmitter. Fit the Receiver Collar Step Important: The proper fit and placement of your Receiver Collar is important for effective operation. The Contact Points must have direct contact with your dog’s skin on the underside of his neck. -
Page 11: Two Dog System
Step Note: If you wish to add another receiver collar to the training system, accessory receiver collars are available where you bought your training system, through our website at www.petsafe.net or through our Customer Care Center at 1-800-732-2677. To Add Dog 2 PDT00-11951 –... - Page 12 Dog 2 Receiver Collar 1. With the Receiver Collar off your pet, turn the Receiver Collar off. 2. Press and hold the On/Off button for 5 seconds. 3. The Receiver Collar will beep and the LED will flash. 4. On the Remote Transmitter, press Dog 2 the Upper Right or Lower Right button. 5. The Receiver Collar will respond and pair. 6. If the Receiver Collar does not beep twice, please contact the Customer Care Center at 1-800-732-2677. Button Functions for Dog 2 Mode Transmitter Antenna Belt Clip Digital Dispay Dog 2 Dog 1 Tone Tone Dog 1 Dog 2 Stimulation Stimulation +2 Boost (see table below) Charging Jack Lanyard Clip (with cover)
-
Page 13: To Pair Dog 1 Receiver Collar And The Remote Transmitter
To Remove Dog 2 from the Remote Transmitter Press and hold the +2 Boost button for 5 seconds. Press the Right Lower button until the “1d” symbol appears on the Digital Display. Press +2 Boost to exit the menu. To Pair Dog 1 Receiver Collar and the Step Remote Transmitter If your Receiver Collar does not beep when the Upper Left button of the Remote Transmitter is pressed, or if you feel the Receiver Collar is not responding to the Remote Transmitter: 1. With the Receiver Collar off your pet, turn the Receiver Collar off. 2. Press and hold the On/Off button for 5 seconds. 3. The Receiver Collar will beep and the LED will flash. 4. Press any Transmitter button. 5. The Receiver Collar will respond and pair. 6. If the Receiver Collar does not beep twice, please contact the Customer Care Center at 1-800-732-2677. Note: Pairing is for Dog 1 only. www.petsafe.net... -
Page 14: Training Guide
Training Guide General Tips • Eliminate one misbehavior or teach one obedience command at a time. If you move too fast with training, your pet may become confused. • Be consistent. Correct your pet every time he misbehaves. • Unless you can supervise him, it is recommended that you restrict your pet from situations in which he has a history of misbehaving. However, setting up a situation as a training session can dramatically improve your chances of success. • If your pet reacts to the tones by hiding or acting fearful, redirect his attention to a simple and appropriate behavior, such as the “sit” command. • Pets should be at least 6 months old before using the Trainer. • Only let responsible family members use the Trainer. It is not a toy! • Other pets in hearing range will be affected by the training tones. Therefore, training sessions should be conducted out of hearing range of other pets. • Never use the Remote Trainer to correct or eliminate any form of aggressive behavior. We recommend you contact your local veterinarian or professional trainer to determine if your pet might be aggressive. • Training instructions in this guide are written for use with the Transmitter being programmed to Dog 1. Adjust the instructions to fit your desired training mode. Teaching Your Pet the Positive Tone Before using the Trainer to correct your pet, spend 10 to 15 minutes per day for 2 or 3 days helping him create the association of the tone with reward and praise. To accomplish this: 1. Push the Tone button for 2 consecutive seconds. 2. Release the button and immediately reward your pet with verbal praise, petting, or a small food reward. Spend 3 to 5 seconds on your rewarding. 3. Wait a few minutes and repeat holding the Tone button for 2 seconds following with praise. Vary the reward to prevent your pet from anticipating a specific type. This stage of training is complete when your pet obviously anticipates a reward when he hears the positive tone. Find the Best Stimulation Level for Your Pet Important: Always start at the lowest level and work your way up. -
Page 15: Boost
IF THIS HAPPENS, THE STIMULATION LEVEL IS TOO HIGH AND Y OU NEED TO GO BACK TO THE PREVIOUS LEVEL AND REPEAT THE PROCESS. 4. Move up through the Stimulation levels until your pet reliably responds to the Stimulation. 5. If your pet continues to show no response at Level 8, check the fit of the Receiver Collar. If your pet has long or thick hair, contact our Customer Care Center 1-800-732-2677 to obtain a longer set of Contact Points. Then go back to #1 and repeat the process. If this still does not yield any results, your pet’s hair will need to be trimmed around the Contact Points. If all of these steps have been done and your pet continues to show no reaction to the Stimulation, see the “Test Light Instructions” section. If after completing all of these steps your dog still does not indicate he is feeling the Stimulation, please contact Customer Care Center or visit our website at www.petsafe.net. +2 Boost A press of this button sends a signal to the collar to issue a correction that is 2 levels higher than the currently selected level. For example, if the correction level is set at Level 2, a touch of the +2 Boost button will correct at Level 4. Some trainers like instant access to a higher setting for circumstances where the dog may not respond to lower levels, such as around high distraction. The system will not correct higher than level 10. Teaching Basic Obedience The “Sit” Command 1. Put a separate, non-metallic collar on your pet’s neck ABOVE the Receiver Collar, and attach a 10-foot leash. Note: Be sure the extra collar does not put pressure on the Contact Points. - Page 16 The “Come” Command 1. Put a separate, non-metallic collar on your pet’s neck ABOVE the Receiver Collar, and attach a 10-foot leash. Note: Be sure the extra collar does not put pressure on the Contact Points. 2. Hold your leash in one hand and the Remote Transmitter in the other. 3. Wait for your pet to walk away from you. Using the Recognition Level for your pet, press and hold the Stimulation Only button on your Remote Transmitter. 4. Immediately give the command “Come” while continuing to hold the Stimulation Only button. 5. Using the leash, gently guide your pet toward you until he begins to come in your direction. 6. Immediately release the Stimulation Only button as soon as your pet steps towards you, and praise him enthusiastically. 7. Quickly move backwards as your pet begins to come back to you, praising him the entire time.
-
Page 17: Eliminating Unwanted Behavior
Note: It is best if your pet first understands the “Sit” command. 1. Choose your pet’s Recognition Level. 2. As soon as your pet lifts his paws off the ground to jump on you, press the Stimulation Only button and give the command “Sit.” 3. Release the Stimulation Only button immediately once your pet is sitting, and verbally praise him. 4. If your pet ignores the stimulation, increase the Intensity Level by 1. 5. Practice this exercise in several different areas and use different people for distractions. Digging It is important to first understand why your pet is digging. Many dogs, such as terriers, were bred to flush out prey, and digging is very innate to them. Other dogs may be digging to find a cool spot to lie down, or simply out of boredom. Your pet may no longer have the desire to dig if he is provided with the following: • A cool, shaded area in which to lie down, and plenty of water. • An alternate activity, such as a favorite toy. • Plenty of play, exercise, and attention. • A yard free from rodents or prey that he may be trying to flush out. 1. Choose the Intensity Level 1 higher than your pet’s Recognition Level. 2. Place the Receiver Collar on your pet and wait at least 10 minutes before placing him in the yard. No other people or pets should be in the yard, as you do not want your pet to associate the stimulation with anything other than his digging. Your pet must be securely fenced in or contained during training. 3. From a window or area where your pet cannot see you, wait until your pet begins to dig. www.petsafe.net... - Page 18 4. While your pet digs, press the Stimulation Only button and release it when he stops digging. Only press the button while your pet is in the act of digging, and do not say anything to him. 5. If your pet ignores the stimulation, increase the Intensity Level by 1. 6. Continue to watch your pet, as he may choose another area to dig. 7. Do not allow your pet in the yard unsupervised until he has completely stopped digging. Chasing Chasing is an instinctive behavior stimulated by moving objects. Some dogs have a particularly strong desire to chase that can put them in harm’s way and leave you helpless. Never allow your dog off the leash or out of a contained area until he has learned the “Come” command, regardless of the distraction. Be consistent and correct your dog every time he chases something. It is vitally important that you and your dog remain safe while carrying out this training. CAUTION Your dog should be on a strong leash, long enough for him to attempt to chase an object, but short enough for him not to reach a road or other unsafe area.
-
Page 19: Trash Raiding
3. While your pet’s mouth is touching the temptation, press and hold the Stimulation Only button. Immediately release the button when your pet leaves the temptation. 4. Do not say anything, as you want your pet to associate the stimulation with his behavior, not you. 5. If your pet does not respond to the stimulation, increase the Intensity Level by 1 and repeat the process. 6. Repeat this process in several different locations with different temptations. Excessive Barking Barking is an instinctive behavior for dogs. It is impossible to keep your dog from barking entirely, but you can teach him be quiet when you give him a command. Note: This will only be effective when you are at home with your dog. 1. Choose your pet’s Recognition Level. 2. Put your dog in a situation that will tempt him to bark. 3. When your dog begins to bark, press the Stimulation Only button and give him the command “Quiet.” 4. Immediately release the button once your dog stops barking and praise him. 5. If your dog ignores the stimulation and continues to bark, increase the Intensity Level by 1 and repeat the process. 6. Practice this exercise in different areas using different situations that would cause your dog to bark. www.petsafe.net... -
Page 20: Frequently Asked Questions
Receiver Collar must be purchased ™ Trainers with more than one pet? to have a 2 dog system. All Venture Series Add a Dog ™ ™ Receiver Collars work with the Venture Series Remote ™ Training systems. Can I use the PetSafe Venture • We do not recommend any of our products to be used ® Series Remote Trainers on on aggressive pets. We recommend you contact your local ™ aggressive pets? veterinarian or professional trainer to determine if your pet might be aggressive. How long can I continuously • The maximum amount of time you can press the... -
Page 21: Troubleshooting
Levels, the Test Light will flash brighter. 5. Turn the Receiver Collar off. Save the Test Light for future testing. Note: If the Test Light does not flash, recharge the battery and re-test. If Test Light still does not flash, contact the Customer Care Center or visit our website at www.petsafe.net. www.petsafe.net... -
Page 22: Accessories
RFA-393 Lanyard RFA-189 Snap Buckle RFA-381 Customer Care International USA & Canada - Tel: 800-732-2677 Monday - Friday 8 AM - 8 PM / Saturday 9 AM – 5 PM Australia - Tel: 1800 786 608 Monday - Friday 7:30 AM - 5 PM New Zealand - Tel: 0800 543 054 Monday - Friday 10:30 AM - 7 PM This product has the benefit of a limited manufacturer’s warranty. Details of the warranty applicable to this product and its terms can be found at www.petsafe.net and/or are available by sending a stamped addressed envelope to PetSafe Ltd. Redthorn House, Unit 9, Chorley West Business Park, Ackhurst Road, Chorley, ® Lancashire PR7 1NL, United Kingdom. Terms of Use and Limitation of Liability 1. Terms of Use This Product is offered to you conditioned upon your acceptance without modification of the terms, conditions and notices contained herein. Usage of this product implies acceptance of all such terms, conditions, and notices. 2. Proper Use This Product is designed for use with pets where training is desired. The specific temperament of your pet may not work with this product. We recommend that you not use this product if your pet is less than 8 lb or under 6 months old, or if your pet is aggressive. If you are unsure whether this is appropriate for your pet, please consult your veterinarian, certified trainer or contact our Customer Care Center or visit our website at www.petsafe.net. -
Page 23: Fcc
CAUTION: Modification or changes to this equipment not expressly approved by Radio Systems ® Corporation may void the user’s authority to operate the equipment. NOTE: This equipment has been tested and found to comply with the limits for a Class B digital device, pursuant to part 15 of the FCC Rules. These limits are designed to provide reasonable protection against harmful interference in a residential installation. This equipment generates, uses, and can radiate radio frequency energy and, if not installed and used in accordance with the instructions, may cause harmful interference to radio communications. However, there is no guarantee that interference will not occur in a specific installation. If interference does occur to radio or television reception, which can be determined by turning the equipment off and on, the user is encouraged to try to correct the interference by one or more of the following measures: • Reorient or relocate the receiving antenna. • Increase the separation between the equipment and the receiver. • Connect the equipment to an outlet on a circuit different from that to which the receiver is connected. • Consult customer care, the dealer, or an experienced radio/TV technician for help. This Class B digital apparatus complies with Canadian ICES-003. Cet appareil numérique de la classe B est con forme à la norme NMB-003 du Canada. Perchlorate Battery Perchlorate Material – special handling may apply. See www.dtsc.ca.gov/hazardouswaste/perchlorate. www.petsafe.net... - Page 24 Radio Systems Corporation ® 10427 Electric Ave. Knoxville, TN 37932 1-800-732-2677 www.petsafe.net 400-1045/1 ©2008 Radio Systems Corporation...
Need help?
Do you have a question about the Venture PDT00-11875 and is the answer not in the manual?
Questions and answers