
Related Manuals for Spire SPp10


Summary of Contents for Spire SPp10
- Page 1 UKCA Standard 70 User Manual Spire Payments SP Family www.spirepayments.com 22237-01...
- Page 2 Introduction Accessories SPp10 PIN Pad Charging Stand For more information regarding these accessories and how to obtain them, please contact your terminal leasing company. Additional accessories (such as mounting poles) may also be available from third party suppliers.
- Page 3 Spire Payments, the Spire Payments logo, Thyron, Thyron Payments Systems and the Thyron Payments Systems logo are trademarks, service marks or registered trademarks or service marks of Spire Payments Holdings S.a.r.l. All other trademarks are the property of their respective owners.
- Page 4 Countertop Terminal SPc50 With Optional SPp10 PIN Pad The SPc50 countertop terminal is designed to operate on a countertop and can be connected to an optional PIN Pad (SPp10). The terminal is powered by a mains power supply. Countertop terminal with PIN Pad...
- Page 5 Introduction Spire Payments SP Terminal Family (Cont.) Portable Terminals SPw60 And SPw70 The SPw60 and SPw70 terminals have been designed to meet the needs of those merchants requiring portable payment. In the case of the SPw60, this is designed to be used in a shop or restaurant.
- Page 6 You must dispose used or faulty batteries using either your local battery disposal facility in accordance with local laws, or by return to Spire Payments. Do not discard with general waste and do not incinerate. Insulate the battery module contacts with electrical tape prior to disposal.
- Page 7 Dispose any part in an environmentally sound manner and in accordance with local laws. • Spire Payments will not be held liable for any damage resulting from user operation that does not comply with the guidance stated. How To Clean Your Terminal...
- Page 8 PCI SSC or the payment brand participants. EU Compliance Statement: Spire Payments Holdings S.a.r.l. hereby declares that this device is in compliance with the essential requirements and other relevant provisions of the R&TTE Directive.
- Page 9 Introduction Additional Services Available For Your Terminal Card Types Accepted The terminal is configured as standard to support Visa and Mastercard scheme credit and debit cards. For some merchant categories, credit card support may not be allowable. The terminal can support American Express, Diners Club, and JCB scheme cards depending upon your bank agreements with these schemes.
-
Page 10: Table Of Contents
Battery Module SPw60 & SPw70 Terminals Optional Charging Stand For SPw60 & SPw70 Loading A Paper Roll Cable Connection SPw60 And SPw70 With Charging Stand SPc50 With Optional SPp10 PIN Pad Communications Information WiFi (SPw60 Portable Terminal Only) WiFi Access Point Cable Connection Installation... -
Page 11: Troubleshooting
Spire Payments, the Spire Payments logo, Thyron, Thyron Payments Systems and the Thyron Payments Systems logo are trademarks, service marks or registered trademarks or service marks of Spire Payments Holdings S.a.r.l. All other trademarks are the property of their respective owners. -
Page 12: Important Information
Monthly Updates Once a month your terminal will connect to the Spire Payments Terminal Management System to download any new software and any important configuration changes. This update will typically occur during the night. For this reason, Spire Payments recommends you leave your terminal powered on at all times. -
Page 13: Data Security Standard (Pci Dss) Advice
4. secure payment applications. The Spire Payments terminal and its software applications have been designed in line with PCI DSS and industry best practices. You need take no further action to ensure your PCI DSS compliant environment... - Page 14 8. ensuring cardholder data must never be stored on a server connected to the Internet. If you are using the Spire Payments SP device on a Local Area Network for the payment transaction interface and you are using a local server to store and forward the transaction data, you must take steps to protect the transaction data in accordance with DSS requirements.
- Page 15 This is not applicable to the Spire Payments payment application. 13. maintain instructional documentation/training programs for cardholders, resellers, & integrators. As well as the information in this user manual, Spire Payments will make further information regarding PCI DSS compliance available to you via its website www.spirepayments.com.
-
Page 16: Spw60 & Spw70
Page 15. Understanding Your Equipment SPw60 & SPw70 Portable Terminals SPw60 And SPw70 Overview Paper roll compartment Four status LEDs More information about your printer Refer to the contactless section on and how to load a paper roll can be page 43 in this User Manual for details found on page 22 in this User Manual and in the Quick Reference Guide... -
Page 17: Spc50
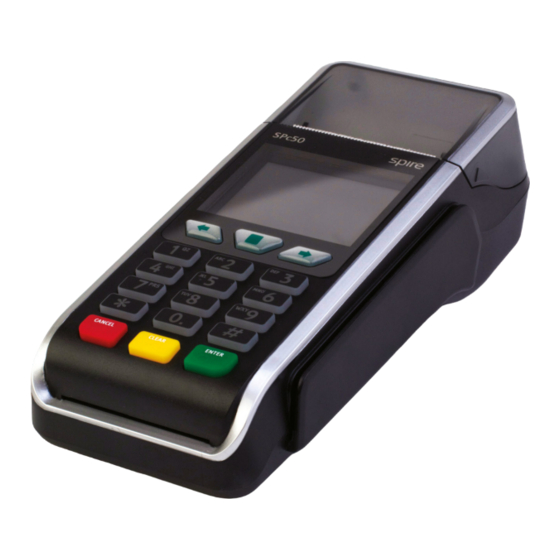
Page 16. Understanding Your Equipment SPc50 Countertop Terminal SPc50 Overview Paper roll compartment Four status LEDs More information about your printer Refer to the contactless section on and how to load a paper roll can be page 43 in this User Manual for details found on page 22 in this User Manual and in the Quick Reference Guide Colour display... -
Page 18: Spp10
Page 17. Understanding Your Equipment SPp10 PIN Pad SPp10 Overview Four status LEDs Cable access hatch Refer to the contactless section on Please do not remove page 43 in this User Manual for details Colour display Displays transaction instructions for... -
Page 19: Privacy Shield
You only perform keyed transactions, e.g. in a mail-order business without the cardholder present. • Cardholders enter his/her PIN into the separate handheld SPp10 PIN Pad. • Cardholders can enter his/her PIN while holding the terminal in his/her hand (as with the SPw60... -
Page 20: Battery Module Spw60 & Spw70 Terminals
Step 3 Remove the packaging from the new battery module and ensure the connections are aligned with those in the battery compartment. The Spire Payments logo should be facing upwards. Note: The battery module can only be fitted in one orientation. - Page 21 Page 20. Battery Module SPw60 & SPw70 Terminals (Cont.) Step 4 With the contacts aligned, insert the module into the battery compartment by pushing downwards. Step 5 Slide the battery compartment cover back into position.
-
Page 22: Optional Charging Stand For Spw60 & Spw70
Page 21. Optional Charging Stand For SPw60 & SPw70 Portable terminals may come with a charging stand. When the terminal is placed on a powered charging stand it will charge the battery module. Power indicator Illuminates red once mains power supply is connected to the stand... -
Page 23: Loading A Paper Roll
Page 22. Loading A Paper Roll The SPw60, SPw70 and SPc50 terminals are all supplied with a paper roll. It may be loose in the box or can be found in the terminal’s paper compartment. It is critical that only approved paper rolls are used and these can be obtained from authorised paper roll supplier. - Page 24 Page 23. Loading A Paper Roll (Cont.) SPc50 Paper Roll Loading Procedure Step 1 With the terminal facing upwards, place finger and thumb on either side of the printer door, squeeze inwards and pull upwards at the same time. Step 2 Discard any packing material from the paper roll.
-
Page 25: Cable Connection
Plug the power supply into the rear of the terminal as shown in the picture and leave to charge. The SPc50 countertop terminal and optional SPp10 PIN Pad need to be located near a mains socket and the desired communication point (telephone socket and/or network connection). -
Page 26: Spc50 With Optional Spp10 Pin Pad
Page 25. Cable Connection SPc50 Countertop Terminal With Optional SPp10 PIN Pad Step 1 Place the terminal face down on the counter and use both thumbs to slide the cable tidy upwards as indicated by the unlock arrow. Step 2 Thread the black power supply cable as detailed in the picture. -
Page 27: Communications Information
The SPc50 countertop terminal utilises an analogue phone line (dial-up) or Internet connection to communicate with acquiring systems and the Spire Payments terminal management system. The choice of communication method will be dependent upon the configuration requested by the terminal leasing company. - Page 28 SPw60 to WiFi access point pairing procedure. Please note: If you are not using the Spire Payments provided WiFi access point then you may have to configure your router to support the payment terminal, e.g. for MAC address filtering.
-
Page 29: Wifi (Spw60 Portable Terminal Only)
Page 28. WiFi (SPw60 Portable Terminal Only) WiFi Access Point Models The exact model of WiFi access point may vary from that pictured here. However, the installation procedure is identical. WiFi Access Point Siting Recommendations The design of the WiFi access point allows it to be placed on a counter or shelf. Please bear the following in mind when choosing an installation location: •... -
Page 30: Wifi Access Point Cable Connection
Page 29. WiFi Access Point Cable Connection Please follow this procedure carefully and only power on the terminal and WiFi access point when instructed. Step 1 Plug the supplied network cable into the blue socket in the rear of the WiFi access point. Connect the other end of the network cable to your Internet connection point. -
Page 31: Installation
Page 30. Installation Please read and follow the separate Quick Reference Guide received with your terminal. This User Manual and the Quick Reference Guide contain instructions on how to: • Connect the cables and accessories e.g. power supply, telecoms cable and PIN Pad. •... -
Page 32: Using Your Terminal
Page 31. Using Your Terminal Please note: the screens-shots and receipt examples on your terminal may differ in detail from those depicted in this manual. Turning The Terminal On To turn the terminal on press the power button found on the left hand side of the terminal until the screen lights up. -
Page 33: Terminal Keypad
Page 32. Using Your Terminal (Cont.) Terminal Keypad The SPw60, SPw70 and SPc50 all share a common keypad layout. The ‘MAIN MENU’ , key represented by a square and • positioned above the ‘2’ key, toggles between menus. • The ‘ARROW’ keys either side of ‘MAIN MENU’ key are used to move to the next and previous menu screens. - Page 34 Page 33. Using Your Terminal (Cont.) Terminal Display The SPw60, SPw70 and SPc50 all share a common graphical display: in landscape format on the SPc50 and portrait on the portable terminals. (Please note: a portrait format has been used in this User Manual for illustration purposes.) The display is separated into three specific areas: Status Bar...
- Page 35 Page 34. Using Your Terminal (Cont.) Status bar 09/11/13 12:00 CUSTOMER TO CONFIRM SA RANDS Middle of screen ZAR156.63 Print RATE Application bar VISA M/O REFUND Screen Saver If a key has not been pressed for 30 seconds, the terminal’s display will automatically revert to a screen saver.
-
Page 36: Icons Index
Page 35. Icons Index The following is an index to the icons shown in the status bar: Battery level indicator 100% Charge 75% Charge 50% Charge 25% Charge Warning Charging Signal strength indicator 100% Signal 75% Signal 50% Signal 25% Signal Under 10% Signal GPRS Connected Connectivity indicators... - Page 37 Page 36. Icons Index (Cont.) The following is an index to the miscellaneous icons Additional Icons SHIFT Engaged Numbers Lowercase Uppercase Welcome screen graphics Screen Buttons Contactless Icon Chip & Pin Icon Swipe Card Icon...
-
Page 38: Menu Operation
Page 37. Menu Operation Reports And Terminal Menu The screens below show the Reports and Terminal Menu. This is displayed by pressing the ‘MAIN MENU’ key when the Transaction Menu or Welcome Screen is displayed. As there are more than five menu options it is split between two screens. -
Page 39: Training Mode
Page 38. Training Mode PLEASE NOTE: The Training Payment Card is not supplied with the terminal as standard. Once the terminal is switched to Training Mode it enables the user to perform all transaction types without the actual transfer of funds. You may use normal Chip and PIN cards to perform these training transactions. - Page 40 Page 39. Training Mode (Cont.) How To Leave Training Mode Ensure the terminal is displaying the Welcome screen. Press the ‘MAIN MENU’ key to display the Reports and Terminal Menu. • • Select ‘TERMINAL’ from the menu. • Select ‘TRAINING’ from the menu. •...
-
Page 41: Setting The Merchant Password
Page 40. Setting the Merchant Password You may be asked to enter a password to perform certain functions. Different passwords protect different terminal functions and it is best to change these from the factory default to protect against potential fraudulent usage of the terminal. PLEASE NOTE: To protect against fraudulent activity with regard to voice referred transactions, you must amend your merchant password to your own value. -
Page 42: Transactions
How To Insert A Chip Card If the card has a Chip on the front, insert the card either in the main terminal or separate PIN Pad (SPp10) with the Chip facing up and towards the terminal/PIN Pad. When the card is inserted correctly you should feel some resistance and hear an audible soft ‘click’... -
Page 43: How To Swipe A Card
Page 42. Transactions (Cont.) What Happens If The Cardholder Has Forgotten His/Her PIN? The cardholder usually has 3 attempts to enter his/her PIN correctly. If they enter it incorrectly 3 times in a row (even on different days and in different locations), the card will lock the PIN and the cardholder must contact his/her card issuer or have it unlocked at an ATM. -
Page 44: Presenting A Contactless Card
(a few millimetres) to the terminal. This is known as ‘presenting’ the card. This method of payment is for small transactions and is designed to speed up the entire process. Contactless technology is available as standard on the Spire Payments SP terminal family. How To Present A Contactless Card... - Page 45 Page 44. Presenting A Contactless Card (Cont.) Card Reading Status Four LEDs are present above the display, providing feedback on the success of the operation. Contactless status LED 1 LED 2 LED 3 LED 4 NOT READY The reader is not ready to read a card. This can be caused by lack of power or failure in communicating with the terminal.
-
Page 46: Typing In Card Numbers
Page 45. Typing In Card Numbers Customer Present If the terminal cannot read the Chip or the magnetic stripe on the card, you can type in the long number on the front of the card. Once all the information has been entered and the transaction approved by the acquirer the terminal will ask for the cardholder to sign the merchant’s copy of the receipt. -
Page 47: Sale - Inserting A Chip Card
Page 46. Sale (Inserting A Chip Card) Step 1 When the terminal is ready to perform a Sale transaction it will show the Welcome screen. You can start a Chip and PIN Sale transaction in one of two ways: Option 1 09/11/13 12:00 Enter the Sale amount in pence (or cents in ROI) and press the... - Page 48 Page 47. Sale (Inserting A Chip Card) (Cont.) Option 2 Insert the Chip Card into the terminal’s Chip Card reader or PIN Pad (if fitted). A Sale transaction will be initiated. Type in the Sale amount in pence (or cents for ROI) and press the green ‘ENTER’ key. Example: Typing in 1000 would equate to a value of £10.00 (€10.00 in ROI).
- Page 49 Page 48. Sale (Inserting A Chip Card) (Cont.) 09/11/13 12:00 PLEASE REMOVE CARD Step 3 Remove the card. SMART CARD 09/11/13 12:00 Step 4 REMOVE MERCHANT COPY The terminal will then print the merchant’s copy of the receipt. Then press the green ‘ENTER’ key. Step 5 The terminal will then print the customers copy of the receipt.
-
Page 50: Example Of Sale Receipts
Page 49. Example Of Sale Receipts Merchant’s copy SPIRE PAYMENTS SALISBURY Merchant name, address SP1 2UD TERMINAL ID: 91234567 MERCHANT ID: 123000123 CREDITODEVISA 1234000012345678 PAN SEQ NO: 01 Transaction Information AID: A00000000123456 START 07/95 EXPIRY 12/20 Terminal ID Merchant ID... -
Page 51: Sale - Swiping A Card
Page 50. Sale (Swiping A Card) If your terminal cannot read the Chip on the presented Chip Card (or one is not present) you may be given the option to swipe the card’s magnetic stripe (located on the rear of the card). Step 1 When the terminal is ready to perform a Sale transaction it will show the Welcome screen. - Page 52 Page 51. Sale (Swiping A Card) (Cont.) Option 2 Swipe the Card in the terminal’s magnetic stripe reader (see page 42). A Sale transaction will be initiated. Type in the Sale amount in pence (or cents for ROI) and press the green ‘ENTER’ key. Example: Typing in 1000 would equate to a value of £10.00 (€10.00 in ROI).
- Page 53 Page 52. Sale (Swiping A Card) (Cont.) Step 4 09/11/13 12:00 Compare the cardholder’s signature on the receipt to that on the rear of the card. SIGNATURE CORRECT? If you are happy with the signature comparison, select ‘YES’ by pressing the green ‘ENTER’ key. The transaction will be approved and a customer copy of the receipt will be printed.
-
Page 54: Example Of Sale Receipts (Swiped Card)
Page 53. Example Of Sale Receipts (Swiped Card) Merchant’s copy SPIRE PAYMENTS SALISBURY Merchant name, address SP1 2UD TERMINAL ID: 91234567 MERCHANT ID: 123000123 VISA 1234000012345678 SWIPED START 07/95 EXPIRY 12/20 Transaction Information Terminal ID SALE Merchant ID AMOUNT £10.00... -
Page 55: Sale - Presenting A Contactless Card
Page 54. Sale (Presenting A Contactless Card) The terminal will offer contactless payment if: • the terminal supports the functionality; • the card supports the functionality; • and the transaction amount is below the threshold of £15.00. Step 1 When the terminal is ready to perform a Sale transaction it will show the Welcome screen. If the cardholder requests a contactless payment you must 09/11/13 12:00... - Page 56 Page 55. Sale (Presenting A Contactless Card) (Cont.) 09/11/13 12:00 Step 2 The terminal will now connect to your acquirer and display progress. If the transaction is approved, the Approval Code will be displayed APPROVAL 123456 and the terminal will print the merchant’s copy of the receipt. (See Appendix A for possible transaction responses.) Step 3 The merchant’s copy of the receipt will be printed and the...
-
Page 57: Sale And Cashback
Page 56. Sale And Cashback (Inserting A Chip Card) This is similar to a regular Sale transaction and, if enabled, replaces the standard Sale transaction described previously. There is a facility to enter an additional figure for Cashback. PLEASE NOTE: This is a service that must be requested from your acquirer. - Page 58 Page 57. Sale And Cashback (Inserting A Chip Card) (Cont.) Insert the Chip Card into the terminal’s Chip Card reader or PIN Pad (if fitted). Option 2 Insert the Chip Card into the terminal’s Chip Card reader or PIN Pad (if fitted). Type in the Sale amount in pence (or cents for ROI) and press the green ‘ENTER’...
-
Page 59: Example Of Sale And Cashback Receipts
Page 58. Example Of Sale And Cashback Receipts Merchant’s copy SPIRE PAYMENTS SALISBURY Merchant name, address SP1 2UD TERMINAL ID: 91234567 MERCHANT ID: 123000123 CREDITODEVISA 1234000012345678 PAN SEQ NO: 01 Transaction Information AID: A0000000012345 START 07/95 EXPIRY 12/20 Terminal ID... -
Page 60: Sale And Tip
Page 59. Sale And Tip (Inserting A Chip Card) This is much the same as a regular Sale transaction but with the added ability of including a tip in addition to the transaction amount. PLEASE NOTE: This is a service that must be requested from your acquirer. When activated, tipping will be set by default for all Sale transactions. - Page 61 Page 60. Sale And Tip (Inserting A Chip Card) (Cont.) Step 2 09/11/13 12:00 Ask the cardholder if they wish to enter a tip. If the answer is yes, select ‘YES’ by pressing the green ‘ENTER’ key. If the answer BASE AMOUNT £100.00 is no, select ‘NO’...
- Page 62 Page 61. Sale And Tip (Inserting A Chip Card) (Cont.) 09/11/13 12:00 TOTAL £110.00 CORRECT? Step 4 The cardholder should confirm the total value of the transaction, by selecting ‘YES’ by pressing the green ‘ENTER’ key’ . 09/11/13 12:00 VISA SALE SWIPE/INSERT CARD Step 5...
-
Page 63: Example Of Sale And Tip Receipts
Page 62. Example Of Sale And Tip Receipts Merchant’s copy SPIRE PAYMENTS SALISBURY Merchant name, address SP1 2UD TERMINAL ID: 91234567 MERCHANT ID: 123000123 CREDITODEVISA 1234000012345678 PAN SEQ NO: 01 Transaction Information AID: A0000000012345 START 07/95 EXPIRY 12/20 Terminal ID... -
Page 64: Forced Authorisation
Page 63. Forced Authorisation Force Authorisation is a transaction type that may be available on your terminal if permitted by your bank. This transaction type allows you to capture and submit transactions that have previously been authorised using paper vouchers. You can capture both Sale and Refund paper voucher transactions. Force Authorisation must only be used if the transaction has already been authorised on a paper voucher, and you must continue to keep the original paper voucher for the period specified by your bank. - Page 65 The transaction data will be submitted by the terminal when it next goes online to the acquirer. Example Of Forced Sale Receipts Merchant’s copy SPIRE PAYMENTS SALISBURY Merchant name, address SP1 2UD...
-
Page 66: Pre-Authorisation - Check-In
Page 65. Hotel and Rental Operations The SP family of terminals allow transaction types for use in the hotel industry. These transaction types are also relevant for other merchant categories such as car rentals. The transaction is performed in two parts: a ‘Pre-Authorisation’ and a confirming ‘Completion’ . The optional Express Check-Out feature (that allows Customer Not Present checkout) and Tipping features are not available unless requested and agreed with your bank. - Page 67 The terminal will prompt for the cardholder’s card to be inserted or swiped. £100.00 The transaction will continue in the same way as a normal Chip and PIN Sale. Cancel Enter VISA PRE AUTH SPIRE PAYMENTS SALISBURY SP1 2UD Merchant’s copy TERMINAL ID: 91234567 MERCHANT ID: 123000123 CREDITODEVISA...
-
Page 68: Completion - Check Out
Page 67. Completion - Check Out A Completion transaction is performed at the end of a stay to debit funds from the card holder. For a rental environment, this will be when the vehicle is returned. In order to perform a Completion transaction, a Pre-Authorisation must have been previously performed using the same card. - Page 69 Page 68. Completion - Check Out (Cont.) Step 3 09/11/13 12:00 Type in the Completion amount in pence (or cents for ROI) and press the green ‘ENTER’ key. COMPLETION AMT Example: Typing in 1000 would equate to a value of £10.00 (€10.00 in ROI). PLEASE NOTE: £110.00 If a mistake is made entering data, the the last digit can...
- Page 70 Page 69. Completion - Check Out (Cont.) Step 6 Remove the card and the merchant’s copy of the receipt and press the green ‘ENTER’ key. The terminal will then print the customer’s copy of the receipt. Step 7 Tear off the customer’s copy and hand it to the cardholder. For an Express Check Out or No-Show, you must mail this to the cardholder.
- Page 71 Page 70. Sale Transaction (Customer Not Present – Keyed) This method is used for taking transactions when the cardholder is not next to the terminal - a telephone order, for example. Please note: Some of the screens which ask for information are dependent on your terminal’ s configuration. If a screen is absent, simply skip to the next step.
- Page 72 Page 71. Sale Transaction (Cont.) 09/11/13 12:00 CARD PRESENT? Step 3 Since the cardholder (and card) is not present, select ‘NO’ by pressing the yellow ‘CLEAR’ key. 09/11/13 12:00 VISA SALE CVV2 FROM CARD Step 4 If prompted, ask the cardholder for the 3 digit CVV2 code (security code) on the back of the card and press the green ‘ENTER’...
- Page 73 Page 72. Sale Transaction (Cont.) Step 6 09/11/13 12:00 If prompted enter the numbers from the cardholder’s first line of his/her address and press the green ‘ENTER’ key. ENTER ADDRESS (NUMERICS ONLY) Example: If the first line of the customer’s address is 159 Baker Street, enter ‘159’...
-
Page 74: Refund
Page 73. Refund (Inserting A Chip Card) A Refund transaction should only be performed if an End of Day Banking/Settlement has been completed subsequent to the original transaction that needs to be refunded. If the banking hasn’t been completed, a Void transaction should be performed instead. Step 1 09/11/13 12:00... -
Page 75: Example Of Refund Receipt
Page 74. Example Of Refund Receipt Merchant’s copy SPIRE PAYMENTS SALISBURY Merchant name, address SP1 2UD TERMINAL ID: 91234567 MERCHANT ID: 123000123 VISA 1234000012345678 PAN SEQ NO: 01 Transaction Information EXPIRY 12/20 Terminal ID Merchant ID REFUND Card type AMOUNT -£10.00... -
Page 76: Settlement
Page 75. Settlement At the end of a business day, the Settlement procedure must be performed on the terminal unless set to automatically settle at a particular time of day (if you are unsure whether your terminal settles automatically, please contact your helpdesk). Automatic Settlement is not usually permitted. For the totals to display correctly, this must be done during the ‘Banking Window’... - Page 77 Settlement that had a Totals Unconfirmed response. PLEASE NOTE: If you are unsure of any aspect relating to the Settlement 09 NOV 13 12:00 procedure, please contact your Acquirer or the helpdesk. Z TOTALS SPIRE PAYMENTS SALISBURY SP1 2UD TERMINAL ID: 91234567 STREAMLINE MERCHANT ID:...
-
Page 78: Reports
09 NOV 13 12:00 For compliance with the PCI Data Security Standard, you X TOTALS must contact the helpdesk to access Full View reports. Full SPIRE PAYMENTS SALISBURY View reports may not be avalable on your terminal. SP1 2UD TERMINAL ID:... - Page 79 Page 78. Reports (Cont.) Audit SPIRE PAYMENTS SALISBURY Performing an Audit on the terminal will print out a report of SP1 2UD each transaction that has been put through the terminal since TERMINAL ID: 91234567 the last Settlement. This can be used in the unlikely event of a...
- Page 80 Page 79. Reviewing Transactions/Reprinting A Receipt The SP family of terminals maintain a Batch record of all transaction information since the last successful Settlement was performed. It is possible to review the Batch, find the appropriate transaction and, if required, reprint the receipt. There are two versions of this feature: Limited View and Full View •...
-
Page 81: Error Messages
When a Chip Card is inserted, swiped or the long card number is typed in, the terminal will check against a number of parameters downloaded from the Spire Payments system. If the terminal rejects the card it will display one of the following messages: ACQUIRER DISABLED The terminal has become logged off from your acquirers. -
Page 82: Terminal Problems
Troubleshooting Terminal Problems Terminal screen is blank Countertop models (SPc50) Check that the power supply or mains cable is plugged into a working electrical wall socket and that any switch is on. If an extension cable is being used, check the fuse. Check that the power supply is connected to the socket on the base of the terminal. - Page 83 Check that the roll is loaded the correct way round. See Quick Reference Guide or the paper loading section within this User Manual for more information. Only use paper from an authorised supplier for Spire terminals. Screen appears frozen OR If the screen appears frozen and doesn’t react to key presses or...
-
Page 84: Communication Problems
Troubleshooting Communication Problems SPc50 (dial only) The normal sequence of messages displayed during a transaction using a dial connection is: CONNECTING VIA DIAL, CONNECTION MADE, PROCESSING NOW, APPROVAL XXXXXX CONNECTION MADE, PROCESSING NOW This message indicates the terminal has connected successfully. In this case, the following display will be a response from the acquirer. - Page 85 Troubleshooting Communication Problems SPc50 (IP With Dial Backup) The normal sequence of messages displayed during a transaction using an IP/Ethernet connection is: CONNECTING VIA IP, CONNECTION MADE, PROCESSING NOW, APPROVAL XXXXXX CONNECTION MADE, PROCESSING NOW This message indicates the terminal has connected successfully. In this case, the following display will be a response from your acquirer.
- Page 86 There may be no SIM card installed PLEASE NOTE: GPRS terminals come with a SIM card pre-installed by Spire Payments. If there is no SIM card installed, a warning will display at power up. If this happens, please call the helpdesk.
- Page 87 Troubleshooting Communication Problems SPw60 (WiFi) The normal sequence of messages displayed during a transaction using a WiFi connection is: CONNECTING VIA IP, CONNECTION MADE, PROCESSING NOW, APPROVAL XXXXXX CONNECTION MADE, PROCESSING NOW This message indicates that the terminal has connected successfully. In this case, the following response displayed will be from your acquirer.
-
Page 88: Transaction And Terminal Responses
Appendix A Transaction And Terminal Responses APPROVAL The word ‘APPROVAL’ plus a 2 to 6 digit Approval Code indicates the transaction was approved by the Card Issuer. CARD BLOCKED The Card Issuer has blocked the card from use. CALL AUTH CENTRE A call to the Authorisation Centre is required to complete the transaction. -
Page 89: Cvv2 And Avs Responses
Appendix B CVV2 And AVS Responses DATA MATCHED The address, postcode and CVV2 code data supplied have all matched the data held by the Card Issuer. DATA NOT MATCHED The CVV2 code and one (or both) of the address details has not matched the data held by the Card Issuer. -
Page 90: Terminal Functions From The Menu System
Appendix C Terminal Functions From The Menu System The following terminal functions can be initiated from the Menu System. Reprint Allows the user to reprint a receipt of the last transaction in the current batch. Ensure the terminal is displaying the Welcome screen. MAIN MENU Press the ‘... -
Page 91: Terminal Functions Using'functions'shortcut
Appendix D Terminal Functions Using ‘Functions’ Shortcut The following functions can be initiated by pressing the ‘Functions’ key on the Transactions Menu and entering a two digit number (see table below). You may be asked to enter a password before the function can be activated. -
Page 92: Set A Pabx Digit(S)
Appendix E Set a PABX Digit(s) Terminals with a dial connection come pre-configured with the option to dial a 9 prefix digit before dialling out. By default. If you require a PABX Digit, please call the helpdesk. -
Page 93: Terminal Operation
Glossary Terminal Operation AVS - Address Verification System A security method used for Customer Not Present keyed transactions to help reduce fraud. This method confirms the house number and numbers from the postcode of the Cardholder’s registered address. (Not applicable on International cards.) Batch The store of transaction totals in the terminal. -
Page 94: Glossary Communications
An individual address given to every piece, of Ethernet networking equipment. This address is always marked on Spire Payments equipment containing such an address. Do not confuse with Message Authentication Certificate: a certificate used in the UKCA Standard 70 message protocol. -
Page 95: Software License
Software License © 2014 Spire Payments Holdings S.a.r.l. All rights reserved. All information is subject to change without notice and Spire Payments does not warrant the information’ s accuracy or correctness. Spire Payments, the Spire Payments logo, Thyron, Thyron Payments Systems and the Thyron Payments Systems logo are trademarks, service marks or registered trademarks or service marks of Spire Payments Holdings S.a.r.l.
Need help?
Do you have a question about the SPp10 and is the answer not in the manual?
Questions and answers