Dogtra 1800NC Series Owner's Manual
Remote controlled dog training collars
Hide thumbs
Also See for 1800NC Series:
- Settings manual (6 pages) ,
- Instruction manual (36 pages) ,
- Owner's manual (26 pages)
Table of Contents
Advertisement
Quick Links
Advertisement
Table of Contents

Related Manuals for Dogtra 1800NC Series


Summary of Contents for Dogtra 1800NC Series
-
Page 2: Table Of Contents
CONTENTS MAIN FEATURES PRODUCT SAFETY AND HEALTH STATEMENTS COLLAR PACKAGE CONTENTS DESCRIPTION OF TRANSMITTER PARTS DESCRIPTION OF COLLAR / RECEIVER PARTS BATTERY CHARGER CHARGING THE BATTERIES TESTING YOUR COLLAR OPERATING INSTRUCTIONS ACCESSORIES WARRANTY AND REPAIR INFORMATION... -
Page 3: Main Features
Dogs should be in good health during any e-collar Reliable stimulation effective for all types of training. Dogtra e-collars are not intended for use on dogs - no matter how heavy the coat. dogs weighing less than 12 pounds or under 6 months of age. -
Page 4: Collar Package Contents
They are not intended for human use or use on other animals. Dogtra Company does not assume any liability for Transmitter improper use of the Dogtra e-collar. Receiver (s) -
Page 5: Description Of Transmitter Parts
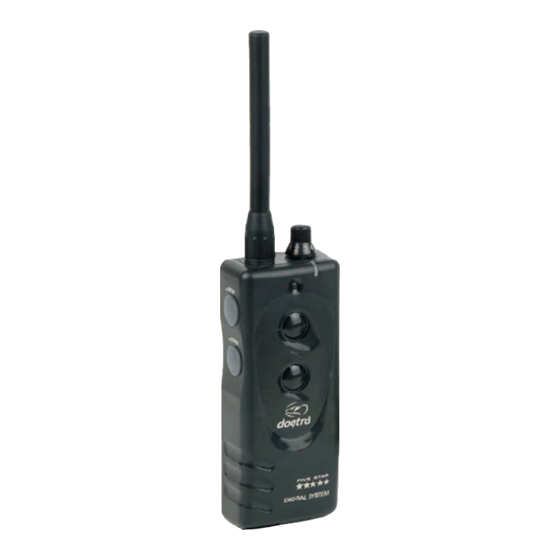
TRANSMITTER TRANSMITTER DESCRIPTION OF TRANSMITTER PARTS transmitter Antenna Intensity 3.2 Antenna Selection Dial Indicator Light Transmitter Antenna Selector or Toggle Switch A heavy-duty 3.2 antenna is supplied with (Nick, Cont.) -dog Button transmitter. -dog Button The antenna should be screwed into the top of the transmitter to ensure that the signals are sent -dog Button properly to the collar receiver and that maximum... - Page 6 TRANSMITTER TRANSMITTER Transmitter Battery Charging Receptacle Located on the side of the transmitter, the receptacle is covered by a rubber plug. Insert one end of the battery charging cable into the receptacle to charge the battery. (See Battery Intensity Selection Dial Charging Procedure on page 24.) The intensity selection dial is located on the After charging is completed, close the...
-
Page 7: Button Function
BUTTON FUNCTION TRANSMITTER BUTTON FUNCTION ONE-DOG MODELS Nick Transmitter Indicator Light (LED window) The transmitter indicator light is located near Cont. the intensity selection dial. When a button on the transmitter is pushed, the light comes on to indicate that the transmitter is being activated. The color of the light indicates the status of The transmitter for has two... - Page 8 BUTTON FUNCTION BUTTON FUNCTION TWO-DOG MODELS “Nick” Button When the “Nick” button is pushed the receiver emits a single, rapid pulse of electrical stimulation. -dog (Gray Button) “Constant” Button Pressing the “Constant” button gives -dog continuous stimulation as long as the button is (Orange Button) pushed, for up to twelve seconds.
- Page 9 BUTTON FUNCTION BUTTON FUNCTION FOUR-DOG MODELS THREE-DOG MODELS -dog -dog (Gray Button) (Gray Button) -dog (Green Button) -dog (Green Button) -dog -dog -dog (Blue Button) (Orange Button) (Orange Button) The transmitter for the The transmitter for the has four buttons; The Gray (1 dog) button has three buttons;...
-
Page 10: Description Of Collar / Receiver Parts
COLLAR / RECEIVER COLLAR / RECEIVER DESCRIPTION OF COLLAR / RECEIVER PARTS collar Collar strap Turning on the Collar Receiver The ON/OFF button is on the bottom of the Contact Points receivers. Push and hold the button for two Battery seconds until the LED light, located on the front Charging of the collar, starts blinking. - Page 11 COLLAR / RECEIVER COLLAR / RECEIVER green = full charge, amber = medium charge red = needs charge When the “Constant” button on the transmitter is pushed, the collar indicator light will glow steadily as long as you hold the button down, for up to twelve seconds.
-
Page 12: Battery Charger
BATTERY CHARGER COLLAR / RECEIVER BATTERY CHARGER Charging Cable 120 volt Charger Receiver Battery Charging Receptacle The battery charger and charging cables allow On the inside of the collar, next to the collar you to charge both the transmitter and receiver at strap, is a battery charging receptacle with a the same time. -
Page 13: Charging The Batteries
CHARGING THE BATTERIES CHARGING THE BATTERIES CHARGING THE BATTERIES 2. Do not charge the batteries near any flammable substances. 3. Fully charge the batteries for 14 hours if the collar is to be stored without use for a period of a month or more. 4. -
Page 14: Testing Your Collar
CHARGING THE BATTERIES TESTING TESTING YOUR Battery Charging Procedure COLLAR 1. Attach the charging cables to both the transmitter and receiver(s), as shown on page 22. 2. Plug the charger into a 120-volt wall outlet or, if using the accessory field charger, plug into a cigarette lighter. -
Page 15: Operating Instructions
TESTING OPERATING 2. Watch the test light as you push the “Nick” OPERATING INSTRUCTIONS button on the transmitter. It should light for just a moment. Fitting the Collar 3. Watch the test light as you push the “Constant” button on the transmitter. It should The collar strap should be adjusted so that glow brightly. - Page 16 OPERATING MAINTENANCE Maintenance Intensity Selection To select the intensity level, start on the The receiver and collar strap should be lowest (1) setting. Gradually increase the level cleaned periodically with detergent and water to prevent malfunction. until you get a response from the dog that would be equivalent to a quick pull or jerk with a leash.
-
Page 17: Accessories
RECEPTION ACCESSORIES ACCESSORIES Reception collar has one- The following items may be purchased mile range. Depending on the way you use separately : your transmitter, the transmitting range may vary. Hold the transmitter away from your body European Charger and avoid touching the antenna to get the Designed for use with 230V AC electrical greatest range. -
Page 18: Warranty And Repair Information
Dogtra will estimate the age of the unit responsibility. Labor fees will be variable by the serial number. Serial number estimates can depending on the extent of work required. - Page 19 1502NCP will also not be covered. All for loss of training time or inconvenience while replacement cost for either the transmitter or the unit is in for repair work. Dogtra does not receiver will be the owner’s responsibility. provide loaner units or any form of...
- Page 20 Or, you can visit our website at www.dogtra.com. Click on the Service Request Form, print it out and follow the instructions. If repair costs are not covered under...
Need help?
Do you have a question about the 1800NC Series and is the answer not in the manual?
Questions and answers