Table of Contents

Related Manuals for DR Manual-Start - Push


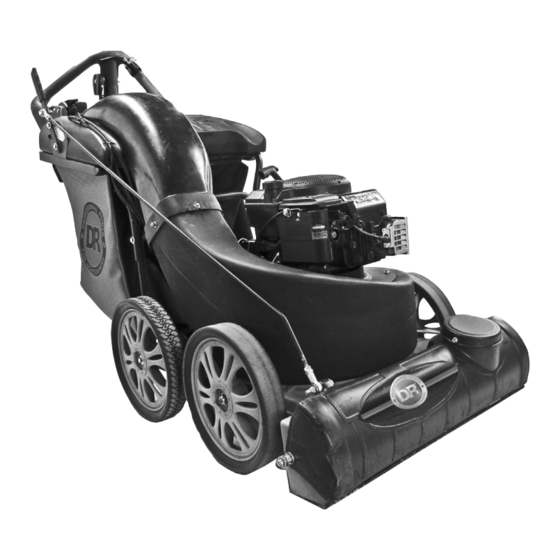
Summary of Contents for DR Manual-Start - Push
- Page 1 ® WALK-BEHIND LEAF & LAWN VACUUM SAFETY & OPERATING INSTRUCTIONS Models: Manual-Start - Push Manual-Start - Self-Propelled Electric-Start - Self-Propelled READ AND UNDERSTAND THIS MANUAL AND ALL INSTRUCTIONS BEFORE OPERATING THIS VACUUM.
- Page 2 DR WALK-BEHIND LEAF & LAWN VACUUM! We have done our utmost to ensure that your DR WALK-BEHIND LEAF & LAWN VACUUM will be one of the most trouble-free and satisfying pieces of equipment you have ever owned. Please let us know of any questions or problems you may have.
-
Page 3: Table Of Contents
Additional Information and Potential Changes.............. 9 CHAPTER 3........................... 11 SETTING UP YOUR DR WALK-BEHIND LEAF & LAWN VACUUM......11 DR WALK-BEHIND LEAF & LAWN VACUUM Controls and Features ......12 Unpacking and Assembling the Machine..............13 Opening the Shipping Carton ..................13 Attaching the Top Shield/Upper Handle Assembly ............. - Page 4 CHAPTER 6........................... 43 TROUBLESHOOTING....................43 Troubleshooting Table....................43 CHAPTER 7........................... 46 PARTS LISTS, SCHEMATIC DIAGRAMS AND WARRANTY........46 Parts List - Nozzle and Front Axle Assembly..............46 Schematic Diagram - Nozzle and Front Axle Assembly..........47 Parts List - Drive/Rear Axle Assembly................48 Schematic Diagram - Drive/Rear Axle Assembly............
-
Page 5: Chapter 1
THIS INFORMATION IS IMPORTANT IN THE PROPER USE OF YOUR MACHINE. FAILURE TO FOLLOW THIS INSTRUCTION COULD RESULT IN DAMAGE TO YOUR MACHINE OR PROPERTY. Tip: This is a helpful hint to guide you in getting the most out of your DR WALK-BEHIND LEAF & LAWN VACUUM. -
Page 6: Wll Specification Sheet
WLL Specification Sheet WLL 6.0 HP Manual-Start, WLL 6.0 HP Manual-Start, WLL 6.0 HP Electric-Start, Push Self-Propelled Self-Propelled Engine Manual, Briggs & Stratton Manual, Briggs & Stratton Electric, Briggs & Stratton Type Quantum Quantum Quantum Horsepower Self Propelled Battery 12V 5.6ah Impeller weight 17.56 lbs 17.28 lbs... -
Page 7: Chapter 2
Your DR WALK-BEHIND LEAF & LAWN VACUUM carries prominent labels as reminders for its proper and safe use. Shown below are copies of all the labels that appear on the equipment. Take a moment to study them and make a note of their location on your DR WALK-BEHIND LEAF & LAWN VACUUM as you before assemble and you operate the machine. - Page 8 Do not allow people or pets near the machine when it is operating. #21854 Keep hands away from Drive Belt and Sprocket when the engine is running. #21862 To raise or lower the vacuum nozzle, turn the crank handle clockwise or counterclockwise. #21675 You can adjust the Nozzle Door for Turf, a Hard Surface, or the Optional Hose Kit.
-
Page 9: Protecting Yourself And Those Around You
• NEVER, UNDER ANY CONDITIONS, REMOVE, BEND, CUT, FIT, WELD, OR OTHERWISE ALTER STANDARD PARTS ON THE DR WALK-BEHIND LEAF & LAWN VACUUM. THIS INCLUDES ALL SHIELDS AND GUARDS. MODIFICATIONS TO YOUR MACHINE COULD CAUSE PERSONAL INJURIES AND PROPERTY DAMAGE AND WILL VOID YOUR WARRANTY. -
Page 10: Slope Operation
KEEP CHILDREN OUT OF THE WORK AREA AND UNDER THE WATCHFUL CARE OF A RESPONSIBLE ADULT. • BE ALERT AND ALWAYS TURN OFF THE DR WALK-BEHIND LEAF & LAWN VACUUM ENGINE IF CHILDREN ENTER THE WORK AREA. • BEFORE, AND WHILE MOVING BACKWARDS, LOOK BEHIND, AND DOWN FOR SMALL CHILDREN. -
Page 11: Safety With Gasoline-Powered Machines
DISPOSE OF THE WASTE. • ALLOW THE ENGINE TO COOL COMPLETELY AND EMPTY THE DEBRIS BAG BEFORE STORING THE DR WALK-BEHIND LEAF & LAWN VACUUM IN ANY ENCLOSURE. REMEMBER, DECOMPOSING MATERIAL GENERATED HEAT AND START A FIRE. NEVER STORE THE MACHINE WITH GAS IN THE TANK OR A FUEL CONTAINER, NEAR AN OPEN FLAME OR SPARK SUCH AS A WATER HEATER. -
Page 12: General Safety
LOOSE IMPELLER BOLT, LOOSE IMPELLER KEY, OR LOOSE ENGINE MOUNTING BOLTS. CLEAN AND REPAIR AND/OR REPLACE DAMAGED PARTS. • ALWAYS SHUT OFF THE DR WALK-BEHIND LEAF & LAWN VACUUM ENGINE, WAIT FIVE (5) MINUTES TO COOL, AND DISCONNECT THE SPARK PLUG WIRE BEFORE ATTEMPTING TO CLEAR ANY OBSTRUCTIONS. •... -
Page 13: A Note To All Users
This also applies to operation on US Forest Lands. All DR WALK-BEHIND LEAF & LAWN VACUUMS shipped to California and Washington State are provided with spark arresters. Failure of the owner/operator to maintain this equipment in compliance with state regulations is a misdemeanor under California law and may be in violation of other state and/or federal regulations. - Page 14 ® WALK-BEHIND LEAF & LAWN VACUUM...
-
Page 15: Chapter 3
CHAPTER 3 SETTING UP YOUR DR WALK-BEHIND LEAF & LAWN VACUUM This chapter outlines a few simple steps you will need to follow to set up your new machine before you use it. It may be helpful to familiarize yourself with the controls and features on your new machine by reviewing the picture in the next section before beginning the steps outlined in this chapter. -
Page 16: Dr Walk-Behind Leaf & Lawn Vacuum Controls And Features
& DR WALK-BEHIND LEAF LAWN VACUUM Controls and Features NOTE: The model shown in Figure 1 may look slightly different from your machine. Gear Shift Lever (Self-Propelled Models) Nozzle Door Lever Manual Recoil Start Handle & Briggs Stratton 6.0 HP... -
Page 17: Unpacking And Assembling The Machine
Unpacking and Assembling the Machine Your DR WALK-BEHIND LEAF & LAWN VACUUM is shipped in one carton, completely assembled except for the Top Shield/Upper Handle Assembly and the Nozzle Door Rod. The mounting hardware for the Top Shield/Upper Handle Assembly is temporarily installed on the Lower Handle Brace and the remaining hardware is in the Hardware Bag (see the Attaching Hardware Description on the next page). - Page 18 Top Shield/Upper Wrapped Nozzle Door Rod Handle Assy Control Cut this end of carton and fold it down. Cables Figure 2 Figure 3 Attaching Hardware Description: (not shown to scale) Bolts: (1) Bolt, 1/4"-20 x 3/4" (1) Bolt, 5/16"-18 x 1-3/4" (2) Bolt, 3/8"-16 x 2-1/2"...
-
Page 19: Attaching The Top Shield/Upper Handle Assembly
6. Now you can safely roll the machine out of the shipping carton. Left Upper Handle Brace Left Lower Top Shield/Upper Handle Brace Handle Assembly 1/4"-20 Bolt and Washer Lower Housing 5/16"-18 x 5/16" Washer and 1-3/4" Bolt 5/16"-18 Lock Nut and 5/16" Washer Figure 4b Figure 4a CALL TOLL FREE 1-800-DR-OWNER... - Page 20 Tip: For easier access in the next steps, you may want to tilt the machine forward and block up the rear axle between the rear wheels using a milk crate as a suggestion (Figure 5). 7. From the underside of the Top Shield (Figure 5), install a 1/4"-20 Screw with a 1/4" Fender Washer through the Lower Housing and Top Shield.
-
Page 21: Attaching The Nozzle Door Rod
Ball-Joint 3/8"-16 Lock Nut Lever w/Washer 3/8"-16 x 1-1/2" Ball-Joint Bolt Mounting Hole 3/8"-16 3/8"-16 x 2-1/2" Bolt Lock Nut w/Washer Retaining 3/8" Flat Washer, 2 places Nozzle Door Rod Nozzle Door Figure 6 Figure 7 CALL TOLL FREE 1-800-DR-OWNER... -
Page 22: Attaching The Debris Bag
Attaching the Debris Bag The following procedure in Figure 8 illustrates the steps necessary for attaching the Debris Bag to the Top Shield Assembly on the DR WALK-BEHIND LEAF &LAWN VACUUM. Channel 1. Place the Left and Right ends of the... -
Page 23: Connecting The Battery Wire (Electric-Starting Model)
Connecting the Battery Wire (Electric-Starting Model) We ship all electric-starting systems with the negative terminal battery wire disconnected. This prevents the battery from discharging during shipment. Before using your DR WALK-BEHIND LEAF & LAWN VACUUM, you must connect the battery wire. -
Page 24: Adding The Engine Oil And Gasoline
Adding the Engine Oil and Gasoline • YOU MUST ADD OIL BEFORE STARTING THE ENGINE. THIS MACHINE SHIPPED WITHOUT OIL. TRACES OF OIL MAY BE IN THE RESERVOIR FROM FACTORY TESTING, BUT YOU MUST ADD OIL BEFORE STARTING THE ENGINE. FILL THE RESERVOIR SLOWLY CHECKING THE DIPSTICK FREQUENTLY TO AVOID OVERFILLING. - Page 25 Recoil Starter Handle Gas Fill Oil Fill Air Filter Primer Bulb Muffler Spark Plug Figure 10 CALL TOLL FREE 1-800-DR-OWNER...
- Page 26 ® WALK-BEHIND LEAF & LAWN VACUUM...
-
Page 27: Chapter 4
CHAPTER 4 OPERATING YOUR DR WALK-BEHIND LEAF & LAWN VACUUM This chapter covers the procedures for starting and stopping your new DR WALK-BEHIND LEAF & LAWN VACUUM and discusses basic operation features. • THE DESIGN OF THIS MACHINE IS FOR VACUUMING LEAVES, GRASS CLIPPINGS AND OTHER TYPES OF ORGANIC LITTER AS WELL AS DEBRIS MIXED WITH CANS, BOTTLES AND SMALL AMOUNTS OF SAND. -
Page 28: Before Starting The Engine
One or two pulls usually starts the DR WALK-BEHIND LEAF & LAWN VACUUM. It may be necessary to repeat the priming operation if the machine does not start within two pulls. -
Page 29: Electric-Starting
4. Move the Throttle back to the desired operating speed; however, we recommend that you operate the engine in the fast (Rabbit) position for optimum performance of the DR WALK-BEHIND LEAF & LAWN VACUUM. -
Page 30: Operating Safety
WE RECOMMEND WEARING THEM. DO NOT USE THE MACHINE WHILE BAREFOOT OR WEARING OPEN SANDALS. • WEAR LONG PANTS WHILE OPERATING THE DR WALK-BEHIND LEAF & LAWN VACUUM. • USE EAR PROTECTORS OR EAR PLUGS RATED FOR AT LEAST 20 DBA TO PROTECT YOUR HEARING. -
Page 31: Vacuum Nozzle Door Operation
Nozzle Door fully opened. This is ideal for turf application. Nozzle Door opened half way. This is ideal for hard surface application. Nozzle Door closed for the OPTIONAL Hose Kit. This is ideal for hard to reach places. Figure 14 CALL TOLL FREE 1-800-DR-OWNER... -
Page 32: Vacuuming Operation
Vacuuming Operation The design of this machine is for vacuuming leaves, grass clippings, and other types of organic litter. You can also vacuum debris mixed with cans, bottles, and small amounts of sand. Tip: Many vacuums are used where dust is mixed in with trash. Your machine can intermittently vacuum dusty areas. -
Page 33: Slopes And Uneven Terrain
Slopes and Uneven Terrain • WHEN OPERATING THE DR WALK-BEHIND LEAF & LAWN VACUUM OVER UNEVEN TERRAIN OR SLOPES, USE EXTREME CAUTION NOT TO LOOSE YOUR FOOTING OR TIP THE MACHINE OVER. • NEVER OPERATE YOUR MACHINE ON SLOPES GREATER THAN 20 DEGREES. DOING SO COULD RESULT IN SERIOUS INJURY OR DAMAGE TO YOUR MACHINE. -
Page 34: Emptying The Debris Bag
Emptying the Debris Bag • MOVE THE MACHINE TO LEVEL AREA BEFORE CLEANING. • BEFORE EMPTYING THE DEBRIS BAG, BE SURE THAT THE ENGINE HAS COME TO A COMPLETE STOP. • NEVER PLACE THE DEBRIS BAG ON OR NEAR A HOT SURFACE SUCH AS THE ENGINE. •... -
Page 35: Installing The Optional Disposable Debris Bag Liner (P/N 21794, Package Of 12)
Bag Presence Interlock Switch is properly engaged (see Figure 8c on page 18) and there is a good seal between the Bag Frame and the Top Shield Assembly. Top Shield Assembly Slot for Frame Support Retaining Pin through Liner Liner through Frame Pin Bag Frame Support Figure 17a Figure 17b CALL TOLL FREE 1-800-DR-OWNER... -
Page 36: Handling And Transporting
NEVER LIFT THE MACHINE WHILE THE ENGINE IS RUNNING. We recommend using two (2) people to lift the DR WALK-BEHIND LEAF & LAWN VACUUM. Lift the machine holding the Handle and the front of the Nozzle. Make sure to properly secure the vacuum in the transporting vehicle. -
Page 37: Chapter 5
Replace Air Filter and Pre-cleaner** ▲ Replace the *Drive Belt. ▲ Replace Spark Plug ▲ * Applicable to Self-Propelled models. ** The engine on your DR WALK-BEHIND LEAF & LAWN VACUUM may not have a Pre-cleaner or Oil Filter. CALL TOLL FREE 1-800-DR-OWNER... -
Page 38: Lubrication
MINUTES TO ALLOW PARTS TO COOL AND DISCONNECT THE SPARK PLUG WIRE, KEEPING IT AWAY FROM THE SPARK PLUG. Your DR WALK-BEHIND LEAF & LAWN VACUUM was lubricated at the Factory. The operator needs to provide engine lubrication and lubricate the Throttle Control Cable, *Drive Clutch Cable, *Drive Chain, and the *Gear Shift Cable periodically. -
Page 39: Removing And Replacing The Engine Oil
3. Reattach the spark plug wire. NOTE: If you are not reusing the oil, be sure to use environmentally safe disposal procedures in the disposing of the used oil. Engine Oil Fill Cap and Tube Figure 20 CALL TOLL FREE 1-800-DR-OWNER... -
Page 40: Battery Care (For Electric-Starting Models)
Operate the engine for at least 45 minutes to maintain proper battery charge. If the battery loses its charge, you will need to use a trickle charger (like the DR Battery Charger) to recharge it. The charger should have an output of 12 volts at no more than 2 amps. -
Page 41: Removing And Replacing The Impeller
7. If the Impeller does not slide off the Engine Crankshaft, place two (2) Pry Bars between Lock Washer Impeller and Mounting Plate on opposite sides. Carefully and evenly, pry the Impeller away from Engine until it loosens. Impeller Bolt Figure 22 CALL TOLL FREE 1-800-DR-OWNER... - Page 42 Tip: Using a penetrating oil can help loosen a stuck Impeller. 8. If you still cannot loosen the Impeller, obtain a 3/8"-24 x 3-3/4" Bolt, and thread the Bolt by hand into the Engine Crankshaft until the Bolt bottoms out. Using a suitable gear or wheel puller against the Bolt Head and the backside of the Impeller (near the blades), remove the Impeller from the Crankshaft.
-
Page 43: Drive Clutch Cable Adjustment
Spring length to assure it stayed in adjustment. 7. Readjust as required. 8. Reinstall the Belt Cover and reconnect the Spark Plug Wire. 9. Test run the DR WALK-BEHIND LEAF & LAWN VACUUM to insure proper operation after this or any other maintenance procedure. Cable... -
Page 44: Removing And Replacing The Drive Belt
Removing and Replacing the Drive Belt WHEN PERFORMING ANY MAINTENANCE, YOU MUST FIRST SHUT OFF THE ENGINE, WAIT FIVE (5) MINUTES TO ALLOW PARTS TO COOL AND DISCONNECT THE SPARK PLUG WIRE, KEEPING IT AWAY FROM THE SPARK PLUG. Tools Needed: •... -
Page 45: Drive Chain Alignment/Tension
7. Thread the new Drive Chain onto the sprockets. Tip: Place the ends of the Chain on the Axle Sprocket; this makes it easier to hold the Chain in place when you slide the new Master Link in place. CALL TOLL FREE 1-800-DR-OWNER... -
Page 46: End Of Season And Storage
Change the oil. • If your DR WALK-BEHIND LEAF & LAWN VACUUM will be idle for more than 30 days, we recommend using a gas stabilizer. This will prevent sediment from gumming up the carburetor. If there is dirt or moisture in the gas or tank, remove it by draining the tank. Completely fill the tank with fresh, unleaded gas and add the appropriate amount of stabilizer or gasoline additive. -
Page 47: Chapter 6
Spark Plug hole and pull the recoil cord several times to blow out any oil in the cylinder. Wipe off the Spark Plug and reinstall it. ⇒ The recoil may be broken or jammed. Call 1-800-DR-OWNER (376-9637) for assistance. The engine will not ⇒... - Page 48 45 minutes at a time, the battery may need to be periodically charged. See the Battery Care section on page 36. ⇒ If your battery is charged and your DR WALK-BEHIND LEAF & LAWN VACUUM still will not start, call 1-800-DR-OWNER (376-9637) for assistance.
- Page 49 Use 1 or 2 gear for best results. ⇒ If your DR WALK-BEHIND LEAF & LAWN VACUUM is still not vacuuming properly, call 1-800-DR-OWNER (376-9637) for assistance. ⇒ The Impeller is loose or out of balance. Tighten or replace the Impeller. See page Vibrations higher than normal.
-
Page 50: Chapter 7
Nut, Pal, 1/2" Diameter 21862 Label, Warning, Open 21865 Cover, Nozzle 21813 Bolt, Carriage, 5/16"-18 x 3-1/2" 21181 Label, Product Decal, DR 21890 Roll Pin, 1/4" x 1" long 21892 Screw, Plastic 21930 Washer, 1/2", SAE 21875 Label, Height Adjuster 21864 Nozzle, Vacuum, 27", Plastic... -
Page 51: Schematic Diagram - Nozzle And Front Axle Assembly
Schematic Diagram - Nozzle and Front Axle Assembly 060620 CALL TOLL FREE 1-800-DR-OWNER... -
Page 52: Parts List - Drive/Rear Axle Assembly
Parts List - Drive/Rear Axle Assembly NOTE: Part numbers listed are available through Country Home Products, Inc. Ref# Part# Description Ref# Part# Description 21825 Bracket, Transmission Mount 107 21893 Screw, Self-Tap, 5/16"NC x 3/4" Hex 21809 Bearing, 3/4" w/Pillow Block 108 21831 Chain, #41 x 42 Pitch 21386... -
Page 53: Schematic Diagram - Drive/Rear Axle Assembly
Schematic Diagram - Drive/Rear Axle Assembly Drive Assembly - Self-Propelled Models Rear Axle Assembly - Push Model 060620 CALL TOLL FREE 1-800-DR-OWNER... -
Page 54: Parts List - Engine W/Impeller And Housing - Manual-Start Model
Parts List - Engine w/Impeller and Housing – Manual-Start Model NOTE: Part numbers listed are available through Country Home Products, Inc. Ref# Part# Description 21405 Engine, Briggs & Stratton 6.0 HP Quantum 21851 Impeller Assembly, Self-Propelled models 21852 Impeller Assembly, Push model 21881 Plate, Top, Self-Propelled models 21880... -
Page 55: Schematic Diagram - Engine W/Impeller And Housing - Manual-Start Model
Schematic Diagram - Engine w/Impeller and Housing – Manual-Start Model 060619 CALL TOLL FREE 1-800-DR-OWNER... -
Page 56: Parts List - Engine W/Impeller And Housing - Electric-Start Model
Parts List - Engine w/Impeller and Housing – Electric-Start Model NOTE: Part numbers listed are available through Country Home Products, Inc. Ref# Part# Description 21406 Engine, B&S 6.0 HP Quantum, E/S 21851 Impeller Assembly 21881 Plate, Top 21850 Housing, Plastic 21933 Washer, Lock, 3/8", Twisted Tooth 21858... -
Page 57: Schematic Diagram - Engine W/Impeller And Housing - Electric-Start Model
Schematic Diagram - Engine w/Impeller and Housing – Electric-Start Model 060619 CALL TOLL FREE 1-800-DR-OWNER... -
Page 58: Parts List - Top Shield And Bag Assembly - All Models
Parts List – Top Shield and Bag Assembly - All Models NOTE: Part numbers listed are available through Country Home Products, Inc. Ref# Part# Description Ref# Part# Description 130 21849 Top Shield, Plastic 165 21891 Screw, Cap, 3/8"-16 x 1-1/2", ZP 131 21815 Bracket, Bag, Channel, RH 166 21874... -
Page 59: Schematic Diagram - Top Shield And Bag Assembly - All Models
Schematic Diagram – Top Shield and Bag Assembly - All Models 060612 CALL TOLL FREE 1-800-DR-OWNER... - Page 60 NOTES ® WALK-BEHIND LEAF & LAWN VACUUM...
-
Page 61: Warranty
Country Home Products, Inc.’s objective is to have 100% satisfied customers. For that reason, we operate a 6-day-a-week Technical Service Department for our Owners. You can access a Representative by dialing our TOLL-FREE Hotline at 1-800-DR- OWNER (376-9637). The sole job of our well-trained and friendly folks is to ensure that you get any help you need in a timely fashion. - Page 62 Daily Checklist for the DR WALK-BEHIND LEAF LAWN VACUUM To help maintain your DR WALK-BEHIND LEAF & LAWN VACUUM for optimum performance, we recommend you follow this checklist each time you use your machine. [ ] OIL: With the machine on a level surface, remove the oil fill cap and check the oil level.
Need help?
Do you have a question about the Manual-Start - Push and is the answer not in the manual?
Questions and answers