
Related Manuals for DR DR


Summary of Contents for DR DR
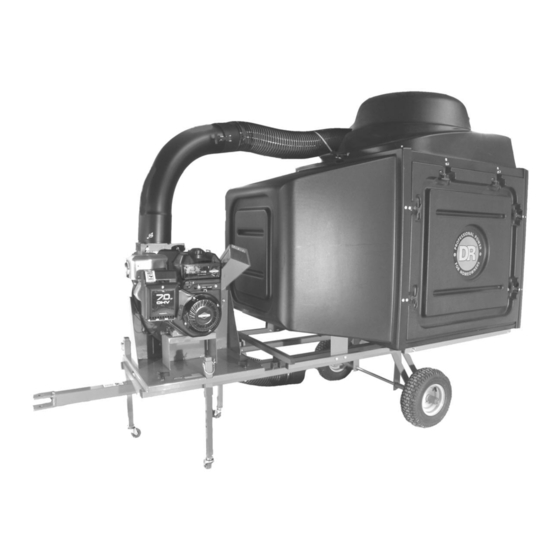
- Page 1 COMMERCIAL LEAF and LAWN VACUUM Safety & Operating Instructions Please read instructions before operating machine...
- Page 2 And congratulations on your purchase of a new DR LEAF and LAWN VACUUM! We have done our utmost to ensure that your DR LEAF and LAWN VACUUM will be one of the most trouble-free and satisfying pieces of equipment you have ever owned.
-
Page 3: Table Of Contents
A Note to All Users ... 7 Additional Information and Potential Changes... 7 Chapter 3: Setting Up Your DR LEAF and LAWN VACUUM ...8 DR LEAF and LAWN VACUUM Controls and Features ... 8 Unpacking and Assembling the Machine ... 9 Attaching Hardware Description ...10... - Page 4 Chapter 7: Parts Lists and Schematic Diagrams...46 Parts List — Trailer Assembly ...46 Schematic Diagram — Trailer Assembly ...47 Parts List — Blower/Chipper Assembly ...48 Schematic Diagram — Blower/Chipper Assembly...49 Parts List — Centrifugal Separator, Hose & Blower Exit Elbow Assembly ...50 Schematic Diagram —...
-
Page 5: Chapter 1: Introducing The Dr Leaf And Lawn Vacuum
Chapter 1: Introducing the DR LEAF and LAWN VACUUM This manual will help you set up and safely operate your new DR LEAF and LAWN VACUUM. Careful adherence to the safety and operating instructions in this manual will ensure many years of productive use. -
Page 6: Chapter 2: Safety Considerations
Taking the time to read and observe all safety instructions will ensure many years of productive use from your DR LEAF and LAWN VACUUM and help you avoid injury. Please take a few moments to read the following guidelines for safely operating your new machine. - Page 7 Safety & Operating Instructions manual and of paying attention to the safety warnings. #18836 Always raise the three support legs before towing the DR LEAF and LAWN VACUUM. #18885 Never detach a vacuum hose or remove a cover or guard while the engine is running.
-
Page 8: Protecting Yourself
Check behind your DR LEAF and LAWN VACUUM before backing up. You cannot see directly behind the Collector Box. Never attempt to dump a load while the lawn tractor engine or the DR LEAF and LAWN VACUUM engine is running. - Page 9 When using the DR LEAF and LAWN VACUUM as a trailer, be sure to secure the load. DO NOT tow the DR LEAF and LAWN VACUUM faster than 8 MPH. Keep your hands out of the Chipper Hopper and Vacuum Inlet while the lawn tractor and the DR LEAF and LAWN VACUUM engines are running.
-
Page 10: Slope Operation
Keep children out of the work area and under the watchful care of a responsible adult. Be alert and always shut OFF the lawn tractor engine and the DR LEAF and LAWN VACUUM engine if children enter the work area. -
Page 11: Safety With Gasoline-Powered Machines
This also applies to operation on US Forest Lands. All DR LEAF and LAWN VACUUMS shipped to California and Washington State are provided with spark arresters. Failure of... -
Page 12: Chapter 3: Setting Up Your Dr Leaf And Lawn Vacuum
Chapter 3: Setting Up Your DR LEAF and LAWN VACUUM This chapter outlines a few simple steps you will need to follow to set up your new machine before you use it. It may be helpful to familiarize yourself with the controls and features on your machine by reviewing the picture below before beginning the steps outlined in this chapter. -
Page 13: Unpacking And Assembling The Machine
Unpacking and Assembling the Machine The DR LEAF and LAWN VACUUM is shipped from the factory with the wheels dismounted from the axles. The following instructions will detail how to unpack the machine, assemble the wheels to the axles, install the Tilt Bed, and assemble the Collector Box. -
Page 14: Attaching Hardware Description
Attaching Hardware Description COMMERICAL LEAF and LAWN VACUUM Safety & Operating Instructions... -
Page 15: Opening The Shipping Container And Installing The Wheels
Opening the Shipping Container and Installing the Wheels WARNING! Stabilize the shipping container on flat terrain before WARNING! Always wear eye protection when cutting the banding. The 1. Stand to one side and cut the banding. 2. Remove the top of the carton (Figure 2). 3. -
Page 16: Tire Pressure Check
9. Slide a Flat Wheel Washer over the Axle and up against the Axle Bracket (Figure 3). 10. Lift the frame and with the valve stem facing out, slide a wheel on the axle, install a second flat wheel washer over the axle and slide it up against the wheel hub (Figure 4). -
Page 17: Tilt Bed Installation
The following procedure includes all of the steps necessary for the installation of the Tilt Bed on the DR LEAF and LAWN VACUUM. Note: The plastic Tilt Bed is mounted loosely on the frame to allow for expansion of the plastic. -
Page 18: Collector Box Installation
Collector Box Installation The following procedure includes all of the steps necessary for the installation of the Collector Box on the DR LEAF and LAWN VACUUM. 1. Place the projecting edges of the two Side Panels in the slots on the trailer as shown. - Page 19 5. Attach the front enclosure panel on the protruding support pins and fasten the sides, top and bottom using the six (6) flexible latches (Figure 12). The mounting holes are located on top of the panels. Tip: For ease of attaching the front box cover, pull the Dump Lever and tilt the body back.
-
Page 20: Blower Exit Elbow Assembly Installation
Connecting the Collector Box Inlet Hose to the Blower Exit Elbow Assembly The following procedure includes the steps necessary for connecting the Collector Box Inlet Hose to the Blower Exit Elbow Assembly on the DR LEAF and LAWN VACUUM. 1. Connect Collector Box to the Blower Exit... -
Page 21: Universal Hitch Plate Installation
The Hitch Plate is designed to accommodate a variety of mounting positions to achieve the proper tongue height for the DR LEAF and LAWN VACUUM. Note: Depending on the size and shape of your lawn tractor, you may not need the Universal Hitch Plate. -
Page 22: Connecting The Dr Leaf And Lawn Vacuum To Your Lawn Tractor
Connecting the DR LEAF and LAWN VACUUM to your Lawn Tractor The following procedure includes the steps necessary for connecting the DR LEAF and LAWN VACUUM to your lawn tractor. 1. Position your lawn tractor on level ground at a slight angle to the trailer... -
Page 23: Lawn Deck Adapter Installation
Lawn Deck Adapter Installation The following procedure includes the steps necessary for connecting the DR LEAF and LAWN VACUUM Blower Inlet Hose to your lawn tractor. Tools Needed: 1/2" Wrench or Socket Drill with 3/8" Bit 1. Install your lawn deck adapter (available from the manufacturer of your lawn tractor) on your lawn tractor. -
Page 24: Hose Adapter
4. We have supplied both a 7" to 6" and 8" to 6" Hose Adapter. Determine which best fits your lawn deck adapter. 5. Slip the Hose Adapter over the cut end of your Lawn Deck Adapter, until they make contact. 6. -
Page 25: Connecting The Blower Inlet Vacuum Hose To The Hose Adapter
Connecting the Blower Inlet Vacuum Hose to the Hose Adapter The following procedure includes the steps necessary for connecting the Blower Inlet Vacuum Hose of the DR LEAF and LAWN VACUUM to the Hose Adapter. Tools May Be Needed: Wire Cutters or Hack Saw... - Page 26 Note: If a tighter turning radius is required, and there is enough hose length to accommodate this, the supplied Hitch Extender may be used (Figure 24). The Hitch Extender is most useful when using your DR LEAF and LAWN VACUUM as a trailer to obtain maximum maneuverability when not concerned about hose length.
-
Page 27: Adding The Engine Oil And Gasoline
Adding the Engine Oil and Gasoline WARNING! You must add oil before starting the engine. This machine is shipped without oil. Traces of oil may be in the reservoir from factory testing, but YOU MUST ADD OIL BEFORE STARTING THE ENGINE. -
Page 28: Chapter 4: Operating Your Dr Leaf And Lawn Vacuum
DR LEAF and LAWN VACUUM. 1. Connect the DR LEAF and LAWN VACUUM to your lawn tractor (see page 18) and raise the three Support Legs into the mounting frame by repositioning the quick release pins into the lower holes provided in the leg shafts (see Figure 18 on page 18). -
Page 29: Operating Safety
2 inches in diameter. Note: Always be sure to stand inside the Operator Zones to run the DR LEAF and LAWN VACUUM as a chipper or held hand vacuum. These are the areas on either side of your machine (Figure 27). -
Page 30: Towing The Dr Leaf And Lawn Vacuum
WARNING! Raise the Support Legs prior to towing this equipment. Extended 1. Make sure the DR LEAF and LAWN VACUUM trailer tongue is firmly attached to your lawn tractor Hitch Plate using the Clevis Pin and Hitch Clip (Figure 28). Also see Connecting the DR LEAF and LAWN VACUUM to your Lawn Tractor on page 18. -
Page 31: Slopes & Uneven Terrain
COMMERICAL LEAF and LAWN VACUUM Safety & Operating Instructions When operating the DR LEAF and LAWN VACUUM over uneven terrain and slopes, use EXTREME CAUTION to not tip over the machine. Move slowly, especially with a full load, if the ground has ruts, bumps and other depressions. -
Page 32: Operating The Chipper
Operating the Chipper In addition to towing the DR LEAF and LAWN VACUUM with your lawn tractor, and using it as a vacuum; the system also allows you to chip sticks and limbs up to 2" in diameter. WARNINGS! Always operate the chipper from the “Chipping Zone” (see To prevent damage to your chipper, feed only wood up to 2"... - Page 33 Tips: It is best to trim off any side twigs from the main branch being chipped (Figure 32). Green branches process quicker and easier than dry branches and soft wood is easier than hardwood. Use caution with small diameter green saplings and branches. Chip these grouped or bundled together to provide support for each other (Figure 33).
-
Page 34: Dumping
Dumping WARNINGS! Always shut off the tractor engine and the vacuum engine and use caution when dumping the Collector Box load. The load may have shifted against the rear panel. Push down on the Dump Handle when releasing the Dump Lever to prevent the Tilt Bed from suddenly tipping. -
Page 35: Use As A Trailer
Use as a Trailer The DR LEAF and LAWN VACUUM may be used as a trailer (500 lbs. MAX) to haul firewood, stones, brush, etc., around your property. There are a few options available to use your DR LEAF and LAWN VACUUM as a trailer. -
Page 36: Leaf And Lawn Vacuum Tips
LEAF and LAWN VACUUM Tips Tip: For the most efficient use of the DR LEAF and LAWN VACUUM, use this sequence of steps: WARNING! Pickup stones, metal objects, glass and sticks before vacuuming. 1. Gather and pile sticks to be chipped. -
Page 37: Chapter 5: Maintaining The Dr Leaf And Lawn Vacuum
Chapter 5: Maintaining the DR LEAF and LAWN VACUUM Regular maintenance is the way to ensure the best performance and long life of your DR LEAF and LAWN VACUUM. Please refer to this manual and the engine owner manual for maintenance procedures. Service intervals listed in the checklist below supercede those listed in the engine owner manual. -
Page 38: Lubrication
Lubrication Your DR LEAF and LAWN VACUUM was lubricated at the Factory. The operator needs to provide engine lubrication and lubricate the wheels periodically. Supplies Needed: Grease gun with #2 Lithium Grease 1. Lubricate each wheel with #2 Lithium grease using a grease gun on the fitting (Figure 38). -
Page 39: Removing And Replacing The Engine Oil
Removing and Replacing the Engine Oil WARNING! Before performing any maintenance procedure, stop the Important! Be certain to fill with oil before starting the engine. See page 23. Tools & Supplies Recommended: Pliers SAE 30 HD, 20 oz. (0.60L) Note: Drain the oil when the engine is warm. Warm oil drains quickly and completely. 1. -
Page 40: Removing And Replacing The Blower Hoses
Removing and Replacing the Blower Hoses WARNING! Before performing any maintenance procedure, stop the Collector Box Hose: Tools Needed: Diagonal or wire cutter Screwdriver or nut driver 1. Disconnect the Collector Box Hose from the Blower Exit Elbow by loosening the Hose Clamp with a screwdriver or nut driver (Figure 40) and separating the hose from the Connector Fitting. - Page 41 WARNING! Before performing any maintenance procedure, stop the Blower Inlet Hose: Tools Needed: Diagonal or wire cutter Screw driver or nut driver 1. Cut the support tie around the Blower Inlet Hose (Figure 43). 2. Loosen the clamp retaining the Inlet Hose at the Inlet Hose Adapter and the connector fitting at the opposite end of the hose.
-
Page 42: Removing And Replacing The Blower Exit Elbow
Removing and Replacing the Blower Exit Elbow WARNING! Before performing any maintenance procedure, stop the Tool Needed: Diagonal or wire cutter 1. Disconnect the Blower Exit Elbow to the Collector Box Hose by releasing the two flexible latches (Figure 44) and separate the hose. -
Page 43: Removing And Replacing The Chipper Blade
Removing and Replacing the Chipper Blade WARNING! Before performing any maintenance procedure, stop the engine WARNING! Do not attempt to re-sharpen the chipper blade. This will Tools Needed: (2) 1/2" wrench or socket 9/16" wrench or socket 3/16" Allen wrench 1. -
Page 44: Removing The Blower/Chipper Engine Unit
Before performing any maintenance procedure, stop the engine and disconnect the spark plug wire. Before performing this procedure, assure that your DR LEAF and LAWN VACUUM is on level terrain and the brake is set on your lawn tractor. Do not use Chipper or Vacuum features without first securing the engine to the frame and securing the hoses. -
Page 45: End Of Season & Storage
Clean out residual debris from the blower hoses and Collector Box. If the DR LEAF and LAWN VACUUM will be used as a trailer during the end of season, we recommend that you remove and store the engine in a dry location. See page 40. -
Page 46: Chapter 6: Troubleshooting
Chapter 6: Troubleshooting Most problems are easy to fix. Consult the troubleshooting table for common problems and their solutions. If you continue to experience problems, call Country Home Products, Inc. for support. Troubleshooting Table WARNING! Before performing any maintenance procedure, stop the... - Page 47 If it’s dirty, change it following the procedure in the engine manufacturer’s owner’s manual. ⇒ Check the oil level and adjust as needed. ⇒ If your engine still lacks power, call 1(800) DR- OWNER (376-9637) for assistance. ⇒ Check the oil level and adjust as needed.
- Page 48 Hose. Remove the hose and shake clogs loose. See pages 37 and 38. ⇒ If your lawn deck still is not vacuuming properly, call 1(800) DR-OWNER (376-9637) for assistance. ⇒ Check for clogs along the edges of the Centrifugal Separator cone.
-
Page 49: Dr Commerical Leaf And Lawn Vacuum Safety & Operating Instructions
COMMERICAL LEAF and LAWN VACUUM Safety & Operating Instructions... -
Page 50: Chapter 7: Parts Lists And Schematic Diagrams
Chapter 7: Parts Lists and Schematic Diagrams Parts List — Trailer Assembly Note: Part numbers listed are available through Country Home Products. Ref# Part# Description 187281 Frame, Commercial 180741 Bracket, Axle, Commercial 180751 Axle, Commercial 180641 Washer, .8" ID, 1.5" OD X .11"... -
Page 51: Schematic Diagram - Trailer Assembly
Schematic Diagram — Trailer Assembly COMMERICAL LEAF and LAWN VACUUM Safety & Operating Instructions... -
Page 52: Parts List - Blower/Chipper Assembly
Parts List — Blower/Chipper Assembly Note: Part numbers listed are available through Country Home Products. Ref# Part# 186921 Engine, 7.0 HP, B&S Deleted 112381 Washer, Flat, 1/4" USS 189311 Screw, Wing Head, 5/16"-18 X 3/4" 186941 Engine Mount, Commercial 134431 Bolt, 5/16"-18 X 1-1/2"... -
Page 53: Schematic Diagram - Blower/Chipper Assembly
Schematic Diagram — Blower/Chipper Assembly COMMERICAL LEAF and LAWN VACUUM Safety & Operating Instructions... -
Page 54: Parts List - Centrifugal Separator, Hose & Blower Exit Elbow Assembly
Parts List — Centrifugal Separator, Hose & Blower Exit Elbow Assembly Note: Part numbers listed are available through Country Home Products. Ref# Part# Description 186831 Centrifugal Separator 114781 Screw, Pan Head, 10-24 X 5/8" 118731 Nut, Nylon Lock, 10-24 112371 Washer, Flat, 10-24 USS 175521 Bolt, Eye, 10-24 X 1/2"... -
Page 55: Schematic Diagram - Centrifugal Separator, Hose & Blower Exit Elbow Assembly
Schematic Diagram — Centrifugal Separator, Hose & Blower Exit Elbow Assembly COMMERICAL LEAF and LAWN VACUUM Safety & Operating Instructions... -
Page 56: Parts List - Tilt Bed Assembly
Parts List — Tilt Bed Assembly Note: Part numbers listed are available through Country Home Products. Ref# Part# Description 180731 Trailer Tilting Bed 186851 Base, Leaf System 187361 Support Bracket, Front Cover 112381 Washer, Flat, 1/4" USS 150451 Bolt, HCS, 5/16"-18 X 1-3/4"... -
Page 57: Schematic Diagram - Tilt Bed Assembly
Schematic Diagram — Tilt Bed Assembly COMMERICAL LEAF and LAWN VACUUM Safety & Operating Instructions... -
Page 58: Parts List - Side And Rear Panel Assembly
Parts List — Side and Rear Panel Assembly Note: Part numbers listed are available through Country Home Products. Ref# Part# Description 186841 Side Panel, Leaf System 189441 Keeper, Draw Latch, 4" 187231 Support, Side 112381 Washer, Flat, 1/4" USS 111491 Bolt, HCS, 1/4"-20 X 1"... -
Page 59: Schematic Diagram - Side And Rear Panel Assembly
Schematic Diagram — Side and Rear Panel Assembly COMMERICAL LEAF and LAWN VACUUM Safety & Operating Instructions... -
Page 60: Parts List - Front Box Cover Assembly
Parts List — Front Box Cover Assembly Note: Part numbers listed are available through Country Home Products. Ref# Part# Description 118731 Nut, Nylon Lock, 10-24 114781 Screw, Pan Head, 10-24 X 5/8" 112371 Washer, Flat, 10-24 USS 186871 Cover, Box, Front 186731 Latch, Draw 189441 Keeper, Draw Latch, 4"... - Page 61 Notes COMMERICAL LEAF and LAWN VACUUM Safety & Operating Instructions...
- Page 62 Notes COMMERICAL LEAF and LAWN VACUUM Safety & Operating Instructions...
-
Page 63: Year Limited Warranty
Technical Service Department for our Owners. You can access a Representative by dialing our TOLL-FREE Hotline at 1-800- DR-OWNER (376-9637). The sole job of our well-trained and friendly folks is to ensure that you get any help you need in a timely fashion. - Page 64 Daily Checklist for the DR LEAF and LAWN VACUUM To help maintain your DR LEAF and LAWN VACUUM for optimum performance, we recommend you follow this checklist each time you use your machine. [ ] OIL: With the machine on a level surface, remove the oil fill cap and check the oil level.
Need help?
Do you have a question about the DR and is the answer not in the manual?
Questions and answers