Table of Contents
Advertisement
CD PORTABLE SYSTEM
SISTEMA PORTATIL CON CD
CHAINE PORTABLE A CD
RC - BX25BK
RC - BX15BK/BU
/
REMOTE CONTROL
PLAY
CD-PORTABLE SYSTEM
RC-BX25
CD
TUNER
FM/AM
ONE-TOUCH OPERATION
POWER
ON/STANDBY
STANDBY ON
REMOTE CONTROL
RC-BX25BK
INSTRUCTIONS
MANUAL DE INSTRUCCIONES
MANUAL D'INSTRUCTIONS
PLAY
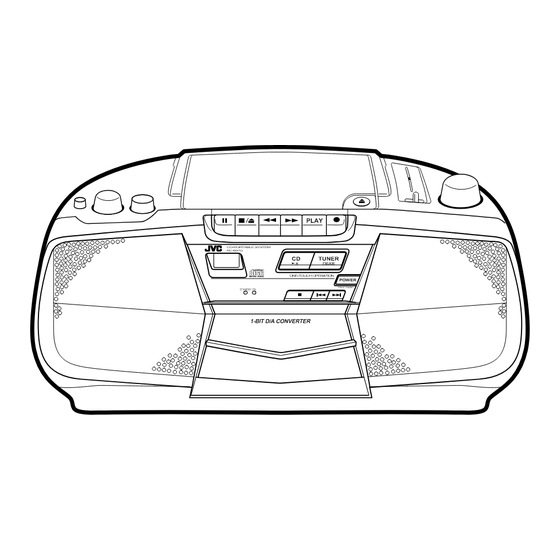
CD-PORTABLE SYSTEM
RC-BX15
CD
TUNER
FM/AM
ONE-TOUCH OPERATION
POWER
ON/STANDBY
STANDBY ON
1-BIT D/A CONVERTER
RC-BX15BK/BU
For Customer Use:
Enter below the Model No. and Serial No.
which are located on the rear of the cabinet.
Retain this information for future reference.
Model No.
Serial No.
LVT0282-001A
[J]
Advertisement
Table of Contents

Related Manuals for JVC RC-BX15BK


Summary of Contents for JVC RC-BX15BK
- Page 1 FM/AM ONE-TOUCH OPERATION POWER ON/STANDBY STANDBY ON 1-BIT D/A CONVERTER RC-BX15BK/BU For Customer Use: Enter below the Model No. and Serial No. which are located on the rear of the cabinet. Retain this information for future reference. Model No. Serial No.
-
Page 2: Table Of Contents
ENGLISH Thank you for purchasing this JVC product. Please read these instructions carefully before starting operation to be sure to obtain optimum performance and a longer service life from the unit. CONTENTS Features ... 3 Safety precautions ... 4 Handling precautions ... 4 Power supply ... -
Page 3: Features
INFORMATION (For U.S.A) This equipment has been tested and found to comply with the limits for a Class B digital device, pursuant to Part 15 of the FCC Rules. These limits are designed to provide reaso- nable protection against harmful interference in a residential installation. -
Page 4: Safety Precautions
SAFETY PRECAUTIONS Prevention of Electric Shocks, Fire Hazards and Damages 1. Even when the POWER button is set to STANDBY, a very small current will flow. To save power and for safety when not using the unit for an extended period of time, dis- connect the power cord from the household AC outlet. - Page 5 3. Condensation In the following cases, condensation may occur on the lens, in which case the unit may not operate correctly. • In a room where a heater has just been switched on. • In a place where there is smoke or high humidity.
-
Page 6: Power Supply
Refer to the illustra- tion for correct connection. CAUTIONS: 1. USE ONLY WITH THE JVC POWER CORD PROVIDED WITH THIS UNIT TO AVOID MALFUNCTION OR DAMAGE TO THE UNIT. REMOVE BATTERIES WHEN USING THE POWER CORD. - Page 7 AC, REMOVE THE BATTERIES TO AVOID A MALFUNCTION OR DAMAGE TO THE UNIT. • WHEN THE JVC POWER CORD PRO- VIDED WITH THIS UNIT IS CONNECTED, THE POWER IS AUTOMATICALLY SWITCHED FROM THE BATTERIES TO THE HOUSEHOLD AC EVEN WHEN THE BATTERIES ARE LOADED.
-
Page 8: Names Of Parts And Their Functions
NAMES OF PARTS AND THEIR FUNCTIONS • Front of top panel 1 BASS BOOST switch _ ON: Set to this position to listen to Bass boost sound. — OFF: Set to this position when Bass boost sound is not required. 2 VOLUME control 3 TONE control 4 Power STANDBY indicator (RED) - Page 9 y Cassette holder u Cassette operation buttons 8 PAUSE: Press to stop the tape temporarily during playback and recording. § STOP/EJECT: Press to stop the tape. Pressing this button after the tape stops opens the cassette holder. 1 FF: Press to wind the tape forward rapidly. ¡REW: Press to rewind the tape rapidly.
-
Page 10: Remote Control Unit (Rc-Bx25 Only)
REMOTE CONTROL UNIT (RC-BX25 only) Preparation before use • Installing batteries in the remote control unit 1. Remove the battery cover from the back of the remote control unit. 2. Insert two ‘‘R6/AA (15F)’’ size batteries (option). Insert the batteries with the ª and · •... - Page 11 The following operations can be performed using the remote control unit. • Check the functions of the operation buttons carefully and operate them cor- rectly. 1 Track (tune) number buttons (No. 1 to No. 10, +10) 2 CD operation buttons REPEAT : Repeat playback button : Stop/clear button...
-
Page 12: Switching The Power On/Off
SWITCHING THE POWER ON/ Play/pause (CD Botón de reproducción/pausa (CD Touche de lecture/pause (CD Switching the power on/off • Switching on: STANDBY ON POWER ON/STANDBY • Switching off: STANDBY ON POWER ON/STANDBY COMPU PLAY (only when AC power is used) Even when the power is set to STANDBY, pres- sing the button shown below switches on the power and selects the source. -
Page 13: Concerning Compact Discs
CONCERNING COMPACT DISCS Since dirty, damaged and warped discs may damage the unit, care should be taken of the following: 1. Usable compact discs Use compact discs with the mark shown. 2. Notes on handling discs • Do not touch the reflective recorded surface. -
Page 14: Playing Compact Discs
PLAYING COMPACT DISCS Playing an entire disc ... The following example assumes a compact disc with 10 tunes and a total playing time of 50 minutes 45 seconds. Operate in the order shown 1 Press to open the Disc holder. 2 Load a disc with the label side facing up and close the Disc holder. - Page 15 Search playback (to locate the required position on the disc) • The required position can be located using fast-forward or reverse search while play- ing a disc. Keep pressing for fast-reverse search. Mantenga presionado para la búsqueda regresiva Maintenir pressée pour la recherche accélérée arrière. •...
- Page 16 Direct access playback (using the re- mote control) (RC-BX25 only) • Pressing any of the track number buttons will start play from the beginning of the de- signated tune, without your having to press the 6 button. 1 Press the 7 (clear) button to set to the CD mode.
-
Page 17: Cassette Tape
CASSETTE TAPE Cassette tape 1. Loose tape may cause trouble. With a pen- cil, gently tighten the tape as shown. 2. To prevent recordings from being erased accidentally, remove the tab(s) with a screw- driver. Reseal the slots with adhesive tape to erase and re-record after the tabs have been broken off. -
Page 18: Radio Reception
RADIO RECEPTION Operate in the order shown 1 Press to set to TUNER mode. 2 Select the band (See page 8). 3 Tune to the required station. 4 Adjust. Using the antennas Note: The built-in ferrite core antenna can pick up in- terference from television receivers in the neighborhood and thereby disturb AM reception. -
Page 19: Recording
RECORDING • In recording, the ALC circuit automatically optimizes the recording level; adjustment of the recording level is unnecessary. Operate in order shown 1 Select the recording source. • When recording from the radio —Set the TUNER mode • When recording from the CD player —Set the CD mode 2 Load a cassette. - Page 20 Synchronized recording with the CD player • In this system, the CD player starts play- back when deck enters the recording mode. Operate in the order shown 1 Set the POWER button to ON. 2 Load a cassette. 3 Load a disc. 4 Set to CD.
-
Page 21: Maintenance
Erasing When recording on a pre-recorded tape, the pre- vious recording is automatically erased and only the new material can be heard when the tape is played. To erase a tape without making a new record- ing ... 1. Press the 7 (CD stop) button while there is no disc loaded in the unit. -
Page 22: Troubleshooting
TROUBLESHOOTING What appears to be trouble is not always serious. Make sure first ... Power cannot be turned on. Is the power cord unplugged? 2. When the TAPE (Play) button is pressed, tape does not move. Is the 8 PAUSE button pressed? 3. -
Page 23: Specifications
SPECIFICATIONS Compact disc player section Type : Compact disc player Signal detection : Non-contact optical system pickup (semiconductor laser) Number of channels : 2 channels (stereo) Frequency response: 20 Hz – 20,000 Hz Signal-to-noise ratio : 90 dB Wow & flutter : Less than measurable limit Radio section... - Page 24 VICTOR COMPANY OF JAPAN, LIMITED Printed in China 0199IMMIDEHIT EN,SP,FR...
Need help?
Do you have a question about the RC-BX15BK and is the answer not in the manual?
Questions and answers