Table of Contents
Advertisement
Quick Links
Advertisement
Table of Contents

Related Manuals for JVC RC-BF10


Summary of Contents for JVC RC-BF10
- Page 1 Introduction Preparation CD PORTABLE SYSTEM RC-BF10 Listening to CDs Listening to Cassette Tapes Listening to Radio Broadcasts Hearing Aid Functions PUSH Convenient Functions Recording Sound Troubleshooting Reference INSTRUCTIONS LVT1245-002A...
- Page 2 Warnings, Cautions and Others IMPORTANT FOR LASER PRODUCTS IMPORTANT for the U.K. DO NOT cut off the mains plug from this equipment. If the 1. CLASS 1 LASER PRODUCT plug fitted is not suitable for the power points in your home 2.
-
Page 3: Safety Instructions
SAFETY INSTRUCTIONS “SOME DOS AND DON'TS ON THE SAFE USE OF EQUIPMENT” This equipment has been designed and manufactured to meet international safety standards but, like any electrical equipment, care must be taken if you are to obtain the best results and safety is to be assured. ★★★★★★★★★★★★★★★★★★★★★★★★★★★★★★★★★★★★★★★★★★★★★★★★... -
Page 4: Table Of Contents
About Cassette Tapes ....40 Specifications ......41 Listening to Radio Broadcasts ... 19 Thank you for purchasing a JVC product. Please read all instructions carefully before operation, to ensure your complete understanding and to obtain the best possible performance from the unit. -
Page 5: Notes On Operation
Notes on Operation Suitable Locations for the Main Unit To minimize the need for servicing and maintain the high quality of this product, do not place the main unit in the following locations: • In a position subject to high humidity or considerable dust •... -
Page 6: Hearing Aid Functions
Hearing Aid Functions When using the hearing aid functions: You can listen to sound that has been slowed down. You can listen to sound that has been made clearer. You can listen to the sound once again. This system employs digital signal correction technology to make the speaker’s voice sound clearer so that you can hear it easily. -
Page 7: Part Names
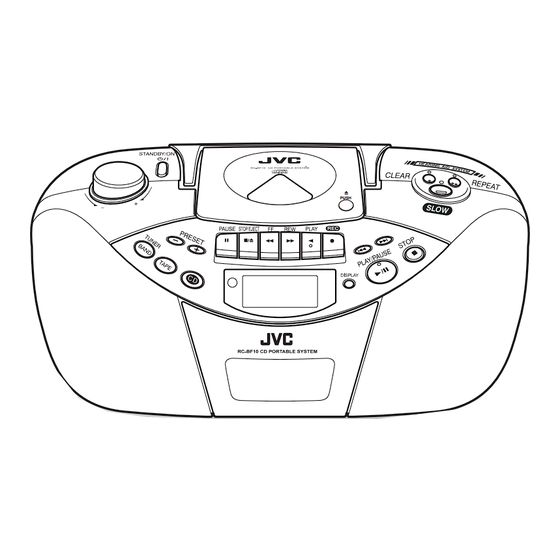
Part Names Main Unit (Front View) STANDBY/ON CD door button page 15 page 11 CD eject part page 15 Volume control Hearing aid buttons page 13 Preset buttons page 20 pages 21 and 22 PUSH CD operation buttons Source select buttons Display button Switches the display between the regular... -
Page 8: Main Unit (Rear View)
Part Names (continued) Main Unit (Rear View) FM telescopic antenna PHONES jack page 20 page 14 AC IN AC IN socket Battery cover page 7 page 8 Display Window 3 4 5 PUSH 1Sound source indicators 7Program playback indicator pages 15, 17 and 19 page 32 2Random playback indicator 8Main display... -
Page 9: Remote Control
Remote Control You cannot use this button while this page 12 product is running on batteries. page 11 CD only CD only page 27 For selecting a sound source. CD only CD only Radio Radio page 16 only only page 20 only only Radio... -
Page 10: Power Source And The Remote Control
Power Source and the Remote Control You can operate this product using either an AC outlet or batteries. Connecting the Power Cord Main unit Supplied power cord AC outlet CAUTION • Use the main unit only with the power cord provided with this product to avoid malfunction or damage to the main unit. - Page 11 Replace the battery cover. CAUTION • When the batteries run low, sound may become smaller or distorted, or may not be produced. In such a case, replace all of the six batteries with new batteries of the same type. • If not using this product for a long period, take out the batteries. •...
-
Page 12: Inserting Batteries Into The Remote Control
Power Source and the Remote Control (continued) Inserting Batteries into the Remote Control Open the battery cover. Insert two batteries. R03 (UM-4)/ 24F (AAA) (supplied) Insert the batteries, making sure that the polarities match the marks ((+) and (-)) inside the battery compartment. -
Page 13: Remote Control Operation
Remote Control Operation PUSH Remote control sensor (REMOTE SENSOR) • When operating the remote control, point it at the remote control sensor. • The effective distance between the remote control and the remote control sensor is approximately 7 m maximum. However, the effective distance decreases when you are not directly facing the front of the main unit. -
Page 14: Turning On/Off The Main Unit
Turning On/Off the Main Unit PUSH Press on the main unit to turn on/off the main unit. • You can also use on the remote control to turn on/off the main unit. (You cannot operate while the main unit is running on batteries.) •... -
Page 15: Setting The Clock
Setting the Clock Set the current time. The time display on the main unit is a 24-hour clock. You can set the clock even while the main unit is turned off. Clock display PUSH 2 4 6 When the clock display is not displayed in the display window on the main unit, press Press The hour display in the display window on the main... -
Page 16: Before Listening To Sound
Before Listening to Sound Adjusting the Sound Volume and Quality You can adjust the sound volume and quality for listening to CDs, cassette tapes and radio broadcasts. The adjustments do not affect recorded sound. PUSH Temporarily Muting Sound Pressing mutes playback sound. To return to the previous sound volume, press again. -
Page 17: Adjusting The Sound Quality
Emphasizing Bass Sound You can emphasize the bass sound. When “HBS” is on Press and hold on the remote control for one or more seconds until “HBS” appears in the display window. To cancel hyper-bass sound, press and hold on the remote control until “HBS”... -
Page 18: Listening To Cds
Listening to CDs This section explains the basic operations for playing back CDs. Before listening to a CD, refer to “About CDs” ( page 39). For more details on the CD playback function, refer to “Various CD Playback Modes” page 25). Turn on the main unit, and then follow the procedure below. -
Page 19: Stopping Playback
Stopping Playback Press The track number and total playing time will appear in the display window. Pausing Playback Press To resume playback, press once again. Skipping to the Beginning of a Track • Each time you press , playback returns to the previous track. When you press during playback, playback returns to the beginning of the current track. -
Page 20: Listening To Cassette Tapes
Listening to Cassette Tapes This section explains the basic operations for playing back cassette tapes. Before playing back a cassette tape, refer to “About Cassette Tapes” ( page 40). For details on the recording operation, refer to “Recording Sound” ( pages 34 - 36). - Page 21 Stopping Playback Press Pausing Playback Press To resume playback, press once again. Fast-forwarding/Fast-reversing • When the cassette tape is stopped, pressing fast-forwards the cassette tape. • When the cassette tape is stopped, pressing fast-rewinds the cassette tape. N O T E •...
-
Page 22: Listening To Radio Broadcasts
Listening to Radio Broadcasts This section explains the basic operations for listening to radio broadcasts. Turn on the main unit, and then follow the procedure below. ( page 11) Press to select “FM” or “AM”. To listen to an To listen to an FM broadcast AM broadcast “FM”... -
Page 23: Improving Radio Reception
Tuning In to a Preset Radio Station (Storing Radio Stations (Preset) page 23) You can select a radio station by pressing Preset number Frequency Each time you press , the preset number toggles. Improving Radio Reception FM broadcasts Adjust the FM telescopic antenna in length, direction or angle to obtain the best possible reception. -
Page 24: Hearing Aid Functions
Hearing Aid Functions These functions are especially useful when you want to learn another language from the radio or confirm contact details. N O T E • The hearing aid functions apply not only to sound from radio broadcasts but also to playback sound from CDs and cassette tapes. - Page 25 When you want to listen to the last portion Repeat function of sound again Press You can listen to up to the last 10 seconds of sound again. While the lamp is lighting up, the sound is repeated. Pressing again turns off the lamp, cancels the repeat function and returns the sound to normal.
-
Page 26: Storing Radio Stations (Preset)
Storing Radio Stations (Preset) You can store up to 10 FM radio stations and up to 10 AM radio stations. Turn on the main unit, and then follow the procedure below. ( page 11) - Page 27 Press repeatedly to select “FM” or “AM”. Press to select the radio station you want to store. Example: FM 87.5 MHz Press Preset number “PROG” and the preset number will flash in the display window. While “PROG” and the preset number are flashing, press to select a preset number.
-
Page 28: Various Cd Playback Modes
Various CD Playback Modes Repeat Playback You can play one track or all tracks repeatedly. Turn on the main unit, and then follow the procedure below. ( page 11) PUSH... - Page 29 Insert a CD. Press Repeat indicator Press Each time you press , the indicator toggles as shown on the right. Repeat playback will start. All tracks repeat One track repeat Repeat canceled Quitting Repeat Playback Press repeatedly to erase the repeat indicator.
-
Page 30: Random Playback
Various CD Playback Modes (continued) Random Playback This unit plays back tracks in random order. Turn on the main unit, and then follow the procedure below. ( page 11) PUSH... - Page 31 Insert a CD. Press Press “RANDOM” will appear in the display window. Random playback will start. When all tracks have been played back, playback will stop automatically. Quitting Random Playback Press to erase the random indicator. N O T E •...
-
Page 32: Introduction Playback
Various CD Playback Modes (continued) Introduction Playback You can listen to the first 10 seconds of each track consecutively. Turn on the main unit, and then follow the procedure below. ( page 11) PUSH... - Page 33 Insert a CD. Press Press “INTRO” will appear in the display window, and introduction playback will start. When the introductions of all tracks have been played back, playback will stop automatically. Quitting Introduction Playback Press to erase the introduction indicator. N O T E •...
-
Page 34: Program Playback
Various CD Playback Modes (continued) Program Playback This function allows you to play back the desired tracks in the desired order. You can program up to 20 tracks. Turn on the main unit, and then follow the procedure below. ( page 11) PUSH... - Page 35 Insert a CD. Press Press Press “PROG” will flash in the display window on the main unit. When “00” appears as the track number, the program playback is not set. Press to select a track number. Selected track number Program number “PROG”...
- Page 36 Various CD Playback Modes (continued) Canceling programs While the CD is stopped and “PROG” is flashing in the display window, press Opening the CD door or changing the sound source also cancels the program playback setting. Confirming the program playback settings While the CD is stopped and “PROG”...
-
Page 37: Recording Tracks From A Cd
Recording Tracks from a CD Before recording sound to a cassette tape, refer to “About Cassette Tapes” ( page 40). Turn on the main unit, and then follow the procedure below. ( page 11) PUSH Insert a cassette tape for recording. Both ends of a cassette tape are unrecordable parts (leader tapes). -
Page 38: Recording A Radio Broadcast
Recording a Radio Broadcast Before recording sound to a cassette tape, refer to “About Cassette Tapes” ( page 40). Turn on the main unit, and then follow the procedure below. ( page 11) PUSH Insert a cassette tape for recording. Both ends of a cassette tape are unrecordable parts (leader tapes). -
Page 39: Erasing Recorded Sound (Soundless Recording)
Erasing Recorded Sound (Soundless Recording) You can erase recorded sound from cassette tapes (soundless recording). Before erasing recorded sound from a cassette tape, refer to “About Cassette Tapes” ( page 40). Turn on the main unit, and then follow the procedure below. ( page 11) PUSH Insert the cassette tape containing the sound you want to erase. -
Page 40: Troubleshooting
Troubleshooting Check the following points before having the JVC service center repair this product. Problem Possible cause Possible solution Page General No sound is produced. Headphones are Disconnect the headphone connected. plug. The clock display in the The main unit is off Reset the clock. -
Page 41: Maintenance
Maintenance You are recommended to perform periodic maintenance on this product to ensure that you can use it for many years to come. Cleaning the Main Unit When the operation panel becomes dirty, wipe it with a soft dry cloth. When the operation panel is very dirty, wipe it with a cloth dampened with a small amount of a neutral detergent, and then wipe it with a soft dry cloth. -
Page 42: About Cds
About CDs Handling CDs Available CD types • Use a CD whose label side shows the logo. • Make sure not to use heart/flower shaped CDs or other irregularly shaped CDs. The use of such CDs damages the main unit. About CD-Rs/CD-RWs You can play back a CD-R or CD-RW only when the disc is finalized. -
Page 43: About Cassette Tapes
About Cassette Tapes IMPORTANT • It should be noted that it may be unlawful to rerecord pre-recorded tapes, records, or discs without the consent of the owner of copyright in the sound or video recording, broadcast or cable program and in any literary, dramatic, musical, or artistic work embodied therein. •... -
Page 44: Specifications
Specifications <CD player> System Compact disc digital audio system Sampling frequency 44.1kHz Number of channels 2 channels (Stereo) Frequency feature 20 Hz – 20 kHz <Tuner> Frequency FM: 87.5 MHz – 108.0 MHz AM: 522 kHz – 1,629 kHz Antennas FM: Telescopic antenna AM: Ferrite core antenna <Cassette tape recorder>...
Need help?
Do you have a question about the RC-BF10 and is the answer not in the manual?
Questions and answers