Siemens OpenStage 40 User Manual
Hipath dx (ver. 10 onwards)
Hide thumbs
Also See for OpenStage 40:
- Administration manual (378 pages) ,
- User manual (205 pages) ,
- Operating manual (144 pages)

Related Manuals for Siemens OpenStage 40


Summary of Contents for Siemens OpenStage 40
- Page 1 HiPath DX (Ver. 10 onwards) OpenStage 40 Phone User Guide 1QDB 50165 ABA - Issue 1 Communication for the open minded Siemens Enterprise Communications www.siemenshipathdx.com...
- Page 2 Waste Electrical and Electronic Equipment (WEEE) All electrical and electronic products should be disposed of separately from the municipal waste stream via designated collection facilities appointed by the government or the local authorities. This product is covered by the European Directive 2002/96/EC.
-
Page 3: Table Of Contents
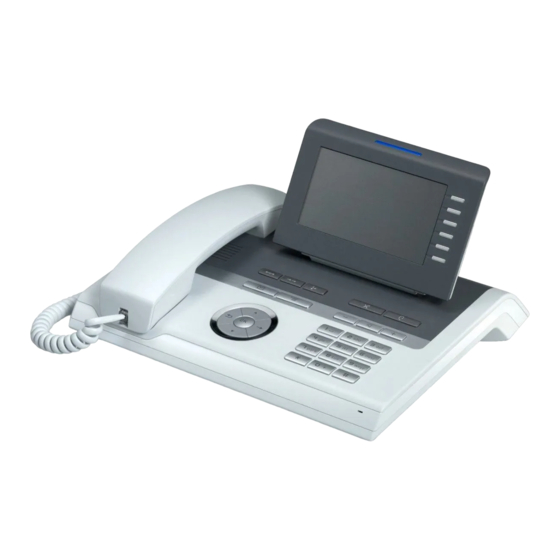
Contents Introduction ....................3 About this user guide ................3 About your phone ..................4 Troubleshooting ..................9 Standard Features ..................10 Handling calls ..................12 Message waiting ..................17 Redial ...................... 19 ... - Page 4 Typical OpenStage 40 phone Hookswitch Redial Divert Headset Mute key/LED key/LED key/LED Enquiry (R) key/LED Shift key/LED Hands-free key/LED Message Waiting 5-way Navigation key Service Menu key Volume keys key/LED...
-
Page 5: Introduction
Menu features How to use the features on the phone’s menu. Other user guides This user guide only covers the basic operation of the OpenStage 40 phone. Refer to the following user guides for more detailed information: • HiPath DX Telephone Features User Guide for information on using the standard HiPath DX features. -
Page 6: About Your Phone
About your phone Display and menu navigation Your OpenStage 40 phone is fitted with an adjustable 6-line graphic display which shows the progress of your calls and provides a menu system that you can navigate using the 5-way navigation key. - Page 7 Introduction 5-way navigation key This control is used in conjunction with the displayed phone menu and call progress messages. In idle mode: • Open the Idle menu In lists and menus: • Go down one level In idle mode: • Has no effect In lists and menus: •...
-
Page 8: Feature Keys
Introduction If you receive a call while using the Idle menu you can answer it; your phone automatically returns to the menu when the call ends. For full details about using your phone’s Idle menu, see page 30. Feature keys Your phone has eight fixed feature keys as follows: Hookswitch - used to make a follow-on call. -
Page 9: Programmable Keys
Introduction Programmable keys Your phone has six programmable keys each with an associated LED which you can use to store phone numbers or as a shortcut to invoke a feature. Two of the keys are pre-programmed to perform Shift and Enquiry functions. -
Page 10: Headset Working
Introduction Volume control keys Use the keys to adjust the volume of ringing and speech during a call, see page 16. Headset working Your telephone has a headset socket which you can use with an approved headset, see page 28. Emergency calls Your phone should have a label, clearly visible, that shows you the number(s) to dial for the public emergency services and/or your site... -
Page 11: Troubleshooting
Introduction Troubleshooting If your phone does not operate as you expect, check the following points before reporting a fault to your telephone services manager: No dial tone • Check that the phone is plugged in to the IP network. • Check that the power supply is plugged in and switched on. Phone does not ring This may happen because: •... -
Page 12: Standard Features
Standard Features This section of the guide describes the standard features available to you for handling calls: Handling calls ........... 12 Making a call ..........12 Answering a call ..........13 Clearing a call ..........14 Call duration ..........14 Ring back ............ -
Page 13: Selecting Options
Standard Features Selecting options: During some operations on the phone, you may be presented with a series of options from which you need to select the most appropriate one. These options have one of two formats: 1. A list of menu options arranged vertically in the bottom four lines of the display. -
Page 14: Handling Calls
Standard Features Handling calls Making a call Pre-dialling Action: Display shows: Dial the number; <number> Delete Digit to delete the last digit dialled, Divert press OK Redial Go Back When the number is complete, <number> either: Dial again • lift the handset, or You hear ring tone. -
Page 15: Answering A Call
Standard Features Dialling a programmed number If you have stored a number on a programmable key (see page 42): Action: Display shows: Press the relevant key <number> Dial again The programmed number is displayed and dialled Lift the handset <number> Dial again You hear ring tone. -
Page 16: Clearing A Call
Standard Features Clearing a call To clear a call: • if you are using the handset, replace it. • if you are using hands-free mode, press Hands-free. The key's LED goes out. If the handset is off its cradle, replace it. •... - Page 17 Standard Features • For a call to a busy extension, your phone rings when the called phone is next free. • For a call which is not answered, your phone rings after the called phone is next used. In both cases, if your phone is busy, Ring back will wait until your phone is free.
-
Page 18: Adjusting Audio Volumes
Standard Features Adjusting audio volumes Ringing volume When your phone is ringing: Action: Display shows: Press the keys to set the desired volume. Handset/loudspeaker volume During a call: Action: Display shows: Press the keys to set the desired volume. Note: These settings only apply to the current call. To adjust the ringing and handset/loudspeaker volume permanently, use the Telephone Menu option (see page 38). -
Page 19: Message Waiting
Standard Features Message waiting If you have voice mail configured on your phone, the Message Waiting key allows you to access a Voice Messaging System (VMS), and the Message Waiting LED indicates when you have a voice message. Initially you must associate the VMS access code with the Message Waiting fixed feature key. - Page 20 Standard Features Accessing your VMS To access the VMS when the Message Waiting LED is not lit: Action: Display shows: Press Message Waiting <VMS number> Dial again Lift the handset. When the VMS answers follow its instructions Enquiry (R) Park Connected Call Hold Action Feature Cancelling a Second Message Waiting indication...
-
Page 21: Redial
Standard Features Redial The last number you dialled is stored in your phone's memory. The Redial feature dials this number again and automatically selects hands- free operation. Using the Redial key The phone is idle: Action: Display shows: Press Redial <number>... -
Page 22: Enquiry
Standard Features Enquiry While you are on a call, you can call another phone (internal or external) to make an enquiry/consultation request. Action: Display shows: During a call <number> <duration> Enquiry (R) Park Connected Call Hold Action Feature Press OK or press Enquiry (R) <number>... - Page 23 Standard Features Action: Display shows: Options available to you during an <enquiry no> <duration> enquiry call: <original no> <duration> Connect Held Conference Enquiry (R) Park Connected Call Hold Action Feature To return to the original call, press ▲ or ▼ keys to select Connect Held and press OK To switch between both calls, press OK again...
-
Page 24: Transfer
Standard Features Transfer If, for example, you receive a misdirected call, you can transfer the caller to the required phone. If the phone is not answered, or the called person does not wish to take the call, you can reconnect to the original call. You cannot transfer an external call to another external number. -
Page 25: Conference
Standard Features Conference You can connect up to six phones together in a conference (which may include external calls). Setting up a conference During a call: Action: Display shows: During a call <number> <duration> Enquiry (R) Park Connected Call Hold Action Feature Press OK or press Enquiry (R) <number>... - Page 26 Standard Features To add further members to the conference, repeat steps 1 to 4. If an enquiry call is not answered or is busy: Action: Display shows: Press ▲ or ▼ keys to select <enq. no>/NUMBER BUSY Connect Held: <original no> <duration>...
-
Page 27: Mute
Standard Features Mute This feature allows you to switch off the microphone so that you can hold a private conversation that cannot be overheard by the called party (or called parties). Muting can be applied to the handset microphone, the headset microphone and the phone’s built-in microphone. -
Page 28: Hands-Free Working
Standard Features Hands-free working Hands-free working allows you to answer your phone without picking up the handset. The phone's built-in microphone and loudspeaker are used instead. Note that hands-free working is not applicable if you use a headset. Making and answering calls Instructions for making and answering calls in hands-free are included on pages 12 and 13. - Page 29 Standard Features Changing from handset to hands-free During a call: Action: Display shows: Press Hands-free <number> <duration> Enquiry (R) Park Connected Call Hold Action Feature The hands-free LED is lit. The call is connected using the built-in microphone and loudspeaker Replace the handset <number>...
-
Page 30: Headset Working
Standard Features Headset working To use this feature you need an approved headset. CAUTION Acoustic shock: Before you use your headset, check that the volume setting is comfortable for your use. Making and answering calls Instructions for making and answering calls using a headset are included on pages 12 and 13. - Page 31 Standard Features Changing from handset to headset During a call: Action: Display shows: Press Headset <number> <duration> Enquiry (R) Park Connected Call Hold Action Feature The headset LED is lit. The call is connected using the headset Replace the handset <number>...
-
Page 32: Idle Menu Features
Idle Menu Features This section of the guide describes the features available to you via the Idle menu: Idle menu ............31 Show missed calls ..........32 Divert ..............33 Action feature ........... 35 Telephone menu ..........38 Programming a number ........42 If “Show text messages”... -
Page 33: Idle Menu
Idle Menu Features Idle menu When your phone is idle, you can display the Idle menu which lets you: • Process missed calls; • Divert your phone; • Invoke a feature that is not associated with a feature key; • Configure your phone;... -
Page 34: Show Missed Calls
Idle Menu Features Show missed calls If your phone rings but you don’t answer it, a missed call message is stored on your phone. Displaying missed calls Action: Display shows: You have missed a call New missed call(s) The Idle menu is displayed Press OK or with the New Missed Calls option selected... -
Page 35: Divert
Idle Menu Features Divert You can divert all your calls to another phone, for example, while you are away from your desk. Your telephone services manager controls whether you are allowed to divert calls to a number on the public network. Alternative features (described in the HiPath DX online user guide) allow you to divert: •... - Page 36 Idle Menu Features Diverting all calls using the Idle menu If you do not have a divert destination number programmed on the Divert key, or if you want to divert all your calls to a different number you can set up diversion using the Idle menu. When the phone is idle: Action: Display shows:...
-
Page 37: Action Feature
Idle Menu Features Action Feature This menu option opens the Select Feature menu which allows you to invoke features provided by your telephone exchange. Access to the features is controlled and therefore you may not be able to use all of them. - Page 38 Idle Menu Features Accessing the features For example, to access Set Divert No Reply: Action: Display shows: The Idle menu is displayed Press OK or Use the ▲ and ▼ keys to highlight the Action Feature menu option and press OK Use the ▲...
- Page 39 Idle Menu Features Figure 1: Action Feature - menu structure...
-
Page 40: Telephone Menu Option
Idle Menu Features Telephone Menu option This menu option opens the Telephone Menu which allows you to customise the operation of your phone. Telephone settings you can change The settings are sub-divided into the following feature groups: • Set Feature Keys (see also page 39); •... - Page 41 Idle Menu Features Set Feature Keys option This menu option opens the Set Feature Keys sub-menu which allows you to program a number or a feature on a Programmable key. The features are sub-divided into the following groups: • Number store options •...
- Page 42 Idle Menu Features Figure 2: Telephone Menu – menu structure...
- Page 43 Idle Menu Features Figure 3: Set Feature Keys – sub-menu structure...
-
Page 44: Programming A Number
Idle Menu Features Programming a number You can program a number against a Programmable key using the Number store options on the Set Feature Keys sub-menu of the Telephone Menu. When the phone is idle: Action: Display shows: The Idle menu is displayed Pressing OK or Use the ▲... - Page 45 Idle Menu Features Action: Display shows: Enter the digits of the number to As each digit is entered, it is be stored against the key (for added to the display. external numbers, prefix the You have following options: number with the external access code, usually 9) <...
-
Page 46: Text Editor
Idle Menu Features Text Editor Inserting characters Characters are entered by pressing the digit keys. In the same way as on mobile telephones, different characters are inserted by repeatedly pressing the same key until the wanted character is displayed. You can only enter up to 12 characters;... - Page 47 Idle Menu Features Insertion point The insertion point is indicated by an underscore ( _ ). When you add a character the insertion point moves to the right. Deleting characters Press to delete the character to the left of the insertion point. If you delete all the characters “PLEASE ENTER LABEL TEXT”...
- Page 48 Siemens Enterprise Communications is owned by a joint venture of OpenScape, OpenStage and HiPath are The Gores Group and Siemens AG. The joint venture also encompasses Enterasys registered trademarks of Networks, which provides network infrastructure and security systems, delivering Siemens Enterprise Communications a perfect basis for joint communications solutions.
Need help?
Do you have a question about the OpenStage 40 and is the answer not in the manual?
Questions and answers