YOKOGAWA YTMX580 User Manual
Multi-input temperature transmitter
Hide thumbs
Also See for YTMX580:
- Startup manual (37 pages) ,
- User manual (2 pages) ,
- User manual (2 pages)

Related Manuals for YOKOGAWA YTMX580


Summary of Contents for YOKOGAWA YTMX580
- Page 1 User’s Manual YTMX580 Multi-Input Temperature Transmitter IM 04R01B01-01EN IM 04R01B01-01EN 3rd Edition Y okogawa Electric Corporation...
-
Page 2: Table Of Contents
Mouting Procedure of Remote Antenna ............4-2 Wiring ......................5-1 Notes on Wiring ....................5-1 Cable Selection ....................5-1 Cable and Terminal Connections ..............5-1 3rd Edition: July. 2012 (YK) IM 04R01B01-01EN All Rights Reserved, Copyright © 2011, Yokogawa Electric Corporation... - Page 3 Wiring and Waterproofing of Remote Antenna ..........5-3 Grounding ......................5-5 Operation ....................6-1 Preparation for Starting Operation ..............6-1 Zero-gain Adjustment ..................6-2 Starting Operation .................... 6-2 Connecting to the Field Wireless Network ............. 6-2 Shutting Down the Transmitter ............... 6-4 Restarting ......................
- Page 4 8.6.2 Example of Troubleshooting Flow ............. 8-6 8.6.3 Alarms and Countermeasures ............8-8 Parameter Summary ................9-1 General Specifications ................10-1 10.1 General Specification ..................10-1 10.2 Model and Suffix Codes ................. 10-7 10.3 Optional Specification ..................10-7 10.4 Optional Specifications (For Explosion Protected type) ......10-7 10.5 Standard Accessories ..................
-
Page 5: Introduction
Indicates that operating the hardware or software written permission. in this manner may damage it or lead to system • Yokogawa makes no warranty of any kind with failure. regard to this manual, including, but not limited to, implied warranty of merchantability and fitness for a particular purpose. -
Page 6: Safe Use Of This Product
Please (e) Modification pay special attention to the following points: • Yokogawa will not be liable for malfunctions or (a) Installation damage resulting from any modification made • This transmitter may only be installed by an to this transmitter by the customer. -
Page 7: Radio Wave
- Failure or damage due to modification or off the source of radio wave emissions. repair by any party except Yokogawa or an Then, contact a Yokogawa office regarding approved representative of Yokogawa. - Page 8 <1. Introduction> Trademarks • YTMX are registered trademarks of Yokogawa Electric Corporation. • All the brand names or product names of Yokogawa Electric used in this document are either trademarks or registered trademarks of Yokogawa Electric Corporation. • Company and product names used in this manual are trademarks or registered trademarks of their respective holders.
-
Page 9: Atex Documentation
<1. Introduction> ATEX Documentation This is only applicable to the countries in European Union. IM 04R01B01-01EN... -
Page 10: Notes On Handling
<2. Notes on Handling> Notes on Handling This transmitter is fully factory-tested upon Antenna shipment. When the transmitter is delivered, check U Bolt the appearance for damage, and also check that the transmitter mounting parts shown in Figure 2.1 are included with your shipment. If “No Mounting Bracket”... -
Page 11: Storage
<2. Notes on Handling> Storage Choosing the Installation Location When an extended storage period is expected, observe the following precautions. Although the temperature transmitter is designed to operate in a vigorous environment, to 1. Choose a storage location that satisfies the maintain stability and accuracy, the following is following requirements. -
Page 12: Use Of A Transceiver
Please Environmental Requirements contact Yokogawa before making any repair or Do not allow the transmitter to be installed in a modification to an instrument. location that is exposed to corrosive atmospheric conditions. -
Page 13: Fm Approval
Caution for FM intrinsically safe type.(Following • The instrument modification or parts contents refer to “DOC. No. IFM041-A20”) replacement by other than authorized Note 1. Model YTMX580 Multi-Input temperature representative of Yokogawa Electric transmitters with optional code /FS17 are Corporation is prohibited and will void applicable for use in hazardous locations. -
Page 14: Csa Certification
<2. Notes on Handling> 2.6.2 CSA Certification Hazardous Location Caution for CSA intrinsically safe type. Input Terminal 1 Note 1. Model YTMX580 Multi-Input temperature transmitters with optional code /CS17 are applicable for use in hazardous locations. Certificate: 2495456 • Applicable Standard: C22.2 No.0, Input Terminal 8 C22.2 No.0.4, C22.2 No.25, C22.2 No.94,... -
Page 15: Atex Certification
2.6.3 ATEX Certification Hazardous Location (1) Technical Data Input Terminal 1 Caution for ATEX Intrinsically safe type. Note 1. Model YTMX580 Multi-Input temperature transmitters with optional code /KS27 for potentially explosive atmospheres: Input Terminal 8 • No. DEKRA 12ATEX0068 X •... - Page 16 * Simple Apparatus E0207.ai devices in a hazardous location. Note 4. Battery Pack • Use only YOKOGAWA battery pack F9915MA, F9915NS. (3) Maintenance and repair WARNING WARNING ・ Be sure to use the specified battery pack and The instrument modification or parts replacement batteries.
-
Page 17: Iecex Certification
Multi-Input Temperature Transmitter (b) Remote Antenna Model Caution for IECEx Intrinsically safe type. * Simple Apparatus E0209.ai Note 1. Model YTMX580 Multi-Input temperature Note 4. Maintenance and Repair transmitters with optional code /SS27 for potentially explosive atmospheres: • No. IECEx DEK 12.0013X WARNING •... - Page 18 <2. Notes on Handling> Note 5. Battery Pack Name Plate for intrinsically safe type • Use only YOKOGAWA battery pack F9915MA, F9915NS. WARNING ・ Be sure to use the specified battery pack and batteries. For details, refer to section 8.4.3 “Handling Batteries.”...
-
Page 19: Emc Conformity Standards
Class A Group 1 Directive (R&TTE) We, Yokogawa Electric Corporation hereby declare CAUTION that this equipment, model YTMX580 Multi-Input temperature transmitters is in compliance with This transmitter is a Class A product, and it is the essential requirements and other relevant designed for use in the industrial environment. -
Page 20: Fcc Compliance
<2. Notes on Handling> 2.11 FCC compliance This radio transmitter IC Number 8999A-WIC001 has been approved by Industry Canada to operate YTMX580 contains transmitter modeule FCC ID: with the antenna types listed below with the SGJ-WFC001. maximum permissible gain and required antenna impedance for each antenna type indicated. -
Page 21: Configuration Tools For Transmitter
2-12 <2. Notes on Handling> 2.13 Configuration Tools for Transmitter Table 8.1 shows Yokogawa’s recommended devices and configuration tools required for configuring the settings of the transmitter. Configure the settings for the transmitter using the these tools via infrared or wireless communication. -
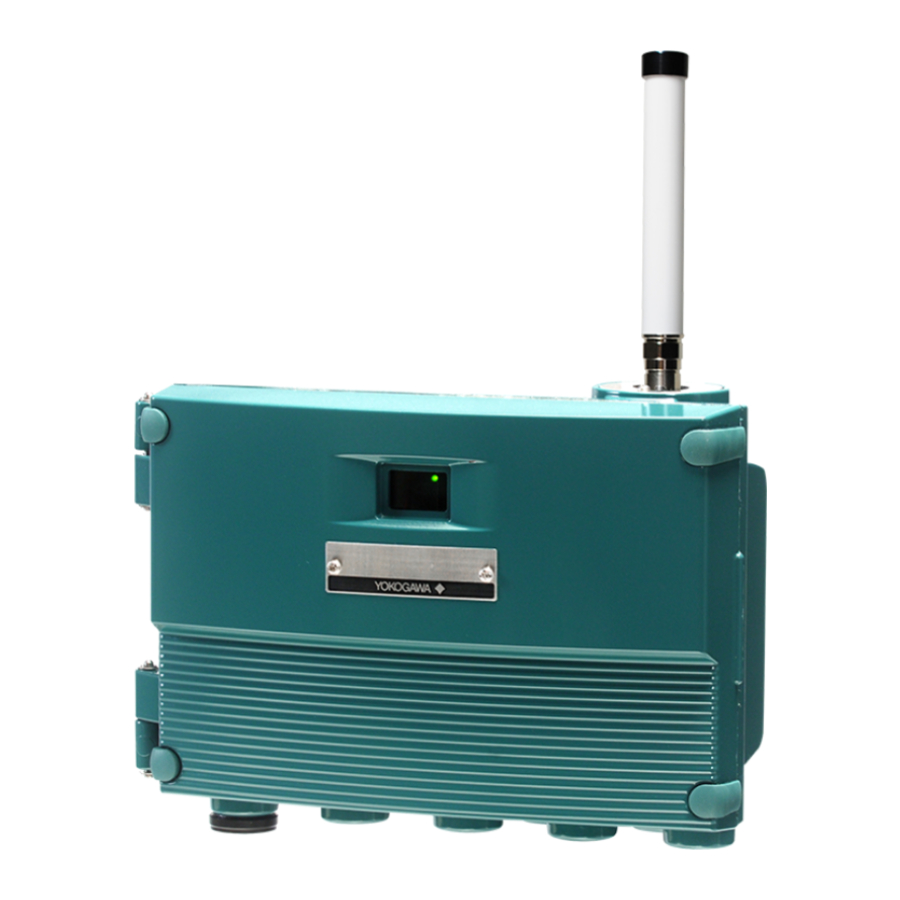
Page 22: Part Names And Functions
Power Off, in Deep Sleep mode Squawk: The RDY and ALM LED’s of the transmitter (YTMX580) that responds to the Squawk command (TRANSDUCER block Special cmd) light for ten seconds. This can be used for such things as identifying the transmitter. -
Page 23: Installation
<4. Installation> Installation Precautions Procedure for Mounting Transmitter • Before installing the transmitter and remote ntenna, read the cautionary notes in section • Use the mounting bracket shown in Figure 4.1 2.4, “Choosing the Installation Location.” to install the transmitter on a 50A (2-inch) pipe •... -
Page 24: Mouting Procedure Of Remote Antenna
<4. Installation> Note: You need to provide bolts for fastening the wall mounting bracket on the wall. Recommended 5mm bolt. (When inch bolt, #10 or #12.) E0401.ai Figure 4.1 Transmitter Mounting Mouting Procedure of Remote antenna Remote Antenna Mounting Remote Antenna to Main Body ... - Page 25 <4. Installation> Fixing of Remote Antenna • Fix the antenna extension cable to the bracket 1 with the provided nut as shown in the figure 4.2. • Fix the bracket 1 to the 2-inch (2B) pipe by using the provided a pair of U bolts and bracket 2. •...
-
Page 26: Wiring
<5. Wiring> Wiring Cable and Terminal Notes on Wiring Connections IMPORTANT • Apply a waterproofing sealant to the threads of the connection port. (It is recommended that you use non-hardening sealant made of silicon resin for waterproofing.) • Lay wiring as far away as possible from electrical noise sources such as large transformers, motors and power supplies. -
Page 27: Wiring Cautions
<5. Wiring> Wiring Cautions Input Wiring Connect the temperature sensor and other input Use metal conduit wiring or a waterproof gland cables as shown in Figure 5.3. The sensor input (metal wiring conduit JIS F 8801) for cable wiring. terminal layout differs between input 1 and inputs 2 to 8 as shown in Figure 5.4. -
Page 28: Wiring And Waterproofing Of Remote Antenna
<5. Wiring> Wiring and Waterproofing of Remote Antenna • Use the provided extension antenna cable to connect the antenna connector with the remote antenna. Tighten the connector of the antenna extension cable with a torque of 2 to 3 N-m. For the allowable bending radius when wiring the antenna and for the fixed antenna, refer to Chapter 10 “General Specifications”. - Page 29 <5. Wiring> Mounting of Arrester and Wiring Waterproofing of Remote Antenna connector • Mount an arrester between the extension cables and connect the grounding cable to the Confirm the connection of the remote antenna, grounding extension antenna cable, arrester, and the •...
-
Page 30: Grounding
<5. Wiring> Grounding Always ground the transmitter case in accordance with national and local electrical codes. The most effective transmitter case grounding method is a direct connection to earth ground with minimal impedance. Grounding terminals are located inside and outside of the terminal block respectively. -
Page 31: Operation
Turn on the power and connect the field • Input sensor type wireless devices to the field wireless network. • Connection of RTD For Yokogawa’s recommended field wireless • Measurement range (measurement lower/ system configuration tool or field wireless upper limit, unit) device configuration tool, refer to section 8.2... -
Page 32: Zero-Gain Adjustment
<6. Operation> Zero-gain Adjustment Connecting to the Field Wireless Network IMPORTANT ■ Preparation work prior to connecting to a After performing zero-gain adjustment, do not field wireless network power off the transmitter immediately. Turning off This transmitter does not need to be connected the power within 30 seconds resets the zero- with a physical wire. - Page 33 Provisioning work performs provisioning for each field wireless device using FieldMate and an infrared adapter. When using the Yokogawa recommended near infrared adapter for the provisioning device, the distance between the front glass (Infrared port ) of this transmitter and the infrared surface of the near infrared adapter should be within 30 cm.
-
Page 34: Shutting Down The Transmitter
<6. Operation> Shutting Down the ■ Connecting to a field wireless network Transmitter The action after installing the battery pack varies depending on the silence setting. When shut down the transmitter, remove the battery With the factory setting, installing the battery pack pack or set the transmitter to deep sleep mode by automatically starts a search for the field wireless the device Configuration Tool. -
Page 35: Setting Parameters
Configuration Tool and the Device Configuration Tool Before using the device configuration tool, confirm that CF/DD and DeviceDTM for your transmitter ( YTMX580 ) are installed in the device configuration tool. For the latest information on CF/DD and DeviceDTM, refer to the following website. -
Page 36: Parameter Usage And Selection
<7. Setting Parameters> Setting Parameters operation stops. Settings can be changed while in this state. If you change the Function block mode to When the data of AI Block (AI1 Temp to AI8 Temp) Man (Manual), updating of the function block output parameters is rewritten, it is necessary to set the values stops. -
Page 37: Function Block And Menu Tree
<7. Setting Parameters> 7.3.2 Function Block and Menu Tree (1) Function Block The function of this transmitter is shown below. A specific function might not be able to be used according to the field wireless configuration tool used. When the field wireless configuration tool of our recommendation is used, the software ( CO block: Field Wireless Configurator, UDO block: Field Wireless Management Tool ) attached to the Field Wireless Integrated Gateway is necessary for setting the dotted line part. - Page 38 <7. Setting Parameters> Online Menu (Continued) (Block Info) (TRANSDUCER) • Tag Description • Block Info • Configuration (Configuration/Calibration) /Calibration • Model • Others • Serial Number • Wireless Status • LED Mode • YTMX Option • Utility Frequence • Measurement Rate (Others) •...
- Page 39 <7. Setting Parameters> (2) Menu Tree The menu tree of the device configuration tool of our recommendation is shown below. Refer to section 8.2 “Calibration Instruments Selection” for the device configuration tool of our recommendation. Online Menu (Device Configuration) (UAPMO) (Configuration) •...
- Page 40 <7. Setting Parameters> Online Menu (Continued) (Diagnostic) (UAPMO) (Diagnostics/Alerts) • UAPMO • Device Diagnostics • Diagnostic Status • Diagnostic Status Detail1, Diagnostic Status Detail2, Diagnostic Status Detail3, • Diagnostic Switch • Diagnostic Configuration (Power Status) • Energy Left • Power Supply Status (AI1 Temp - AI8 Temp) (Process Variables) (Dynamic Variables)
-
Page 41: Parameters For Wireless Communication
<7. Setting Parameters> 7.3.3 Parameters for Wireless (4) LED display mode Communication TRANSDUCER block : LED Mode This parameter is used to set the display mode (1) Network Information of the status display LED. CO block The power consumption of the batteries can be reduced by setting “Always off (1).”... -
Page 42: Unit
The setting items are the sensor type and the number of cables. The input terminal of YTMX580 When the unit of the temperature, voltage, and supports the following sensor types. -
Page 43: Assignment To Ai Object
■ Procedure to call up external temperature Compensation parameter(External Reference E0704.ai Junction Value) Figure 7.2 YTMX580 Wire Connection Diagram AI1 to AI8 block : External Reference Junction Setting the Sensor Type Value ■ Procedure to call up the sensor type setting... -
Page 44: Write Protect
7-10 <7. Setting Parameters> 7.3.9 Write Protect b) Setting the sensor type • AI1 to AI8 block : Lin Type Hardware write protection and software write protection functions are available for this Set the sensor type used in the Lin Type transmitter. -
Page 45: Switching To The Deep Sleep Mode
7-11 <7. Setting Parameters> NOTE GAIN ZERO • This procedure to switch to deep sleep mode Output can only be use for wireless communication. Transmitter becomes the stop state after setting deep sleep mode and cannot reply any request from Communication Tool. Input •... -
Page 46: Self-Diagnostics
7-12 <7. Setting Parameters> Self-Diagnostics ■ Procedure to call up the self-diagnostic parameter 7.4.1 Identify Problems by Using the UAPMO block : Diagnostic Status Device Configuration Tool Any of the four categories ( Failure status, The device configuration tool allows checking the Function check status, Out of specification self-diagnosis results and setting errors of this status, Maintenance required status ) according... - Page 47 7-13 <7. Setting Parameters> The contents of diagnostic status are defined either Note: Be careful when changing the alert category and turning detection on and off as described above. Be sure to set valid or invalid at Diagnostic Switch parameter. UAP Option Diagnostic Status configuration to disable Follow the example below to change “Out of again to prevent setting errors.
-
Page 48: Checking Using The Status Display Led
7-14 <7. Setting Parameters> 7.4.2 Checking Using the Status Display NOTE If there is an error in the self-diagnostic result, ALM (red) of the status display LED of the transmitter turns on. If ALM turns on, check the self-diagnostic result in the field wireless device configuration tool. -
Page 49: Maintenance
For the configuration tools recommended by Transmitters are precision instruments. Please Yokogawa and the latest information on Device File, carefully and thoroughly read the following sections refer to the following website. for information on how to properly handle them while performing maintenance. -
Page 50: Calibration Procedure
<8. Maintenance> Calibration Procedure 4) Calibration Procedure a) For DC voltage input The transmitter is tested adequately before it is With a universal calibration system, deliver shipped from the factory to guarantee a certain input signals corresponding to 0, 25, 75, or accuracy level even without calibration. -
Page 51: Battery
<8. Maintenance> Battery This section describes the procedure for replacing the battery pack and batteries. Table 8.2 shows the tools needed to replace the battery pack and batteries. A battery pack means the specified batteries enclosed in a battery case. Table 8.2 Tools for Disassembly and Reassembly Tool... -
Page 52: Handling Batteries
<8. Maintenance> ■ Disassembling WARNING 1) Loosen the two battery case mounting screws. 2) Separate the battery case into two parts. Handling the battery pack 3) Remove the old batteries. The following precautions must be observed ■ Assembling in order to safely and effectively use a battery 1) Insert new batteries into the battery case. -
Page 53: Replacing The Front Door Gasket
<8. Maintenance> Replacing the Front Door Transportation of products containing lithium batteries Gasket The battery pack contains lithium batteries. When the gasket is damaged, exchange of the When transporting this transmitter with the gasket is recommended for protection against water battery pack inserted, keep it in deep sleep and dust. -
Page 54: Troubleshooting
Causes and Countermeasures” and locate not identify all. If you have difficulty isolating or the problem and take the corresponding correcting a problem, contact Yokogawa service countermeasure. personnel. The following phenomena indicate that this 8.6.1 Basic Troubleshooting Flow... - Page 55 <8. Maintenance> Table 8.3 Problems, Cause and Countermeasure Observed Problems Possible Cause Countermeasure Related Parameter Output fluctuates greatly. Input adjustment by user was Set or clear the user adjustment • Lin Type not correctly done. value. • Sensor Range Damping adjustment is not Set the damping adjustment to •...
-
Page 56: Alarms And Countermeasures
The output is fixed to Replace the Amplifier ±999999°C. amplifier. temperature None The sign is Contact Yokogawa sensor error dependent on service personnel. the setting of Burn Out Type. M E M O R Y Replace the ERROR Amplifier memory Same as amplifier. - Page 57 <8. Maintenance> Release/ Factory recovery Diagnostic Diagnostic Output NAMUR Cause conditions Action Status Status Detail Operation category (except restart) SENSOR1 to The temperature S E N S O R 8 of sensor 1 Recovers TEMP HI to sensor 8 is when the Check the sensor higher than the...
-
Page 58: Parameter Summary
Object Attribute Label Description Default value Handling Version Revision Indicates the application revision of YTMX580. This revision R ** . ** . ** UAPMO changes when the application software is downloaded. block Static Revision When a parameter is changed, +1 is added to the previous value. - Page 59 <9. Parameter Summary> Object Attribute Label Description Default value Handling Power Supply Indicates remaining battery life and power supply of device. UAPMO Status 0: external powered (continued) 1: battery powered, greater than 75% remaining capacity 2: battery powered, between 25% and 75% remaining capacity 3: battery powered, less than 25% remaining capacity Hardware Write...
- Page 60 Memo field available to write anything. ( up to 32 letters ) Transducer TRANSDUCER Model Indicates the model name of the transmitter. YTMX580 block Serial Number Indicates the device number of the transmitter. Wireless Status Indicates the wireless communication status.
- Page 61 <9. Parameter Summary> Object Attribute Label Description Default value Handling 5. to 12. Tag Description A universal parameter to store the comment that describes the Sensor* AI1 to AI8 tag. ( up to 32 letters ) The asterisk block (*) indicates (continued) the sensor input number.
- Page 62 <9. Parameter Summary> Object Attribute Label Description Default value Handling 5. to 12. Sensor Serial Indicates the serial number of the sensor, which corresponds to AI1 to AI8 Number the tag assigned to the temperature sensor. block Cal Point Lo Sets the zero-point adjustment for the input adjustment (zero- (continued) gain adjustment ) of the sensor.
- Page 63 <9. Parameter Summary> Table 9.2 Diagnostic Status Detail Diagnostic Status Diagnostic Status Detail Description NAMUR assignment Diagnostic Status Detail.1 AMP ERR Amplifier failure Bit27 MEMORY ERR Memory failure Bit27 Firm Update ERR Firmware write error Bit27 ADC ERR AD Converter failure Bit27 TERM SNS FAILURE CJC sensor burnout...
- Page 64 <9. Parameter Summary> Diagnostic Status Diagnostic Status Detail Description NAMUR assignment AI1 O/S MODE AI1 O/S Mode Bit24 AI2 O/S MODE AI2 O/S Mode Bit24 AI3 O/S MODE AI3 O/S Mode Bit24 AI4 O/S MODE AI4 O/S Mode Bit24 AI5 O/S MODE AI5 O/S Mode Bit24 AI6 O/S MODE...
-
Page 65: General Specifications
10-1 <10. General Specifications> 10. General Specifications 10.1 General Specification ■ FUNCTIONAL SPECIFICATIONS Number of Input ■ WIRELESS SPECIFICATIONS channels: 8 points Communication Protocol Input Signal ISA100.11a ( IEEE802.15.4 ) protocol Thermocouples: B, E, J, K, N, R, S, T ( IEC584 ) Data Rate RTDs: Pt100, Pt200, and Pt500 ( IEC751 ) 2-, 3-, and 4-wire... - Page 66 10-2 <10. General Specifications> Sensor Burnout Explosion-proof Construction Select HIGH, LOW or OFF as the configuration. FM, CSA, ATEX, IECEx intrinsically safe ( set using software ) approval * FM: Nonincendive ( Class I ) Self Diagnostics CSA: Non-incendive ( Class I ) Amplifier failure, sensor failure, configuration TIIS intrinsically safe approval ( pending ) error, battery alarm, wireless communication...
- Page 67 DATE OF MANUFACTURE : See the Sensor Circuit Parameter: Uo= 5.88 V, nameplate of the product. Io= 130.1 mA, Po= 191.2 mW, Co= 1 μF, APPLICANT : YOKOGAWA ELECTRIC CORP. Lo= 1 mH MANUFACTURER : YOKOGAWA ELECTRIC ATEX Intrinsically safe Approval CORP.
- Page 68 10-4 <10. General Specifications> ■ PHYSICAL SPECIFICATIONS ■ Accessories Housing Remote Antenna Cable (optional accessories) Low copper cast aluminum alloy (Only by order of option) Specification of Cable: 8D-SFA(PE) Coating Outside Diameter of Cable: 11.1 mm • Standard coating Minimum Bend Radius: 67 mm (when fixing) polyurethane, mint-green paint.
- Page 69 10-5 <10. General Specifications> Table 10.1 Sensor type, measurement range, and accuracy Sensor Type Standard Measurement Range Accuracy 100 to 1820 °C ( 212.0 to 3308.0 °F ) Accuracy not guaranteed for less than 400 °C ( 752.0 °F ) ±...
- Page 70 10-6 <10. General Specifications> Table 10.2 Effects of ambient temperature Temperature Effects per 1.0 °C Change in Ambient Sensor Type Measurement Range Temperature 0.2 °C - ( 0.066 % of ( t - 100 ) ) t < 300 °C 0.007 °C - ( 0.0057 % of ( t - 300 ) ) 300 °C ≤...
-
Page 71: Model And Suffix Codes
10-7 <10. General Specifications> 10.2 Model and Suffix Codes Model Suffix Code Descriptions YTMX580 Multi-Input Temperature Transmitter Output Signal Wireless communication ( ISA100.11a ) Housing Always 7 G 1/2 female, nine electrical connections Electrical Connection 1/2 NPT female, nine electrical connections... -
Page 72: Standard Accessories
10-8 <10. General Specifications> 10.5 Standard Accessories Product User’s manual ( Booklet ) Mounting bracket ( 2-inch pipe mounting or wall mounting ) 1 set Battery case ( installed in the main body. ) Remote antenna Not included if specifying no mounting brackets (mounting bracket suffix code is N). With the remote antenna option (Antenna Type suffix code B). -
Page 73: Dimensions
10-9 <10. General Specifications> 10.7 Dimensions ● 2-inch vertical pipe mounting Unit: mm (approx. inch) 147.3 (5.80) 45.2 67.3 (2.65) (1.78) 118 (4.65) 118 (4.65) 125 (4.92) 120 (4.72) 133.8 (5.27) Electrical connection (1.89) □ (1.89) E1001.ai Note: If not specified, the tolerance is ±3%. However, for dimentions less than 10mm, the tolerance is ±0.3mm. IM 04R01B01-01EN... - Page 74 10-10 <10. General Specifications> ● 2-inch horizontal pipe mounting Unit: mm (approx. inch) 147.3 (5.80) 45.2 67.3 (2.65) (1.78) 253.8 (9.99) 125 (4.92) Electrical connection (1.89) □ (1.89) E1002.ai Note: If not specified, the tolerance is ±3%. However, for dimentions less than 10mm, the tolerance is ±0.3mm. IM 04R01B01-01EN...
-
Page 75: Wall Mounting
10-11 <10. General Specifications> ● Wall mounting Unit: mm (approx. inch) 4-Ø6.2 (0.24) hole Mounting bracket 256 (10) 143 (5.63) (0.39) 276 (10.87) Electrical connection (1.89) □ (1.89) ±0.2 4-Φ6.2 hole or M5 tapping □ Wall mounting dimensions ±0.5 ±0.02 (10.08 E1003.ai Note: If not specified, the tolerance is ±3%. -
Page 76: Remote Antenna
10-12 <10. General Specifications> ● Remote antenna bracket Unit: mm (approx. inch) 69.3 (0.91) (2.73) (1.54) minimum R67 69 (2.72) 2-inch pipe 92 (3.62) E1004.ai ● Remote Antenna □ Antenna □ Remote antenna Antenna High-frequency coaxial cable * Non-direction antenna *Sheath dia. - Page 77 10-13 <10. General Specifications> ● Infrared Configuration ● Terminal Configuration Ground terminal Infrared port E1006.ai Ground terminal E1007.ai ● Input Wiring – two-wire four-wire T/C or DC milivolts three-wire RTD or ohm RTD or ohm RTD or ohm E1008.ai – –...
-
Page 78: Revision Information
Revision Information Title : YTMX580 Multi-Input Temperature Transmitter Manual No. : IM 04R01B01-01EN Edition Date Page Revised Item Sep. 2011 — New publication Feb. 2012 1-2, 2-1, 2-4, • Additions of descriptions for regulatory compliance statements ( CE, FCC, 2-5, 10-2 IC, KC ).
Need help?
Do you have a question about the YTMX580 and is the answer not in the manual?
Questions and answers