Table of Contents
Advertisement
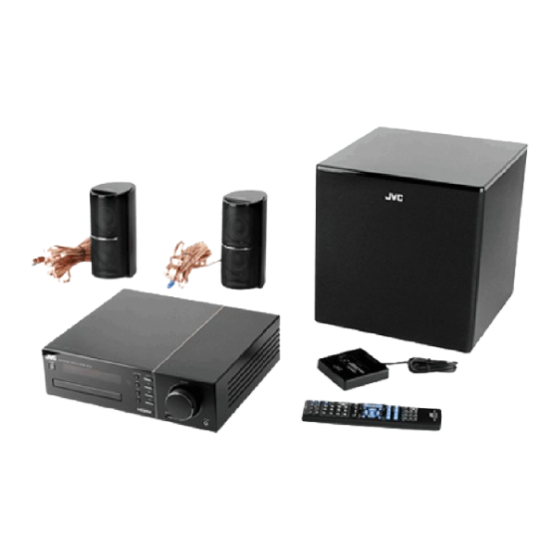
DVD DIGITAL THEATER SYSTEM
TH-F3
Consists of XV-THF3, SP-THF3F and SP-THF3W
INSTRUCTIONS
For Customer Use:
Enter below the Model No. and Serial
No. which are located either on the rear,
bottom or side of the cabinet. Retain this
information for future reference.
Model No.
Serial No.
LVT1833-001A
[J, C]
Advertisement
Table of Contents

Related Manuals for JVC TH-F3


Summary of Contents for JVC TH-F3
- Page 1 DVD DIGITAL THEATER SYSTEM TH-F3 Consists of XV-THF3, SP-THF3F and SP-THF3W INSTRUCTIONS For Customer Use: Enter below the Model No. and Serial No. which are located either on the rear, bottom or side of the cabinet. Retain this information for future reference.
-
Page 2: Warnings, Cautions And Others
Connect the equipment into an outlet on a circuit different from that to which the receiver is connected. Consult the dealer or an experienced radio/TV technician for help. CAUTION Changes or modifications not approved by JVC could void the user’s authority to operate the equipment. (For U.S.A.) Note to CATV system installer: This reminder is provided to call the CATV system installer’s attention to Section 820-40 of the NEC which... - Page 3 For Canada/pour le Canada THIS DIGITAL APPARATUS DOES NOT EXCEED THE CLASS B LIMITS FOR RADIO NOISE EMISSIONS FROM DIGITAL APPARATUS AS SET OUT IN THE INTERFERENCE-CAUSING EQUIPMENT STANDARD ENTITLED “DIGITAL APPARATUS”, ICES-003 OF THE DEPARTMENT OF COMMUNICATIONS. CET APPAREIL NUMERIQUE RESPECTE LES LIMITES DE BRUITS RADIOELECTRIQUES APPLICA- BLES AUX APPAREILS NUMIRIQUES DE CLASSE B PRESCRITES DANS LA NORME SUR LE MATE- RIEL BROUILLEUR: “APPAREILS NUMERIQUES”, NMB-003 EDICTEE PAR LE MINISTRE DES COMMUNICATIONS.
- Page 4 Warnings, cautions and others (continued) 1. CLASS 1 LASER PRODUCT 2. CAUTION: Do not open the top cover or cabinet. There are no user serviceable parts inside the unit; leave all servicing to qualified service personnel. 3. CAUTION: Visible and/or invisible class 1M laser radiation when open. Do not view directly with optical instruments.
- Page 5 — CAUTION Proper Ventilation To avoid risk of electric shock and fire and to protect from damage, locate the apparatus as follows: Top/Front/Back/Sides: No obstructions should be placed in the areas shown by the dimensions below. Bottom: Place on the level surface. Maintain adequate air path for ventilation by placing on a stand with a height of 10 cm more.
-
Page 6: Table Of Contents
Table of contents Thank you for purchasing a JVC product. Please read all instructions carefully before operation, to ensure your complete understanding and to obtain the best possible performance from the unit. Introduction Part description ...3 Using the remote control ...4 Inserting the batteries into the remote control ... - Page 7 Convenient functions of disc/file playback Convenient functions of disc/file playback ...29 Playing back a disc/file in the desired order (Program playback) ... 29 Playing back a disc/file in a random order (Random playback) ... 31 Playing back a disc/file repeatedly (Repeat playback) ...
-
Page 8: Part Description
Part description The numbers refer to the pages in which the parts are explained. Front view Refer to “Display window” shown below. Rear view Display window Remote control sensor Cooling fan... -
Page 9: Using The Remote Control
Using the remote control The numbers refer to the pages in which the parts are explained. Inserting the batteries into the remote control Insert the batteries into the remote control by matching the polarity (+ and −) correctly. R03 (UM-4)/AAA (24F) type dry-cell batteries (supplied) •... -
Page 10: Preparation
Preparation Do not connect the power cable until all other connections have been made. Connecting the antennas AM loop antenna (supplied) Setting up the AM loop antenna If insulation covers the tips of the antenna cable, twist and pull off the insulation. -
Page 11: Connecting The Speakers And Subwoofer
Connecting the speakers and subwoofer Connect the speakers to the main unit by connecting the colored connectors to the same color terminals on the rear of the main unit. Speaker cable (4.5 m [14′9 ″]) Gray Right speaker (rear view) Subwoofer (rear view) ■... -
Page 12: Speaker Layout
Preparation (continued) Do not connect the power cable until all other connections have been made. Using the speakers with commercially available speaker stands The left and right speakers can be fitted onto com- mercially available speaker stands. Before fitting the speakers onto commercially available speaker stands, remove the speaker cables from the tabs and slots on the speakers. -
Page 13: Connecting A Tv
Connecting a TV After connecting a TV, follow the instructions on page 10. ■ IMPORTANT • Connect the main unit directly to a TV (or a mon- itor) without routing through a video cassette recorder (VCR). Otherwise picture distortion may occur during playback. (Routing the con- nection through a VCR, however, does not affect the audio quality.) Main unit... -
Page 14: Connecting External Digital Audio Devices
Preparation (continued) Do not connect the power cable until all other connections have been made. Connecting external digital audio devices Output MD player or satellite receiver To an optical digital output terminal Optical digital cable (not supplied) Main unit (rear view) Input Output Optical digital cable... -
Page 15: Selecting The Video Signal Type
[AUDIO]. • To check the compatibility of your TV, contact your local JVC customer service center. • Even if the main unit is turned off, the video sig- nal type setting is stored. -
Page 16: Basic Operations
Basic operations Number buttons ■ IMPORTANT • Slide the remote control mode selector to [AUDIO]. Using the number buttons Examples: 5: [5] 15: [ 10] → [1] → [5] 150: [ 10] → [ 10] → [1] → [5] → [0] Remote control Turning on/off the main unit mode selector... -
Page 17: Adjusting The Volume
Adjusting the volume Press [VOL +] or [VOL –] repeatedly. • You can also adjust the volume by turning the [VOLUME] control on the main unit. Turning off the sound temporarily Press [MUTING]. • Press [MUTING] again or [VOL +] or [VOL –], or turn the [VOLUME] control on the main unit to restore the sound. -
Page 18: Selecting The Headphone Surround Mode
Basic operations (continued) Selecting the headphone surround mode You can listen to surround sound via headphones connected to the [PHONES] terminal. ■When headphones are connected to the [PHONES] terminal Press [SURROUND]. • Each time you press [SURROUND], the setting toggles between “H.P. SURR” and “H.PHONE” in the display window. -
Page 19: Using The Sleep Timer
Using the sleep timer When the time you specify elapses, the main unit automatically turns off. Press [SLEEP]. • Each time you press [SLEEP], the time indicated in the display window changes. You can set the time to 10, 20, 30, 60, 90, 120, 150 or 180 minutes. Example: Display when the sleep timer is set to 60 minutes Changing the remaining time... -
Page 20: Listening To Radio Broadcasts
Listening to radio broadcasts Number buttons For the number button usage, refer to “Using the number buttons” on page 11. ■ IMPORTANT • Slide the remote control mode selector to [AUDIO]. Selecting a radio station Press [FM/AM] to select “FM” or “AM”... -
Page 21: Tuning In To A Preset Radio Station
Tuning in to a preset radio station Presetting radio stations in the main unit allows you to easily tune in to a radio station. Presetting radio stations You can store up to 30 FM radio stations and up to 15 AM radio stations. Select a radio station you want to store. -
Page 22: Playback
Playing back sources from external devices Remote control mode selector ■ IMPORTANT • Slide the remote control mode selector to [AUDIO]. Playing back sources from external devices Press [AUDIO IN/DIGITAL IN]. • Each time you press [AUDIO IN/DIGITAL IN], the display changes to “AUDIO IN” or “DGTL IN”... -
Page 23: Basic Operations Of Disc/File Playback
Basic operations of disc/file playback Number buttons For the number button usage, refer to “Using the number buttons” on page 11. ■ IMPORTANT • Slide the remote control mode selector to [AUDIO]. Playing back a disc This part explains how to play back the types of discs shown above. -
Page 24: Playing Back A File
Basic operations of disc/file playback (continued) Playing back a file This part explains how to play back 1) files recorded on the loaded disc, and 2) files recorded on a USB mass storage class device (hereinafter referred to as “USB device”) connected to the main unit. -
Page 25: Display Window On The Main Unit For Disc/File Types
Press 5, /, 2 or 3 (cursor) to select a group and track. NOTE • You can also use the number buttons and 4 or ¢ to select a track. • You can also select a group by another method. (1) Slide the remote control mode selector to [SHIFT], (2) press [GROUP/TITLE], and then (3) use the number buttons to enter the desired... -
Page 26: Dvd Audio
Basic operations of disc/file playback (continued) DVD AUDIO ■When a disc is played back Track number Elapsed playback time [DISPLAY] is pressed. Group number Track number • If the “BONUS” or “B.S.P.” indicator lights up dur- ing DVD AUDIO playback, refer to pages 34 or ■When a disc is stopped Group number Track number... - Page 27 VCD/SVCD ■When a disc is played back Track number Playback control • You can use the menu screen to control play- back of a PBC compatible disc. • To cancel the PBC function, follow the instruc- tions below. - Specify the track number using the number buttons when the disc is stopped.
- Page 28 Basic operations of disc/file playback (continued) MP3/WMA/WAV/ASF/DivX/MPEG1/ MPEG2 file ■When a file is played back Track number Elapsed playback time [DISPLAY] is pressed. Group number Track number ■When a file is stopped Group number Track number [DISPLAY] is pressed. File type •...
- Page 29 Messages on the TV screen When a DVD VIDEO or a USB device is selected as the source, the messages shown below are dis- played on the TV screen to indicate the status of the DVD VIDEO or USB device. NOW READING: Appears when the main unit is reading the disc/ file information.
-
Page 30: Stopping Playback
Basic operations of disc/file playback (continued) Stopping playback ■When a disc/file is played back Press 7. Resuming playback When playback is stopped in the middle, playback can be started from the stopped position. Temporarily stopping playback ■When a disc/file is played back Follow any of the operations below. -
Page 31: Fast Reverse/Fast Forward Search
Fast reverse/fast forward search There are two methods. ■When a disc/file is played back • Press 1 or ¡. Each time you press ¡, the speed increases. To restore the normal speed, press [DVD 3], [USB 3] or 3(playback). • Hold down 4 or ¢. NOTE •... -
Page 32: Skipping To The Beginning Of A Chapter/Track/File
Basic operations of disc/file playback (continued) Skipping to the beginning of a chapter/track/file ■When a disc/file is played back Press 4 or ¢ repeatedly. NOTE • You cannot skip to the previous track even by pressing 4 during random playback. (Refer to page 31.) •... -
Page 33: Selecting A Chapter/Track From The Menu Screen
Selecting a chapter/track from the menu screen ■When a disc is stopped or played back Press [TOP MENU/PG] or [MENU/ PL]. • The menu screen is displayed. • Pressing [TOP MENU/PG] may not work depending on the disc type. In this case, press [MENU/PL]. -
Page 34: Convenient Functions Of Disc/File Playback
Convenient functions of disc/file playback Number buttons For the number button usage, refer to “Using the number buttons” on page 11. ■ IMPORTANT • Some buttons change their functions according to the remote control mode. • Before using the functions described in “Convenient func- tions of disc/file playback”... - Page 35 Press the number buttons to pro- gram tracks/chapters. • You can refer to the program number in the display window by pressing [DISPLAY]. Display for a DVD VIDEO • Select a title number, and then a chapter number. Title number Chapter number [DISPLAY] is pressed.
-
Page 36: Playing Back A Disc/File In A Random Order (Random Playback)
Convenient functions of disc/file playback (continued) Playing back a disc/file in a random order (Random playback) (only on a loaded disc) ■When a disc/file is stopped Press [PLAY MODE] repeatedly to display “RANDOM” in the display window. This indicator lights up when the random playback function is activated. -
Page 37: Selecting The Audio Language And Subtitle Language
Selecting the audio language and subtitle language ■When a disc/file is played back ■ IMPORTANT • Slide the remote control mode selector to [SHIFT]. Press the desired button shown below. Function Button Available disc/file Audio [AUDIO] language Subtitle [SUBTITLE] language (only for moving images) Example: TV screen for the subtitle language... -
Page 38: Adjusting The Picture Quality (Vfp)
Convenient functions of disc/file playback (continued) Adjusting the picture quality (VFP) ■When a disc/file is played back or paused ■ IMPORTANT • Slide the remote control mode selector to [SHIFT]. Press [VFP]. • The current settings are displayed. Example: TV screen for the VFP mode Selected VFP mode Press 2 or 3 (cursor) to select the video fine processor (VFP) mode. -
Page 39: Playing Back The Bonus Group
Playing back the bonus group Some DVD AUDIOs may have a special group, called “bonus group”. You can use this function when the “BONUS” indicator lights up in the dis- play window. ■When a disc is played back ■ IMPORTANT •... -
Page 40: Using The Status Bar And The Menu Bar
Using the status bar and the menu bar ■When a disc/file is played back Press [ON SCREEN] twice. Example: TV screen for a DVD VIDEO Status bar Menu bar Press 2 or 3 (cursor) to select an item you want to operate. Press [ENTER]. -
Page 41: Function List
Function list Changes the time information in the TIME display window and the status bar. Time display Instead of steps 3 and 4 on page 35, press [ENTER] repeatedly. Each time selection [ENTER] is pressed, the display changes on the status bar. ■... -
Page 42: Playing Back A Specified Part Repeatedly (A-B Repeat Playback)
Using the status bar and the menu bar (continued) Playing back a specified part repeatedly (A-B repeat playback) You can play back a desired part repeatedly by specifying a start point (A) and an end point (B). ■When a disc is played back Press [ON SCREEN] twice. -
Page 43: Changing The Initial Settings With The Preference Screen
Changing the initial settings with the preference screen You can use the preference screen to change the initial settings of the main unit according to the environment where the main unit is used. Remote control mode selector 5///2/3 (cursor)/ ENTER ■... -
Page 44: Picture
Changing the initial settings with the preference screen (continued) PICTURE Items Contents ( : initial setting) MONITOR Select the display method suitable for TYPE your TV. 16 : 9 NORMAL : For a widescreen TV whose aspect ratio is fixed at 16:9. When a conventional screen picture whose aspect ratio is 4:3 is input, black bars appear on the left and right sides of the screen. -
Page 45: Audio
AUDIO Items Contents ( : initial setting) DIGITAL Select the output signal type suitable to AUDIO the device connected to the [DIGITAL OUTPUT OUT] terminal. Refer to “List of relation- ships of DIGITAL AUDIO OUTPUT pref- erence items and output signals” on page PCM ONLY : Device corresponding only to linear PCM DOLBY DIGITAL/PCM :... - Page 46 Changing the initial settings with the preference screen (continued) List of relationships of DIGITAL AUDIO OUTPUT preference items and output signals Playback disc/file 48 kHz, 16/20/24-bit linear PCM DVD VIDEO 96 kHz linear PCM DVD VIDEO 48/96/192 kHz, 16/20/24-bit lin- ear PCM DVD AUDIO 44.1/88.2/176.4 kHz, 16/20/24-bit linear PCM DVD AUDIO...
-
Page 47: Language Codes
Language codes Code Language Code Language Afar Abkhazian Afrikaans Ameharic Arabic Assamese Aymara Azerbaijani Bashkir Byelorussian Bulgarian Bihari Bislama Bengali, Bangla Tibetan Breton Catalan Corsican Welsh Danish Bhutani Greek Esperanto Estonian Basque Persian Finnish Fiji Faroese Frisian Irish Code Language Scots Gaelic Maori Galician... -
Page 48: Playing Back Sound From An
Playing back sound from an iPod You can listen to the sound from an iPod. You can also operate the iPod using the remote control of this system. NOTE • Depending on your iPod model or playback con- tent, you may not obtain the explained result even after following the operation in this manual. -
Page 49: Operating The Ipod Using The Remote Control
CAUTION • Do not connect or disconnect the iPod when the main unit is on. • Do not touch the pins of the iPod or the pins of the docking station for iPod. • Do not carry the main unit with an iPod con- nected. -
Page 50: Changing The Time When The Backlight Turns On
For the locations of the remote control buttons, refer to page 43. Notes on an iPod • JVC is not responsible for any loss of data on an iPod when used with this system. • This system can receive sound from the follow- ing iPod models. -
Page 51: Operating External Devices Using The Remote Control
Sanyo Sharp Sony Toshiba Zenith The initial code setting is “01 (JVC)”. Release [TV F]. NOTE • It is recommended that you slide the remote control mode selector to [AUDIO] after using this function. Most of the other functions can be used when the remote control mode selector is at [AUDIO]. -
Page 52: Operating A Dbs Using The Remote Control
Operating external devices using the remote control (continued Using the remote control for the TV operation Before the TV operation, select the remote control mode for the TV. ■ IMPORTANT • Slide the remote control mode selector to the lowest position. Press [TV]. -
Page 53: Operating A Vcr Using The Remote Control
10, 14, 15, 16 Gold Star Hitachi Mitsubishi Panasonic 07, 17 Philips 05, 06 Samsung Sanyo 21, 22, 23 Sharp 27, 28 Shintom Sony 18, 19, 20 Zenith The initial code setting is “01 (JVC)”. (Continued on the next page) -
Page 54: Vcr Operation
Operating external devices using the remote control (continued Release [DBS/VCR F]. NOTE • It is recommended that you slide the remote control mode selector to [AUDIO] after using this function. Most of the other functions can be used when the remote control mode selector is at [AUDIO]. -
Page 55: Reference
• Not all HDMI devices are compatible with CEC. If the main unit is connected to non-CEC compatible devices, these devices cannot be controlled using the CEC function. • The CEC function may not work with some CEC devices. (When the main unit is connected to a non-JVC product, the CEC function may not work.) •... -
Page 56: Notes On Operation
Notes on operation Suitable locations for the main unit To minimize the need for servicing and maintain the high quality of this system, do not place the main unit in the following locations: • In a position subject to high humidity or consid- erable dust •... -
Page 57: Safety Precautions
Safety Precautions Avoid moisture, water and dust Do not place the system in moist or dusty places. Avoid high temperatures Do not expose the system to direct sunlight and do not place it near heating equipment. When you are away When away on travel or for other reasons for an extended period of time, disconnect the power cable plug from the wall outlet. -
Page 58: Notes On Discs/Files
Notes on discs/files Playable disc/file types Playable discs * Playable files recorded on a disc * Playable files recorded on a USB device * • Even though listed above, some types may be unplayable. 1 Discs should be finalized before being played back. -
Page 59: Unplayable Discs
(other than a disc of 12 cm or 8 cm (4 ″ or ″) in diameter) cannot be played back. • JVC does not guarantee the operation and sound quality of discs not authorized by CD-DA, which is a CD specification. -
Page 60: Caution For Dualdisc Playback
USB device is selected as the source. • Always set the volume to the minimum on this system when connecting or disconnecting a USB device. • JVC bears no responsibility for any loss of data on the USB device while using this system. -
Page 61: Data Hierarchy
Data hierarchy DVD VIDEO/DVD VR A DVD VIDEO consists of “titles” and each title may be divided into “chapters”. A DVD VR consists of “original programs” or “play lists” and each original program/play list may be divided into “chapters”. Title 1/Original program 1/ Title 2/Original pro- Play list 1 gram 2/Play list 2... -
Page 62: Troubleshooting
Troubleshooting ■General Problem Possible cause Power does not come The power cable is not con- nected to an AC outlet. You cannot operate any Some specific operations are button. restricted. The remote control does The batteries are running low. not work. You cannot operate the Function assigned to some but- main unit using the... - Page 63 ■General (continued) Problem Possible cause No sound is produced. The speakers are not con- nected correctly. Headphones are connected. The sound is turned off. If “NO AUDIO” is displayed in the display window, the disc may have been produced through illegal copying. The sound is weak and The volume level is low.
- Page 64 Troubleshooting (continued) ■For a loaded disc Problem Possible cause A disc cannot be played If “REGION CODE ERROR!” back. appears on the TV screen, the region code number of a disc is not compatible with this system. (only for a DVD VIDEO) If “CANNOT PLAY THIS DISC”...
- Page 65 ■For a connected USB device Problem Possible cause Files on a USB device If “CANNOT PLAY THIS cannot be played back. DEVICE” appears on the TV screen, the files on a USB device are not playable. MP3, WMA, WAV, The connected USB device JPEG, ASF, DivX, may include files of different MPEG1 or MPEG2 file...
-
Page 66: Specifications
Specifications Main unit (XV-THF3) Tuner FM frequency: 87.5 MHz – 108.0 MHz AM frequency: 530 kHz – 1 710 kHz Terminal (front of the main unit) • USB digital input terminal x 1 • Audio output headphone terminal x 1 Impedance: 16 Ω... - Page 67 For U.S.A.
- Page 68 For U.S.A. 2008 Victor Company of Japan, Limited 0308SKMMODJMM...
Need help?
Do you have a question about the TH-F3 and is the answer not in the manual?
Questions and answers