NEC Dterm Headset Cordless User Manual
Headset cordless telephone
Hide thumbs
Also See for Dterm Headset Cordless:
- User manual (59 pages) ,
- Owner's manual (56 pages) ,
- Quick reference manual (5 pages)
Table of Contents
Advertisement
Quick Links
Download this manual
See also:
Owner's Manual
Notice
Note that when converting this document from its original format to a .pdf file,
some minor font and format changes may occur causing slight variations from the
original printed document. When viewing and printing this document, we cannot
guarantee that your specific PC or printer will support all of the fonts or graphics.
Therefore, when you view the document, fonts may be substituted and your
individual printer may not have the capability to print the document correctly.
Advertisement
Table of Contents

Subscribe to Our Youtube Channel
Related Manuals for NEC Dterm Headset Cordless


Summary of Contents for NEC Dterm Headset Cordless
- Page 1 Notice Note that when converting this document from its original format to a .pdf file, some minor font and format changes may occur causing slight variations from the original printed document. When viewing and printing this document, we cannot guarantee that your specific PC or printer will support all of the fonts or graphics. Therefore, when you view the document, fonts may be substituted and your individual printer may not have the capability to print the document correctly.
- Page 2 term ® Headset Cordless User’s Guide 750246-0 Document Revision 1...
-
Page 4: Controls And Functions
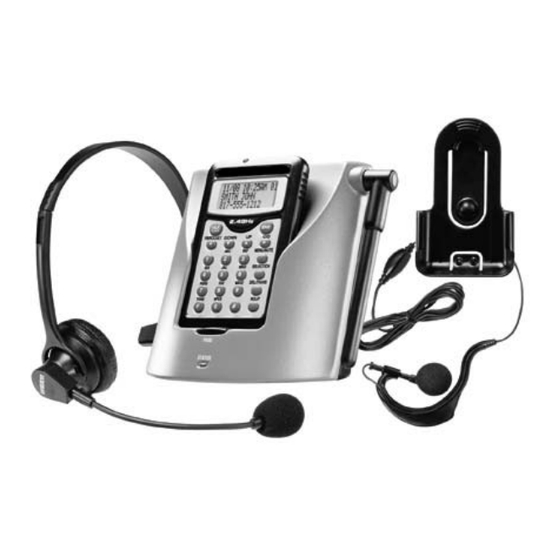
Controls and Functions Incoming Call LED Headset Jack LCD Display TALK/FLASH Key PB/ROCKET (Phone- book)/(RocketDail) DOWN Key UP Key /TONE Key Handset Charging Key 10 END Key . 11 CID/ (right cursor) Key (not supported 12 MENU/MUTE Key Handset Top View 13 SELECT/CH (channel) 14 DEL (Delete) Key 15 RDL/P (Redail/Pause) - Page 5 18 Base Antenna 19 PAGE Key 20 STATUS Key 21 DC Power Input 22 Telephone Line Jack Base Top View Base End View Base Side View Base Bottom View...
- Page 6 Rechargeable Battery Handset Base AC Adapter Beltclip Telephone Cords...
- Page 7 Features term The following features are provided on the D Headset Cordless telephone: • 2.4 GHz Digital Spread Spectrum Technology • Phonebook Locations (up to 100 numbers in total) • Trilingual Language Option • 8-Day Standby Battery Life • 5-Hour Talk Time •...
-
Page 8: Connecting The Base Unit
Connecting the Base Unit Connect the AC adapter to the jack and to a standard 120V AC wall outlet. DC IN 9 V Route the cord To AC Outlet To DC IN 9V AC Adapter (supplied) Figure 1 Connecting the Base to the Adapter Set the base on a desk or tabletop, and place the handset in the base unit as shown. -
Page 9: Making And Receiving Calls
AP(R)-R Unit To TEL LINE Telephone Line Cord (supplied) Figure 2 Connecting the Telephone Cord to the AP(R)-R Unit Place the power cord so that it does not create a trip hazard or where it could become chafed and create a fire or electrical hazard. Making and Receiving Calls To make or receive a call, you need to install one of the supplied headsets. -
Page 10: Ringer Tone Setting
Ringer There are several items to setup for the ringer. These must be done in order to hear a ring when receiving a call. Ringer Tone Setting If you set the ringer to , the ringer tone will not sound. term Setting the ringer tone on the D Headset Cordless telephone is done... -
Page 11: Volume Setup
Volume Setup term Setting the ringer volume on the D Headset Cordless telephone is done manually by following these steps: When the telephone is in the standby mode, press . The MENU/MUTE display then shows the telephone menu in standby mode. Ringer Volume Press to move the pointer to Ringer Volume,... -
Page 12: Mute Microphone
Mute Microphone You can temporarily turn Off the microphone so that the person you are End Key talking with cannot hear you. During a telephone call press and hold to turn Off the microphone and Mute will appear on the MENU/MUTE display. -
Page 13: Making Calls Using The Phonebook
The Pause key counts as one digit. Pressing RDL/P more than once increases the length of pause between numbers. If a name is not required, go to Step 4 Store/Edit No. Press to store the name, then Store/Edit No. appears in SELECT/CH the display. -
Page 14: Chain Dialing
Chain Dialing The memory locations in the handset are not limited to telephone numbers. You can also store a group of numbers (up to 20 digits), that you need to enter once your call connects. This is referred to as Chain Dialing. An example of this is a bank account number. -
Page 15: Deleting The Stored Data
Deleting the Stored Data When the phonebook location to be deleted appears, press DELETE Delete Memory? Delete Memory appears. Delete Memory? Press to move the pointer to Yes. Press . You will hear a confirmation tone SELECT/CH DELETE Deleted! appears in the display. Deleted! Selecting a Different Channel If you encounter interference while using the telephone, you can manually... -
Page 16: Find Handset
term Find Handset (D Headset Cordless) To locate the handset, press on the base. The handset beeps for 60 PAGE seconds, and Paging appears on the display. Paging is canceled by pressing any key on the handset or on the base. Additionally, if an PAGE incoming call is received, page is then also canceled. -
Page 17: Choose The Dialing Mode
Choose the Dialing Mode Most telephone systems use tone dialing which sends DTMF tones through the telephone lines. However, some telephone systems still use pulse dialing such as in rural areas. Your telephone is set for tone dialing, which is its default setting. Depending on your dialing system, set the mode as follows: Ringer Volume Ringer Tones... -
Page 18: Install The Battery Pack
Charge the battery pack for at least 3-5 hours before plugging the telephone line into the base unit. Use only the 730628 lithium ion (Li-ion) battery supplied with the telephone. Replacement batteries are also available through the NEC dealer. Recharge the telephone on a regular basis by returning the handset to the base after each telephone call. -
Page 19: Battery Use Time
Battery Use Time Each fully charged battery will provide: • Five hours of continuous use • Eight days when the handset is in the standby mode. When you charge the handset, test the summary screen and the name of the handset, HS1, appears. Total: 0 Low Battery Alert When the battery pack is very low and needs to be charged, the telephone... - Page 20 Installing the Beltclip with Holster Whenever the telephone is not in use it is best to place the telephone back in the beltclip holster so that it can be easily found when a call is received. Line up the groove on the back of the handset with the groove on the term holster.
- Page 21 THIS PAGE IS INTENTIONALLY LEFT BLANK...
- Page 23 © 2001 NEC America, Inc. Document Revision 1 The material contained herein is subject to change without prior notice at the sole discretion of NEC America, For more information contact: Inc. NEC America, Inc. 6555 N State Highway 161 Irving, TX 75039-2402 term ®...
Need help?
Do you have a question about the Dterm Headset Cordless and is the answer not in the manual?
Questions and answers