RODE Microphones VideoMic Pro Instruction Manual
Hide thumbs
Also See for VideoMic Pro:
- Instruction manual (17 pages) ,
- Instruction manual (18 pages) ,
- Instruction manual (28 pages)
Table of Contents
Advertisement
Quick Links
Advertisement
Table of Contents

Related Manuals for RODE Microphones VideoMic Pro


Summary of Contents for RODE Microphones VideoMic Pro
- Page 1 VIDEOMIC PRO INST RU CT ION M AN UAL www.rodemic.com...
- Page 2 VideoMic Pro. Creating a high performance microphone as lightweight and manageable VideoMic Pro controls as the VideoMic Pro was quite a technical challenge. Other companies have Replacing shock mount bands attempted and failed, simply because a directional microphone depends on...
-
Page 3: Specifications
SPE CI FICAT ION S FR E QU EN C Y R E S P ON S E Acoustic Principle: Line gradient Polar Pattern Super Cardioid Frequency Range: 40 Hz ~ 20 000 Hz Frequency Range: Selectable HPF (High Pass Filter) @ 80 Hz / 12 dB /octave 3 position switch Variable Level:... - Page 4 VideoMic Pro • Spare shock mount bands (4 pieces) HI G H QUAL IT Y PE RFO RM ANCE • VideoMic Pro quick start guide • 9V battery powered – over 70 hours use (alkaline) • Moisture absorbent crystals •...
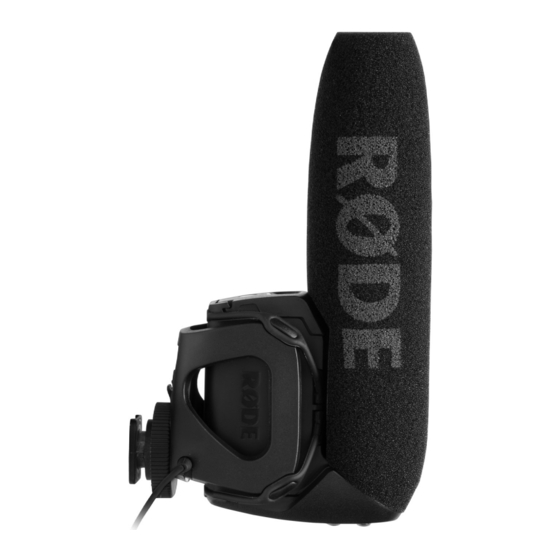
- Page 5 V I D EOMI C PR O ST R UC TUR E 1. Foam windshield 8. Billeted metal 2. Shock mount cradle camera shoe mount 3. Shock mount band 9. Fastening ring 4. Power / High Pass Filter switch 10. 3/8” thread mount 5.
-
Page 6: Setup And Use
SET UP AND U SE I NS TAL LING T HE B AT T E RY Before you can record with your VideoMic Pro, you will need to install a standard 9V battery (ANS1:1604A or IEC:6LR61). RØDE recommends using a high quality lithium or alkaline battery to achieve the best possible battery life. - Page 7 SET UP A ND U SE The VideoMic Pro will run continuously for over 70 hours with a high Some older model and low cost cameras may produce a higher level quality alkaline or lithium battery. Battery performance may vary of mechanical noise, which can be picked up by the VideoMic Pro.
- Page 8 SET UP AND U SE The VideoMic Pro delivers a mic level signal to the video camera via focus settings and distant traffi c audible in the background. a stereo mini jack audio lead. The mini jack should be connected to To engage the High Pass Filter, slide the power switch to the right the camera via the camera’s “audio-in”...
- Page 9 If you have the semester for tutorials most relevant to the VideoMic Pro. +20dB level selected on the VideoMic Pro you may need to reduce the input level on your camera. For more entertaining videos, you may also wish to visit RØDE TV ( www.rodetv.com ) –...
- Page 10 This shock mount uses four elastomer suspension bands to hold the VideoMic Pro in its shock mount cradle. These bands have been BAND TYPE ONE created to be intentionally soft, again to minimise the transmission of mechanical and handling noise through this material.
- Page 11 To fi t your band, match the shape of the band to the notches on the VideoMic Pro’s body. The ‘arrow head’ end of the band is to be placed into the notch on the side of the mic body which is normally just below the windshield foam.
- Page 12 The VideoMic Pro can be used in any situation where you want to listen to what’s in the shot, not what’s at the side or out of view.
-
Page 13: Optional Accessories
However if you wish you may gently remove the foam windshield and soak in cold water to reshape. Please ensure the foam is completely dry before refi tting to your VideoMic Pro. For increased wind protection, an optional DeadCat VMP furry windshield is available for the VideoMic Pro. - Page 14 B OO M P O LE S P G 1 P I S T OL GR I P The VideoMic Pro can also be mounted on the PG1 pistol grip. This The VideoMic Pro may be mounted on a Boompole, allows independent movement of the microphone from your video Mini Boompole or Micro Boompole via the 3/8”...
- Page 15 SA F ET Y / C ARE IN STRU CTIO NS When not in use, always keep your VideoMic Pro in a cool, dry place, preferably in a camera bag or equivalent to protect from dust Loud sound levels can cause serious or damage.
-
Page 16: Troubleshooting & Frequently Asked Questions
After a long period of use, the screw that fastens the camera shoe When it is increased to the level that the noise fl oor in the camera mount to the base of the VideoMic Pro may need to be tightened. microphone amplifi er becomes audible, the low level sound will be A slight rattling noise when the VideoMic Pro is moved is an indicator present in your recording. - Page 17 T RO UBLES HOO TING / FREQUENTLY ASK ED QU E STI ONS WH ER E CA N I O RDER RE P L ACE MEN T SHOC K M OU N T B A NDS F O R M Y V I D EO M IC PR O? The elastomer shock mount bands are available to order as a pack through your local RØDE distributor.
-
Page 18: Product Warranty
All RØDE Microphones are guaranteed for one year from the date of getting the advice or assistance you require, do not hesitate to contact purchase. The VideoMic Pro warranty may be extended to a full ten us directly. year period. Extending your warranty is completely free of charge –...
Need help?
Do you have a question about the VideoMic Pro and is the answer not in the manual?
Questions and answers