RODE Microphones Stereo VideoMic Instruction Manual
Hide thumbs
Also See for Stereo VideoMic:
- Instruction manual (12 pages) ,
- Quick start manual (2 pages) ,
- Instruction manual (7 pages)
Advertisement
Quick Links
Advertisement

Related Manuals for RODE Microphones Stereo VideoMic


Summary of Contents for RODE Microphones Stereo VideoMic
- Page 1 Stereo VideoMic Instruction Manual www.rodemic.com ( EMC, LVD )
- Page 2 You can also use the SVM as a remote mic on a stand or boom pole and have a VideoMic on the camera, or an NTG1/2 on a boom pole. By incorporating a simple mixer you can then create a very professional audio track.
-
Page 3: Specifications
Specifi cations Acoustic Pressure Gradient Principle: Directional Super Cardioid (per capsule) Pattern: (see graph) Frequency 40 Hz - 20 kHz Range: selectable High Pass Filter (HPF) @ 80 HZ 12 dB/octave 200 Output Impedence: Sensitivity: -38 dB re 1 Volt/Pascal (12.6 mV @ 94 dB SPL) +/- 2 dB @ 1kHz Equivalent Noise: 20 dB SPL (A - weighted per IEC651) - Page 4 Specifi cations Frequency Response Polar Response -2.0 -10.0 -20.0 1KHz Accessories Dead Kitten Windscreen - 4 -...
- Page 5 Features • Stereo X/Y condenser microphone • Broadcast sound quality • Rugged cast aluminum body • 9V battery operation • Two step high-pass fi lter and PAD • Low handling noise • Integral camera-shoe mount • Designed & manufactured in Australia •...
-
Page 6: Battery Installation
Battery Installation • The SVM operates on a standard 9V battery. We recommend you use either Alkaline or Lithium batteries for the longest continuous operating time. • The SVM will run continuously for over 60 hours with a good quality Alkaline battery. It is however important to understand that battery performance can vary dramatically with ambient temperature and shelf life. - Page 7 - 7 -...
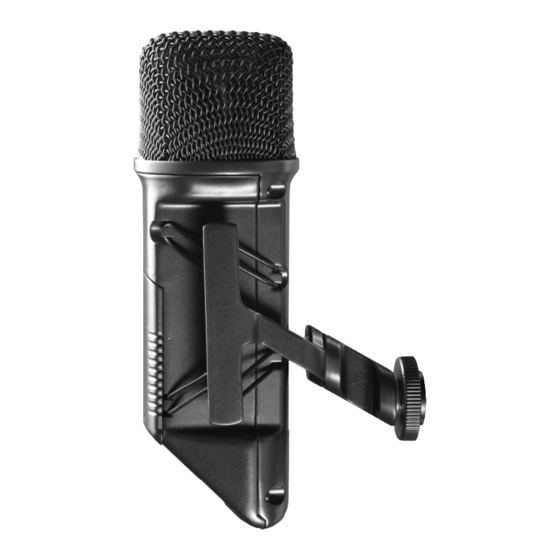
- Page 8 Mounting your SVM • The SVM incorporates a standard camera- shoe mount on the bottom of the microphone. Designed to reduce motor and handling noise, the shock mount has a 3/8” threaded insert for mounting on tripods and poles. You will fi nd older models and low cost cameras produce more motor noise, which the highly sensitive SVM can pick up.
- Page 9 Operating the SVM • Now that you have the SVM securely fastened to your camera and the audio output lead connected, you can switch the mic on. There are three switches located at the rear of the microphone: PAD (left switch) The PAD allows for attenuation of the microphone recording level (either 0dB or -10dB).
- Page 10 Operating the SVM allow you to access this setting through the camera menu. You should try and set the level using the sound source you will be recording, or a sound source of similar level before starting to record or you could distort the input of your camera if the level has been set too high.
- Page 11 Operating the SVM • The SVM is made from rugged cast aluminum, ensuring impact resistance and a longer life. However care must be taken not to get the SVM wet. Treat the mic the way you should treat your camera and you will have many years of reliable service.
-
Page 12: Warranty
Warranty microphones are warranted for one year from date of purchase. You can extend that to a full ten years if you register online at www.rodemic.com. The warranty covers parts and labour that may be required to repair the microphone during the warranty period.
Need help?
Do you have a question about the Stereo VideoMic and is the answer not in the manual?
Questions and answers