Advertisement
Quick Links
Advertisement

Related Manuals for Haicom HI-602X


Summary of Contents for Haicom HI-602X
- Page 1 HI-602X Easy Manual...
- Page 2 User can check the real time location from the GPRS tracking web site or using the Haicom Tracking software installed on the PC and check the real time position on the map via the regular dial tone transmission.
- Page 3 User can also connect HI-602X to all kinds of optional car kits accessories so that the user can globally control the vehicle petro supply or electricity by pressing few phone buttons from any phone. For example, By connecting the optional vibration sensor, the tracker will also actively warning user when there is any movement on the vehicle.
-
Page 4: Getting Started
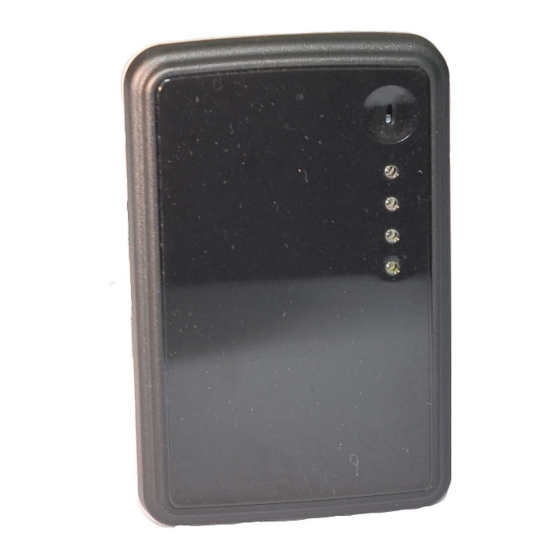
GETTING STARTED:... - Page 5 HI-602X main unit overview...
- Page 6 Dimension...
- Page 7 LED lndicator LED Color Status Amber Charging Charge Completed Green flashing GPS in 3D fixed Stay on GPS not 3D fixed yet GPS in sleeping mode Battery low White Off 3 sec./On 75 micro sec. GSM stand-by Off and On 600 micro sec. Searching GSM network or no SIM Stay on GSM network connected...
- Page 8 APPLICATIONS: Real time vehicle tracking Moving assets security Personal tracking employee, teens, spouse, fleet, etc. Child, aged people protection Pet tracking Sporting, traveling, recreation tracing Remotely control vehicle from any where Tapping the talk around the tracker Rental car or commercial vehicle management...
- Page 9 Features Haicom Asset Tracking Solution offers you a lot of advantages Quad band 850/900/1800/1900 MHz GSM system External SiRF Star III high performance GPS receiver Internal GSM active antennas Advanced communication via SMS/TCP/UDP/HTTP Program, control and the tracker from the OTA (Over the Air) web tracking platform and...
- Page 10 With connecting the optional vibration or microwave sensor, the tracker will initiatively send warning SMS to the preset telephone numbers. Vin12V~24V ViolationReset HelpSw GeoFencing RemoteRelay2 RemoteRelay2 RemoteRelay1 RemoteRelay1 HI-602X car kit set up example...
- Page 11 Permanent power on installation example HI-602X connected to car battery via car kit control box...
- Page 12 HI-602X Characteristics Items Items Specification Specifications s s s Items Items Specification Specification Power Supply DC 5V Backup Battery 1100mAh Normal power consumption Dimension 46.10mm x 70.7mm x 18.2mm Operating temperature -20℃ to 55℃ Humidity 5% to 95% Non-condensing Frequency...
-
Page 13: Standard Packing
Standard Packing 1. HI-602X main unit 2. 1,100mAh battery 3. 18 pin to USB set up cable 4. AC power adaptor 5. DC cigarette lighter 6. mini CD with user manual... - Page 14 The in-build self contained battery As mentioned, we can not tell you how long the HI-602X battery can last because it is really depend on how frequent the tracker used and the sleeping mode time. Anyway, here are the figures:...
- Page 15 The car battery cable can be connected directly to the vehicle battery (12V or 24V) and transfer into 5V for the HI-602X. Very important: don’t connect HI-602X USB set up cable directly to the vehicle battery because the HI-602X 18 pins connector takes only 5V.
-
Page 16: Gprs Tracking
CD and perform the set up from your computer. Please make sure to switch off the power on HI-602X while programming. (User can only program the HI-602X while the HI-602X on power off status) 1. Connect the 18 pins to USB set up cable from the tracker to your computer USB port:... - Page 17 3. Click the “ Get Parameter “ 4. Message will shown: “ GET FINISH “ and all the tracker current set up will appeared: Please double check with your local telecomm service provider to make sure the SIM card APN (Access Point Name) and fill in and program to the tracker.
- Page 18 “ or any name. Also, please double check if the IP and port settings (the below red block) was correctly (for with Haicom GPRS tracking: http://www.tracking.haicom.com.tw:8090/Default.aspx The above settings are the must to make the tracker to start sending data back to our server and show on the platform.
- Page 19 User guides for USB settings and SMS features 1. USB Settings : A. Press to get the tracker current settings B. Press to save the settings changed C. Press to download the GPS data logger records D. Press to delete and clean out the GPS logger records. To avoid the records capacity too full (the full capacity is about 257,000 points) and slow down the download time, the records deleting is recommended after download the GPS data logger.
- Page 20 5. Buzzer sound or silent after receiving the settings from the web tracking site 6. Buzzer sound or silent after receiving the settings from the phone SMS command 7. Buzzer sound or silent when press the buttons (only available for the HI-602X and the optional car kit box)
- Page 21 L: Set up the APN (Access Point Name) from the SIM card telecomm service provider M: Set up the IP/Domain address of the tracking server for the GPRS data to send to 1. Can set up either the IP or the domain name 2.
- Page 22 condition that the user only need to know the tracker updated locations in some fix time and let the tracker go sleeping mode (switched off) to save power consumption. The ‘Time To Sleep’ set up is recommended to set no less than 3 minutes so that the tracker GPS have enough time to let the GPS get 3D fixed.
- Page 23 Terms Explanations System Config: 1. IMEI: Tracker ( International Mobile Equipment Identity number,IMEI# ) 2. Version: Tracker firmware version 3. SMS intervals[s]: Interval of tracker send real time position with Google map hyperlink via SMS 4. GPRS interval[s]: Interval of tracker send real time position to the server via GPRS 5.
- Page 26 SMS Command for X seris Code Format Function 100 #0000,100 Request all setting values back 151 #0000,151,0000000000,0000000000,0000000000 Set Security Phone Number.(10 Max.) 152 #0000,152,0000000000,0000000000,0000000000 Set SOS Phone Number (10Max.) 153 #0000,153,0000000000,0000000000,0000000000 Set SMS Phone Number (10 Max.) 154 #0000,154 Get Security Phone Setting 155 #0000,155 Get SOS Phone Setting 156 #0000,156...
- Page 27 EXAMPLE:#0000,210,60.250.68.23,9101,9120,1943,0 SMS initial code 0000 password (default is 0000) 210 Initial command code 60.250.68.23,9101,9120,1943,0 Varies parameters Fill in “ * “ between the comma when the above parameters unchanged. Fill in nothing between the comma to empty the data (originally there are some parameters in between, such as the APN, USER and the PASS) Different parameters will divided by comma: “...
- Page 28 Set: Buzzer sound or silent ( 1 → enable, 0 → disable ) after receiving the settings from the phone SMS command KEY: Buzzer sound or silent ( 1 → enable, 0 → disable ) when press the buttons (only available for the HI-602X and HI-603)
- Page 29 (Set Power Saving Mode) Mode:Set up the sleeping mode: 0 Full power、1 GPS off、2 all off、3 fixed on/off time Hour1:Time setting, hours Minute1:Time setting, minutes Second1:Time setting, second ( please consult the above USB setting guides “Time To Sleep” Q ) Hour2:Time setting, hours Minute2:Time setting, minutes Second2:Time setting, second ( please consult the above USB setting guides “Time To...
- Page 30 (Inform Tracker send TX000 to Server) Request the tracker and the server to perform the two ways synchronize communications (In order to let the tracker and the server to do the two way settings and information exchanges, they must stay in connection status. But, under some circumstances, the tracker is not connected to the server, such as under GPS off mode (sleeping mode) although the GSM is active but the tracker do not stay connect with the server.
- Page 31 SMS GPS coordinates send back guides: EXAMPLE: $T120808R1,GPS,A,N,24”59’58.26,E,121”29’21.65,000030.0,182.57,120808,074222*(0124971 23456789),http://maps.google.com/maps?q=24.999518,121.489352 Explanations: SMS initial code T120808R1 Firmware version SMS message type (please consult the below SMS message type list) GPS fixed status (A in 3D fixed ,V not fixed yet) Coordinates (Format: degree" minute' second) N,24”59’58.26,E,121”29’21.65 000030.0 Speed ( Sea mile)
- Page 32 * Update new firmware 1. Decompress the files. 2. Run the TRACKER program 3. Plug the tracker to the computer USB port 4. Press the GET PARAMETER and see the current settings 5. Press the UPDATE 6. Open the firmware (2 files) 7.
- Page 33 8. The firmware start loading 9. The below message shown and press OK...
- Page 34 1. Initial registration from the GPRS web tracking platform: http://www.tracking.haicom.com.tw:8090/ New user; please register before login.
- Page 35 3. The tracker imei# is shown on the bottom of the sticker: 4. After login, select the “ Manage “ for Add New Tracker...
- Page 36 * Program tracker from Haicom GPRS web tracking web site 1. Make sure the tracker connected to the GSM network and start sending back the data 2. On the Manage/Device Settings section, select the tracker and press Load 3. Change the prefer settings...
- Page 37 4. Press Setup and will show: Device information update successfully...
- Page 38 How to generate the detail report print out with address 1. Select the preferred from and to date and click “ Search “ 2. Click “ Download “ and the csv file will be saved as Excel file 3. Click “ Address Transfer.zip “ for the transfer program...
- Page 39 1. Click “ Address Transfer program icon to run the program “ 2. Select the csv Excel file 3. Click “ Transfer Address (3) “ 4. After the translate program running, the “ Translate successful ! “ message will appeared. In the mean time, there will extra Excel file with (Address) saved on your desktop.
- Page 40 The example of the detail report printout:...
- Page 41 How to calculate the historical total travel distance: 1. Click the preferred start point 2. Click the start point icon...
- Page 42 3. Click the preferred end point 4. Click the end point icon 5. Click the Distance icon to get the total traveled distance...
- Page 43 How to send command from the GPRS tracking platform: 1. Click Manage -> Command Send: 2. Click to send commands from the platform: Status Open (0) means the relay is stay connection. To cut the relay (cut off the ignition, oil pump, power, etc.), select Close (1)
- Page 44 3. Click the Select to see the command sending status:...
- Page 45 Set up GeoFencing function steps: Basically, there are two ways to set up the geo fence function and both ways are independent to each other. For instance, if you set up the geo fence alarm on the map radius, the trigger will only report to the tracking site. If you set up the geo fence function from the Manage ->...
- Page 46 3. Make sure click “ Yes “ on the Enable section so that the geo fencing function will work. Then, click Setup to complete the procedures. In the mean time, the Update Time will show the time that you set up and show Update Successful on the side: 2.
- Page 47 b. Connect the tracker to your computer and set up geo fence from the set up program: c. The geo fence will triggered only once and user will set up again from the SMS command to activate the alarm once again:...
Need help?
Do you have a question about the HI-602X and is the answer not in the manual?
Questions and answers