Table of Contents
Advertisement
Quick Links
Advertisement
Table of Contents

Related Manuals for Ten-Tec OMNI-VII


Summary of Contents for Ten-Tec OMNI-VII
-
Page 1: Table Of Contents
UNPACKING OMNI-VII ABOUT THIS MANUAL CONNECTING A POWER SUPPLY A WORD ABOUT GROUNDING PHILOSOPHY OF DESIGN RADIO STATE VS. REMOTE STATE Section 2 – OMNI-VII FRONT PANEL CONTROLS (1) POWER (2) PHONES (3) KEY (4) MULTI ENCODER (5) PBT/BW ENCODER... -
Page 2: Acc
(45) ANT 1 (46) ANT 2 (47) AUX RX Section 4 – USING THE MENU AUTO TUNER TX METER TRANSMITTER SSB TX BW TX ROLL OFF KEYING LOOP AUDIO SOURCE LINE GAIN EXT T/R DELY FM TX CTCSS RX EQUALIZER TX EQUALIZER RECALL SUB SIDETONE FRQ... - Page 3 MASTER RESET UPDATING OMNI-VII FIRMWARE DIAGNOSTIC AND IP DATA ENTRY SCREEN # SIGN ON THE SCREEN TROUBLESHOOTING Section 6 – SPECIFICATIONS AND TECHNICAL DATA GENERAL RECEIVER TRANSMITTER BLOCK DIAGRAM CE DECLARATION OF CONFORMITY 588 manual Second release – August 2007...
-
Page 4: Section 1 - Your New Omni-Vii
The voltage source must be capable download website. The latest version of the of supplying minimum 23 amperes OMNI-VII manual is posted in .pdf format on continuous duty. the OMNI-VII section of the Ten-Tec website at www.tentec.com. Schematic diagrams... -
Page 5: A Word About Grounding
Amateur Radio receiver performance. often suitable, but that is now a violation of the National Electrical Code. Be aware that We refer to the roofing filters in the OMNI-VII many modern water connections use plastic as “distributed” because filters are spread pipe, and are not suitable ground across both the first and second I-F stages. -
Page 6: Radio State Vs. Remote State
While remote operation of HF equipment has been done via the Internet or data links The default is RADIO STATE. To toggle to for several years prior, OMNI-VII is the first REMOTE STATE, turn the transceiver off. transceiver that allows direct connection to a... -
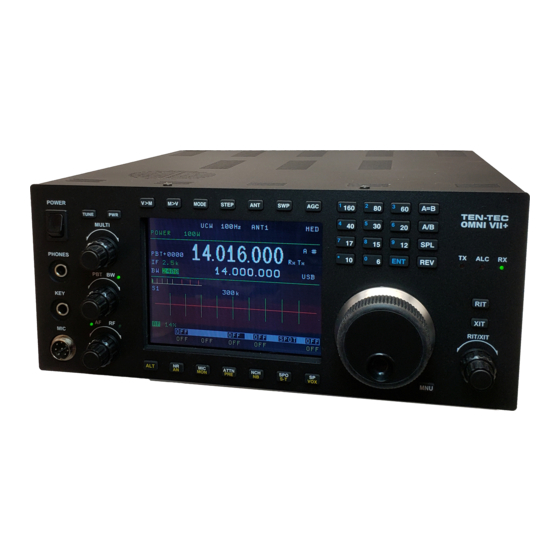
Page 7: Section 2 - Omni-Vii Front Panel Controls
(3) KEY PANEL CONTROLS The front panel provides a ¼” stereo jack for Section 2 of the OMNI-VII manual covers connection of a key, external keyer, or the various controls and connectors on the paddles. See Figure 2-1 for proper wiring. -
Page 8: Multi Encoder
MULTI knob. These items can be accessed counter-clockwise to decrease. by pressing the MULTI encoder towards the front panel of the transceiver. The OMNI-VII Values for AUDIO and RF GAIN are shown will cycle through various menu items in blue on the screen next to the encoder. - Page 9 We include a spare 8-pin microphone connector (P/N 35363) with the packing kit to allow rewiring of your current mic for use with OMNI-VII The pinout for the 8 pin mic connector on the front of the OMNI-VII is shown in Figure 2-2. Recommended wiring is shown in Figure 2-3 Figure 2-2.
-
Page 10: Tune
Turn the MULTI knob The mode indicators at the top of the screen to scroll through the available memory will disappear and the OMNI-VII will return to locations. There are 100 available usual operation. memories. When your desired memory number has been selected, press V>M... -
Page 11: Step
This button enables the momentary SWEEP The step indicators at the top of the screen feature included on OMNI-VII. will disappear and the OMNI-VII will return to usual operation. Press the SWP button. The transceiver will momentarily sweep a given range of... -
Page 12: Agc
Bandstacking registers allow Notes: The REV function can be used even various combinations of mode and filter when OMNI-VII is not in split mode if bandwidth on the same amateur band to be momentarily monitoring the VFO B “stored”. To access the registers, press the frequency is desired. -
Page 13: Mnu
The main tuning knob is also equipped with In LSB and USB modes, the TX LED will be a variable rate function. Unlike tuning STEP lit as long as the radio is in transmit. The as set via the STEP button, the rate control ALC light is used to adjust proper mic gain. -
Page 14: Nr/An
The notch In LSB, USB, and AM modes, mic gain on filter is in the receiver chain post-AGC and the OMNI-VII is set properly by turning the post-DSP filtering. MULTI knob while speaking into the microphone. -
Page 15: Spo/S-T
A and B cannot be toggled without going The alternate function of this button is NB – into the menu – SP will only turn the keyer noise blanker. OMNI-VII is equipped with a on in the selected mode or off. DSP noise blanker with seven selectable stages of aggressiveness. -
Page 16: Section 3 - Omni-Vii Rear Panel
This jack is for connection of an external speaker. When connected using a standard 1/4” phone plug, the internal speaker in OMNI-VII s disabled. Tip of the 1/4” phone plug is audio, sleeve is ground. Requirements for an external speaker... -
Page 17: Rem Pod
See CONNECTING AN EXTERNAL radio. One of the great features about LINEAR AMPLIFIER in Section 5 for a OMNI-VII is that the latest version of the complete description on interfacing a linear radio is always available from our firmware to the OMNI-VII. -
Page 18: Spare
(44) ETHERNET Tip: TX EN can also act as a transmit inhibit The rear panel Ethernet jack is used for input if it is desirable to prevent OMNI-VII remote control of the transceiver with the from transmitting until other station One Plug graphical user interface software, accessories have been switched. - Page 19 mode with either ANT 1 or ANT 2 being used as the transmit antenna. Antennas are selected using the ANT front panel button. See the description of (14) ANT in Section 2 of this manual. The automatic antenna tuner (optional, if installed) is not available for use on an antenna connected to this jack.
-
Page 20: Section 4 - Using The Menu
The SSB TX BW control determines the Section 4 – USING THE MENU bandwidth of a transmitted SSB signal. It is The OMNI-VII is equipped with a single selectable in 200 Hz steps from 1000-4000 menu, accessible by pressing the MNU Hz. -
Page 21: Line Gain
CTCSS is encode (transmit) only. rear panel ACC 1 jack line level input. Set RX EQUALIZER to BOTH, the OMNI-VII will accept either line level audio input via ACC 1 or via the mic Available settings: -20 to 20 dB jack. -
Page 22: Sidetone Frq
SPO/S-T button on the front panel. See (28) Available settings: OFF, MODE A, MODE B SPO/S-T. The OMNI-VII’s internal keyer can be SPOT VOLUME configured for either Curtis mode A or mode B keying. Turn the MULTI knob to select or Available settings: 0 to 100%. -
Page 23: Cw Rise/Fall
VOX. the level of the CW wave or both. VOX HANG The OMNI-VII uses the voltage derived from the bridge circuit as a reference for 100 Available settings: 0-100% watts output. Each band is calibrated in VOX HANG is used to determine how long production. -
Page 24: Fsk Tx Data
F1, F2, and F3 buttons on the accessory model 302R remote Available settings: VFO-A, VFO-B, RIT/XIT, encoder/keypad available for OMNI-VII. If PBT/BW you do not have the 302R connected, they REMOTE ENC is used for the accessory will have no function. -
Page 25: Vfo Enc Rate
2 kHz. 500 Hz, 300 Hz, AUTO. RIT ENC RATE OMNI-VII is equipped with a 20 kHz wide RIT and XIT tuning steps are fixed at 10 Hz. filter at the 70 MHz 1 I-F, and up to five filters at the 455 kHz I-F. -
Page 26: Enable 300Hz, Enable 500 Hz
COLLINS™ MECHANICAL FILTERS in Section 5. SQUELCH Available settings: 0-100% OMNI-VII is equipped with an all-mode squelch that is accessible only from repeat pressing of the MULTI knob; it is not shown as a line item in the menu system. See the description of (4) MULTI ENCODER earlier in the manual. -
Page 27: Section 5 - Operation Notes And Accessory Connection Examples
To use the OMNI-VII with a full break-in time. If user changes bands and does not linear amplifier incorporating a keying loop,... -
Page 28: Tuning Up An External Linear Amplifier
15 Vdc and 100 mA. from the low power setting to whatever level the PWR control has been set at with the The keying loop in the OMNI-VII must be MULTI knob. Repeat operation will require enabled through the menu. For menu line pushing TUNE then PWR again for the item KEYING LOOP, select ON. -
Page 29: I-F Filter And Dsp Bandwidth Filter Theory And Use
FILTER THEORY AND USE The answer is: find a way to protect the overall receive chain, within the limits of the OMNI-VII is equipped with a series of design of the radio, to maintain adequate “distributed roofing filters” at the 70 MHz first sensitivity, dynamic range and third order I-F and 455 kHz second I-F. -
Page 30: Factors That Affect The Sound Of Ssb Transmit Audio And Their Adjustment
AUDIO AND THEIR ADJUSTMENT quality of audio transmitted. OMNI-VII has been provided with the ability to transmit on One of the features of the OMNI-VII is SSB with a maximum bandwidth of 4000 Hz. flexibility afforded the operator for the Please see the note toward the end of this desired sound of SSB transmit audio. - Page 31 (accessible from the transmitting and avoid this. SP/VOX button on the front panel). The speech processor used in the OMNI-VII Mic gain is set by pressing the MIC button is a DSP generated RF compressor. and talking into the microphone. When you...
-
Page 32: Fsk Operation
OVER TEMP – OMNI-VII uses an internal FSK OPERATION temperature gauge on the final amplifier. If Selection of the FSK mode will allow the the temperature exceeds 70 degrees C, this OMNI-VII to operate true FSK RTTY. The message will appear on the screen and the... -
Page 33: External Cw Input Plus Cw Keyer Operation From Paddles
Connect the DB-9 serial port connector on necessary information. the back of OMNI-VII to an open serial port Pin 3 on the ACC 1 connector on the OMNI- on your computer with a standard serial port VIII rear panel is a PTT connection. -
Page 34: Diagnostic And Ip Data Entry Screen
Here is the sequence of steps to follow once rainbow test pattern. Release the RIT the .exe file has been downloaded from button and KEY WAS PRESSED will rfsquared.com: appear, along with hexadecimal information on the right side of the screen. 1) Turn transceiver OFF. -
Page 35: Troubleshooting
MULTI encoder to cycle through available choices and check SQUELCH level. OMNI-VII is equipped with a silicon controlled rectifier that opens if current draw Is the speaker wire internal to the rig broken from the 13.8 Vdc power supply exceeds 25 or disconnected? (have you pulled the amps. - Page 36 Is “VOX” highlighted at the bottom of the screen? If not, VOX is turned off. Check the OMNI-VII menu to see if the items for VOX are active and set properly. If any of the three settings is at zero, VOX will not operate.
-
Page 37: Section 6 - Specifications And Technical Data
Section 6 – SPECIFICATIONS AND TECHNICAL DATA SPECIFICATIONS GENERAL Frequency Range RX: 100 kHz – 30 MHz and 48 – 54 MHz. Specifications should apply within Amateur Radio bands only. Frequency Range TX: 1.797-2.010, 3.495-4.005, 5.275-5.407, 6.995-7.305, 10.095- 10.155, 13.995-14.352, 18.063-18.170, 20.995-21.452, 24.885- 24.995, 27.995-29.702, 49.995-54.0 MHz. -
Page 38: Transmitter
IP3 (Third Order Intercept Point): +13 dBm at 20 kHz spacing, +8.5 dBm at 2 kHz spacing, optional 500 Hz I-F filter installed, 500 Hz DSP BW. IMD3 Dynamic Range: 90 dB @ 20 kHz spacing, 2.5 kHz I-F filter. 78 dB @ 2 kHz spacing, optional 500 Hz I-F filter installed, 500 Hz DSP BW. -
Page 39: Block Diagram
DSP TX Mixer 3rd L.O. 469kHz 14kHz 469kHz Baseband amp/filter Omni VII Block Diagram TX Amps Low pass Power DSP RX filter 14kHz Figure 6-1 OMNI-VII Block Diagram 588 manual Second release – August 2007 Part #74409 Printed in USA...
Need help?
Do you have a question about the OMNI-VII and is the answer not in the manual?
Questions and answers