Table of Contents
Advertisement
Advertisement
Table of Contents

Related Manuals for TDS Recon


Summary of Contents for TDS Recon
- Page 1 TDS Recon Pocket PC handheld Getting Started Guide...
- Page 2 Water damage caused by improper installation of the CF-Cap is not covered by warranty. Removal of the back case voids the limited warranty. There are important seals that will break and the Recon will no longer be waterproof. To the extent allowed by local law, the above limited warranties are exclusive and no other warranty or condition, whether written or oral, is expressed or implied, specifi...
-
Page 3: Table Of Contents
Windows Mobile 2003 software for Pocket PCs. The immersible and shock-resistant design of the Recon allows you to work in harsh outdoor environments. You can run your Pocket PC applications in blazing heat, subzero cold, driving rain, dusty job sites--... -
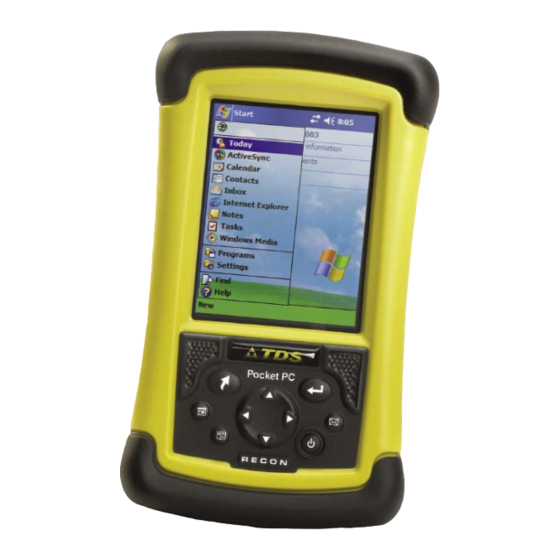
Page 4: Device Hardware
(button 3) PowerBoot Module Navigation pad Assignable application buttons; see Settings. Top View- without Cap Bottom View CompactFlash card slots External Serial Power Note: Be sure to read the warranty and safety information in the manual prior to using your Recon. -
Page 5: Setting Up Your Recon
2. Attach the hand strap To connect the hand strap to your Recon, hold the hand strap clip at a 45 degree angle and push the clip onto the Recon bracket. Repeat the process with the other end of the hand strap. - Page 6 CompactFlash cards that use power conservatively. 4. Align the touch screen When the Recon fi rst turns on (or after a hard reset), the touch screen will require calibration. Tap the screen to set it up. Using a stylus, tap the targets fi...
-
Page 7: Working With Your Recon
Working with your Recon Using the Stylus The touch screen on your Recon works like a mouse on a PC. Use the stylus to navigate and select objects on the screen. Tap: Tap the screen with the stylus to select or open an item. Tapping is equivalent to clicking an item with the mouse on your PC. -
Page 8: Backup And Restore
System in a fi le called backupimg. When the Recon goes through a hard reset, it automatically checks for the presence of this fi le and gives you an opportunity to restore the most recent backup. - Page 9 Power Button Features The power button turns the Recon on and off and can perform a number of additional useful tasks. Turn Backlight on/off Hold down the power button for about 1 second to manually toggle the backlight state. Note: Manually turning...
- Page 10 (These icons appear at the top of every screen on your Recon, and not only the Today screen.) When you turn on your Recon for the fi rst time each day (or after four hours of inactivity), the Today screen displays. You can also view it by tapping and then Today.
-
Page 11: The Start Menu
The Command Bar At the bottom of the screen is the command bar. You can use its menus and buttons to perform tasks in programs. Depending upon which program you are using, the buttons may vary from those depicted. Tap to select menu Tap to select button Tap to display the commands. - Page 12 Text Input Panels Use the input panel to enter information in any program on your Recon. You can type using the standard Keyboard or the Recon Keyboard. You can write using Block Recognizer, Letter Recognizer, or Transcriber. The characters appear as typed text on the screen.
- Page 13 To enter characters, tap on the Keyboard input panel. The Recon Keyboard has larger keys than the standard keyboard. Tapping on the “123” or “*&%”, identifi ed in the circle above, gives additional characters. The Block Recognizer and Letter Recognizer input panels render individual characters that you write as “typed.”...
-
Page 14: Settings On Your Recon
* Beam/Infrared communications are not available. * Backup Battery is not available. Here are a few of the settings on the Recon that are worth noting. Application Buttons Tap the Personal tab at the bottom. Tap on the Buttons icon. The four application buttons can be reassigned to your favorite programs. -
Page 15: Connecting To Your Pc
ActiveSync compares the data on your Recon with the data on your PC, then updates all locations with the most recent information. ActiveSync is already installed on your Recon. Before connecting your Recon to your PC, install ActiveSync on your PC from the Recon Pocket PC Companion CD. ®... - Page 16 We recommend using the default setting. Click Next. The “Get Connected” dialog box will automatically appear on the PC. Connect the Recon to your PC using USB. Click Next. There are two types of ActiveSync connections. The table below summarizes the advantages and disadvantages of each choice.
- Page 17 Click next. Running ActiveSync Start ActiveSync on your PC. Connect the Recon with the USB cable and wait while ActiveSync automatically establishes a connection. (This may require several seconds.) Standard Partnership - ActiveSync will automatically synchronize the settings chosen.
- Page 18 LAN and browse network fi le shares. You can also use ActiveSync over an Ethernet connection to synchronize with your PC. Note that the Recon does not expose fi le shares and cannot be browsed by PCs on the network.
-
Page 19: Microsoft Pocket Outlook
Windows Mobile 2003 Pocket PC devices. Most third-party software is installed by running a setup program on the PC while the Recon is connected with ActiveSync. If prompted by the installation wizard, perform a soft reset to complete the installation. -
Page 20: Companion Programs
If you use Outlook on your PC, you can synchronize tasks between the Recon and the PC. Companion Programs Your Recon comes with the following programs installed. Open the program and then tap Start / Help for instructions on using the various programs. - Page 21 Pocket Word documents (.psw) and templates (.psw) when they’re synchronized or copied from the PC to your Recon, or when you open an e-mail message with an attached Word fi le on your Recon. Pocket Word documents are converted to Word documents when they’re synchronized or copied back to the...
-
Page 22: Caring For Your Recon
Recon from this fresh backup. See Recon Memory and Backup and Restore. With the Recon turned off, you will have at least 30 seconds to change the PowerBoot without danger of a hard reset. 1. Before changing the PowerBoot, back up your Recon to built-in storage using the preinstalled backup program. -
Page 23: Hardware Specifi Cations
Shock The Recon is designed to resist damage for drops up to 122 cm (4 ft). However, you should protect the display from impact, pressure, or abrasive substances that can scratch it or crack it. The Recon should not be dropped unnecessarily. -
Page 24: Safe Use Of Your Recon
Safe Use of your Recon Repair Please do not attempt to dismantle the Recon for repair. There are no user-serviceable parts inside. For service, please use the contact details listed on the last page of this manual or your local dealer for assistance. -
Page 25: Regulatory Information
According to ISO / IEC Guide 22 and EN 450 14 Manufacturer’s Name: Tripod Data Systems, Inc. Manufacturer’s Address: 345 SW Avery Ave. Corvallis, OR 97333 USA Declares, under our sole responsibility, that the product: Product Name: Field Data Collector Model Number: Recon Product Options:... -
Page 26: Supplementary Information
conforms to the following Product Specifi cations: Safety: EN 60950: 1992 +A1, A2, A3, A4, A11 EMC: EN 55022: 1994 +A1, A2:1997 EN 55022: 1998 +A1:2000 EN 61000-3-2, 1995+A1+A2:1998 EN 61000-3-2:2000 EN 61000-3-3:1995 EN 61000-3-3:1995+A1:2001 CFR 47, Part 15, Subpart B EN 55024:1998** EN 55024:1998+A1:2001** Supplementary Information:... -
Page 27: Reference Materials
You can expand the Recon handheld computer’s capabilites by purchasing accessories. Go to www.tdsway.com/accessories. ©2003 Tripod Data Systems, Inc. Tripod Data Systems, the TDS triangle logo, Recon, CF-Cap, PowerBoot Module are trademarks of Tripod Data Systems. ActiveSync, Microsoft, Outlook, Windows and the Windows logo are registered trademarks or trademarks of Microsoft Corporation in the United States and/or other countries. - Page 28 Tripod Data Systems 345 S.W. Avery Avenue Corvallis, OR 97333 541-753-9322 Data subject to change. Edition 09/23/03 Rev. A www.tdsway.com Printed in the USA F-1078-01-TDS...
Need help?
Do you have a question about the Recon and is the answer not in the manual?
Questions and answers