Table of Contents
Advertisement
Advertisement
Table of Contents

Related Manuals for SunTech Tango+ Stress BP


Summary of Contents for SunTech Tango+ Stress BP
- Page 1 Us er Guide...
-
Page 3: Table Of Contents
Table of Contents Copyright Information ................4 Safety and Effectiveness Considerations ..........5 Indications for Use ..................5 User Responsibility ..................5 Warnings and Contraindications .............6 Tango+ Setup ..................7 Tango+ Hardware Setup.................7 Rear Panel Connections ................8 Tango+ Rear Panels ................9 Power Supply Labels ................10 Compatible Stress Systems ..............11 Stress System Setup ................12 At a Glance ..................13... -
Page 4: Copyright Information
Tango+. This manual and the Tango+ described in it are protected under copyright law under which they may not be copied, in whole or in part, without written consent of SunTech Medical. -
Page 5: Safety And Effectiveness Considerations
Further, the user of the device bears sole responsibility for any malfunction that results from improper use, fault maintenance, improper repair, damage or alteration by anyone other than SunTech Medical or authorized service personnel. -
Page 6: Warnings And Contraindications
SENSOR to the same limb as the CUFF or any other blood flow restrictors. Loss of monitoring can occur Only use pulse oximeter sensors supplied by SunTech due to the hindering of pulse measurements. Medical. DO NOT USE IN THE PRESENCE OF FLAMMABLE Check the application site of the pulse oximeter anesthetics;... -
Page 7: Tango+ Setup
Tango+ Setup Tango+ Hardware Setup Your Tango+ will come with a power supply, a patient cable, and an Orbit-K cuff(s) with a microphone. a. Connect the power supply to a power cable and plug the cable into an avail- able outlet. b. Connect the power supply (P/N 19-0012-00) to Tango+ (See Figure 1). -
Page 8: Rear Panel Connections
Rear Panel Connections Connectors Symbol Description Power Reset Switch Resets the power on the monitor. For measurement of oxygen saturation. Option Type BF Applied Part. Serial communication port for interfacing RS-232 with stress systems or computers. BNC/TTL port that allows a stress system BNC External ECG to send an external analog or digital ECG trigger signal to the monitor. -
Page 9: Tango+ Rear Labels
Tango+ Rear Labels Label Description ETL Certified Power supply contains materials which are hazardous. Must be disposed of properly. No SpO alarm Attention, consult accompanying documents. Class II isolation equipment. CE Approval 0413 Warranty Seal Manufactured By Manufacture Date... -
Page 10: Power Supply Labels
Power Supply Labels External power supply (only use the SunTech power supply with Tango+). Input: 100-240 VAC @ 1.6A max, 50-60 Hz. Output +9VDC @ 5A Label Description Recognized component certified by UL to both Canada and U.S. requirements CE Mark... -
Page 11: Compatible Stress Systems
Compatible Stress Systems Tango+ can be setup to work directly with your stress system. If the Tango+ is interfaced with a stress system, the stress system can prompt Tango+ to take a BP measurement while you are conducting a stress test. In addition, some stress systems will transfer the blood pressure measurement and heart rate from Tango+ to your stress system where it will be displayed on the screen and printed on any reports. -
Page 12: Stress System Setup
Stress System Setup To setup the Tango+ with your stress system, please visit the Tango+ Interface Notes on the SunTech Medical website at www.SunTechMed.com. Select Customer Service ► Downloads and under the Products section, select Tango+. If your stress system is not listed, please contact: +1.919.654.2300 (US) -
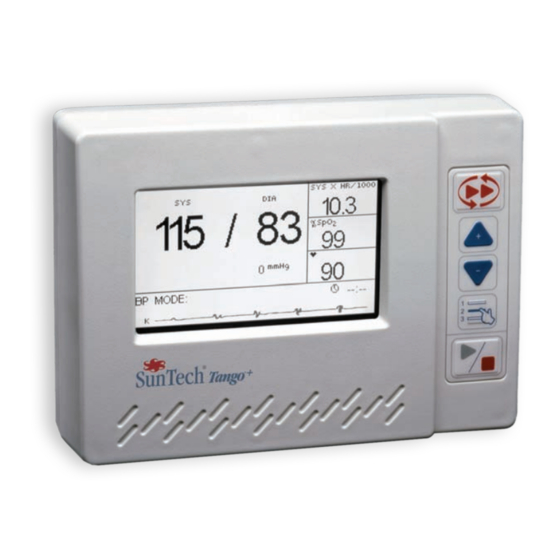
Page 13: At A Glance
At a Glance Front Display - Main Measurement View Heart Rate Double Product Blood Pressure Result % SpO Stat Key Up Key Down Key Select Key Start/Stop Key Timer Waveform Indicator Waveform Display Interval Indicator Status Display Cuff Pressure Figure 2: Front Display - Main Measurement View Symbol Function Description... - Page 14 When the monitor is turned on, the Main Measurement View is displayed. This screen displays the following elements while you take a measurement: • Blood Pressure Result : Displays latest or most current blood pressure. • Double Product : Displays the current workload on the heart in mmHg beats per minute (SYS x HR/1000).
-
Page 15: Front Display - Graph View
Front Display - Graph View Current BP/ Cuff Graph of all BP results Selected measurement Pressure Figure 3: Front Display - Graph View If you are on the Main Measurement View, pressing the SELECT key once will navigate to the Graph View. The Graph view displays the same information in the bottom section as the Main Measurement View. -
Page 16: Main Menu Selections And Settings
Main Menu Selections and Settings Press the Select key to access the MAIN MENU. Press the UP/DOWN keys to navigate through the MAIN MENU and then press the SELECT key to confirm your choice. To exit out of the MAIN MENU, select EXIT and you will return to the Main Measurement View. -
Page 17: Measurement Setup
Measurement Setup Use to modify the blood pressure measurement settings. Measurement Choose the monitor measurement: BP or SYS. Mode: BP includes both systolic and diastolic measurements and deflates at the specified deflate rate (see Deflate Rate below). SYS is a systolic measurement only and deflates at the AUTO deflate rate, resulting in faster measurement times. -
Page 18: View
View Use to modify the display settings. Waveform Choose the type of waveform that will be displayed: Display: K-sound: This will display the Korotkoff sounds detected by the Orbit-K cuff microphone. Choose this for normal operation. ECG: Choose this when you are checking for a proper triggering signal. -
Page 19: Alarms
Alarms Alarms alert you to changes in blood pressure or heart rate. Alarms are only activated at the end of a BP measurement. An alarm of 5 beeps will sound along with a message in the status display. Alarms can be set for systolic blood pressure being too high (SYS HIGH) or too rapid of a decrease (SYS DROP), and for diastolic blood pressure or heart rate being too high, DIA HIGH or HR HIGH, respectively. -
Page 20: Proper Cuff Placement
Proper Cuff Placement To accurately measure blood pressure during a stress test, it is important that the Orbit-K cuff is the correct size and is placed correctly on the arm. 1. Choose the appropriate Orbit-K cuff size. a. Without using the sleeve of the cuff, wrap the cuff around the patient’s upper arm (Figure 4). - Page 21 b. Slide the cuff sleeve up the patient’s arm, ensuring the ARTERY marker points down the arm (Figure 6). Artery Marker Figure 6: Sliding of cuff up the arm c. Place the ARTERY marker (which is where the microphone is located in the sleeve) over the brachial artery, about 3-5 cm above the elbow.
- Page 22 3. Wrap the cuff around the arm and secure (Figure 8). Use the wrist strap to secure the cables to the patient. Figure 8: Wrapping of cuff around arm Replacing the Microphone When you receive the Tango+ cuff, the microphone should already be properly inserted.
-
Page 23: Operation Of Tango
Operation of Tango+ Taking a Blood Pressure Measurement 1. The Tango+ requires an ECG signal to take a measurement. • For Tango+ monitors that are interfaced with a stress system, ensure that your stress system’s ECG connections are properly prepared and connect the electrodes to the patient. -
Page 24: Headphone Kit
4. Take a Blood Pressure Reading • If the Tango+ is interfaced to a stress system, prompt Tango+ for a measurement via the stress system. • If the Tango+ has the Internal ECG option, prompt Tango+ for a measurement by pressing the START/STOP on the monitor. NOTE: During a stress test, some patients’... -
Page 25: Conducting An Exercise Stress Test
Conducting an Exercise Stress Test After your patient is properly prepared and a heart rate is displayed on Tango+, you are ready to conduct a stress test. Remember, you can stop a measurement in process by pressing the START/STOP button. If your patient’s condition becomes unstable, and you need to monitor their BP more closely, remember that you can place the monitor into Stat mode by pressing the STAT Key. - Page 26 b. As you take measurements with the Tango+, pay close attention to the status display and waveform display. If the status display shows a status message, consult the manual for Advice and Troubleshooting tips (page 34). 3. End Study. a. When the stress test is over and you no longer need to take blood pressures, press the SELECT key to display the main menu.
-
Page 27: Accessories
Accessories Pulse Oximetry, SpO (optional) The Tango+ is equipped with an option for pulse oximetry (P/N 98-0087-00). This option allows you to measure the oxygen saturation of arterial blood. Simply plug in the sensor/module cable to the SpO receptacle on the rear panel of the Tango+ and attach the sensor to your patient as described below. After a few seconds, a measurement will be displayed on the main measurement screen. - Page 28 Part Number Description Special Instructions 19-0012-00 Power Supply 91-0001-00 Patient Cable, 15 ft Required only for Tango+ with internal 91-0004-00 ECG Patient Cable K-sound Microphone, 98-0006-01 18” 98-0062-03 Orbit-K Large Adult Cuff Includes microphone, Range: 32-44cm 98-0062-05 Orbit-K Adult Plus Cuff Includes microphone, Range: 27-40cm 98-0062-02 Orbit-K Adult Cuff...
-
Page 29: Rs-232 & Ecg Interface Cables
RS-232 & ECG Interface Cables RS-232 Stress System ECG Trigger Cable Cable AMEDTEC ECGpro 91-0013-00 91-0066-00 Burdick Quest 91-0013-00 91-0011-00 Cambridge Heart CH 2000 & 91-0065-00 (RS-232 and ECG) HearTwave II Delmar Reynolds CardioDirect with 91-0013-00 91-0066-00 CardioCollect Esaote Formul@, Biosound Esaote Formula P/N 91-0049-00 91-0048-00 Formul@ for Archimed... - Page 30 RS-232 & ECG Interface Cables RS-232 Stress System ECG Trigger Cable Cable Quinton Q5000 91-0020-00 91-0018-00 Quinton Q-Stress 91-0013-00 91-0018-00 Schiller AT10/AT60/CS-200 91-0035-00 91-0022-00 Welch Allyn CardioPerfect Workstation 91-0013-00 91-0018-00 Splitter Cables Stress System Part Number GE CASE - use with echocardiograph 91-0053-00 GE CASE 8000 - use with echocardiograph 91-0053-00...
-
Page 31: Maintenance And Cleaning
(no glass). 3. Hand Inflation Bulb with bleed valve. 4. Tubing, Tee pieces, and miscellaneous connectors or you can order the T-Tube Kit (SunTech Part # 98-0030-00). Procedure: 1. When the Main Measurement View is displayed, press the SELECT button 2 times. -
Page 32: Pulse Oximeter
SunTech Medical for disposal. WARNING: Fire, explosion and severe burn hazard. The unit contains a lithium battery that must be disposed of properly or returned to SunTech Medical for disposal. Pulse Oximeter Cautions: - Do not immerse the sensor in liquid. -
Page 33: Ecg Cables
Cleaning Monitor Before cleaning, disconnect the power supply from the monitor. Wipe the device with a soft, damp cloth to remove surface dust and dirt. CAUTION: The Tango+ is not sterilizable. Do not immerse the monitor in any fluid or attempt to clean with any liquid detergents, cleaning agents, or solvents. -
Page 34: Advice & Troubleshooting
Advice & Troubleshooting Status Messages If there is significant noise (as you may note on the Waveform Display) during a measurement, the Tango+ will have problems getting a reliable measurement. Status messages appear over the Status Display in the Main Measurement view or the Graph View immediately after a reading to indicate that there was a problem during that measurement. - Page 35 Weak or missing CHECK ECG/ K-Sounds and Review the solutions for CHECK ECG and the ECG signal CHECK MIC. is erratic. • Check that the microphone is positioned over the brachial artery on the patient (see Proper Cuff Placement, page 20). • Check that the patient cable microphone and the connection to rear panel of the Tango+ are secure.
- Page 36 System or the Tango+ START/STOP key. repeated. Contact your nearest SunTech Medical SERVICE Service Department or authorized service REqUIRED agent. The unit must be sent to SunTech Medical for repair. Systolic reading SYS > 280 is above 280 Therefore, dashed lines will appear for that mmHg (37.3...
- Page 37 Down key. Pressing the Select key will clear the alarm, and the monitor will rerun its internal tests. If the error occurs repeatedly, please contact the SunTech Service Department or an authorized service agent. To test the System Error alarm function, press the Up key when power is applied to the monitor. System Error “30000” should appear on the screen. Pressing the Down...
-
Page 38: Emc Statement
EMC Statement This equipment has been tested and found to comply with the limits for medical devices to IEC60601-1-2: 2001. These limits are designed to provide reasonable protection against harmful interference in a typical medical installation. This equipment generates, uses and can radiate radio frequency energy and, if not installed and used in accordance with the instructions, may cause harmful interference to other devices in the vicinity. - Page 39 Guidance and manufacturer’s declaration – electromagnetic emissions The Tango+ Monitor is intended for use in the electromagnetic environment specified below. The customer or the user of the Tango+ Monitor should assure that it is used in such an environment. IEC 60601 Compliance Electromagnetic environment- Immunity test...
- Page 40 Immunity IEC 60601 Compliance Electromagnetic environment- test test level level guidance Portable and mobile RF communications equipment should be used no closer to any part of the Tango+, including cables, than the recommended separation distance calculated from the equation applicable to the frequency of the transmitter.
- Page 41 Recommended separation distances between portable and mobile RF communications equipment and the Tango+ The Tango+ is intended for use in an electromagnetic environment in which radiated RF disturbances are controlled. The customer or the user of the Tango+ can help prevent electromagnetic interference by maintaining a minimum distance between portable and mobile RF communications equipment (transmitters) and the Tango+ as recommended below, according to the maximum output power of the communications equipment.
-
Page 42: Frequently Asked Questions (Faq's)
How do I set up the Tango+ monitor to work with my stress system? A. To setup the Tango+ with your stress system, please visit the Tango+ Interface Notes on the SunTech Medical website at www.SunTechMed.com and select Customer Service ► Downloads and under the Products section, select Tango+. -
Page 43: Service Centers
• Remove the bladder and microphone from the shell. Machine wash the shell in warm water with a mild detergent (50-140°F or 10-60°C). Line dry the cuff. • Use a medical grade mild disinfectant on the cuff. Afterwards, line dry. Service Centers For customers in the Americas: SunTech Medical, Inc. Service Department 507 Airport Boulevard, Suite 117 Morrisville, NC 27560 USA Tel: 919.654.2300 Fax: 919.654.2301 For customers in Europe, the Middle East, Africa, Asia, and the Pacific: SunTech Medical, Ltd. -
Page 44: Specifications, Blood Pressure Measurement
The system might not meet its performance specifications if used or stored outside the specified temperature and humidity ranges listed above. Power: External power supply, use only SunTech part number 19-0012-00. Input: 100-240 VAC @ 1.6A max, 50-60 Hz. Output +9VDC @ 5A IEC 320 type input connector. Calibration: The accuracy of cuff -pressure transducers/indicators should be verified annually. - Page 45 Standards: UL60601-1, CAN/CSA C22.2 601-1 EN 60601-1, IEC 60601-2-30, IEC 60601-1-2 (EMC), IEC 60601-2-49, ISO 9919, AAMI SP10:2002 + A1:2003 Meets EN 1060-1, Specification for non-invasive sphygmomanometers – Part 1: General requirements and EN 1060-3, Non-invasive sphygmomanometers – Part 3. Supplementary Requirements for Electro-Mechanical BP Measuring Systems. Classifications: Equipment Classification: Class II; Mode of Operation: Continuous. Specifications, Pulse Oximetry Accuracy: 70 - 100% ± 2 digits (± 1 Standard Deviation*). * Standard Deviation is a statistical measure up to 32% of the readings may fall outside those limits.
-
Page 46: Limited Warranty
This limited warranty is void if the instrument has been damaged by accident, misuse, negligence, act of God or serviced by any person not authorized by SunTech Medical, Inc. This limited warranty contains the entire obligation of SunTech Medical, Inc. and no other warranties expressed, implied or statutory are given. No representative or... -
Page 48: Index
Index Tango+ Setup Hardware Setup Power Supply Labels Rear Panel Connections Stress Systems Accessories Stress System Setup Interface Cables Tango+ Rear Labels Pulse Oximetry, Finger Application Troubleshooting Pulse Oximetry, SpO FAQ’s Service Centers Status Messages Copyright Information Warnings EMC Statement Warranty Front Display Graph View... - Page 50 SunTech Medical, Inc. SunTech Medical, Ltd. SunTech Medical, Ltd. 507 Airport Boulevard, Suite 117 Oakfield Industrial Estate, Level 25, Bank of China Tower Morrisville, NC 27560-8200 USA Eynsham, Oxfordshire OX29 4TS, UK 1, Garden Road Central Tel: + 1.919.654.2300 Tel: +44 (0) 1865.884.234 Hong Kong 1.800.421.8626 Fax: +44 (0) 1865.884.235 Tel: +852.2251.1949...
Need help?
Do you have a question about the Tango+ Stress BP and is the answer not in the manual?
Questions and answers