
Related Manuals for Classe Audio CAP 80


Summary of Contents for Classe Audio CAP 80
- Page 1 CLASSÉ AUDIO CAP-80 FULLY REMOTE CONTROL INTEGRATED AMPLIFIER CAP-80 OWNER'S MANUAL...
- Page 2 CAP80, Issue 1, June 97 CLASSÉ DESIGN PHILOSOPHY 1. REPEATED LISTENING DESIGN SESSIONS: Fine tuning of sound by exchanging and mixing of parts (transistors, capacitors, wiring, PCB boards, etc.), and adjusting many specific operating voltages within proper engineering ranges, producing an overall sonic recipe giving the most natural harmonic realism of music typical of instruments in a live performance.
-
Page 3: Table Of Contents
CAP80, Issue 1, June 97 CAP-80 OWNER'S MANUAL TABLE OF CONTENTS UNPACKING & SET-UP..........4 A.C. LINE POWER............5 INPUTS................6 OUTPUTS ..............7 FRONT PANEL CONTROLS........8 REMOTE HANDSET............. 11 PROTECTION CIRCUIT..........12 FEATURES AND SPECIFICATIONS ......18... -
Page 4: Unpacking & Set-Up
CAP80, Issue 1, June 97 UNPACKING & SET-UP Your CLASSÉ CAP-80 integrated amplifier has been carefully wrapped in heavy gauge plastic, packed in semi-rigid foam and contained in a special box. To remove the unit, open and spread the top flaps of the box. -
Page 5: Ac Line Power
CAP80, Issue 1, June 97 AC LINE POWER When your new CLASSÉ CAP-80 is first plugged in it is in “Standby” mode, as indicated by a single red LED in the display. The unit can be turned on by the POWER button on the faceplate (see figure 3, page 13) or by the POWER button on the remote handset (See figure 1, page 13). -
Page 6: Inputs
CAP80, Issue 1, June 97 INPUTS: The input jacks are clearly marked on the back of the CAP-80 (see figure 4, page 15). The following inputs are provided: REG1, REG2, REG3, REG4, REG5, BAL1, and TAPE. REGULAR INPUTS: REG1, REG2, REG3, REG4, and REG5: These are all high level inputs sharing exactly the same characteristics, and may be interchanged if so desired. -
Page 7: Outputs
CAP80, Issue 1, June 97 OUTPUTS TAPE OUTPUT The INPUT jacks, (REG1, REG2, BAL1, etc.), selected by the INPUT SELECTOR will always be fed to the TAPE OUTPUT jacks. The TAPE OUTPUT jacks should be connected to the TAPE IN or LINE IN jacks of the Tape Deck. LOUDSPEAKER OUTPUT The Classé... -
Page 8: Front Panel Controls
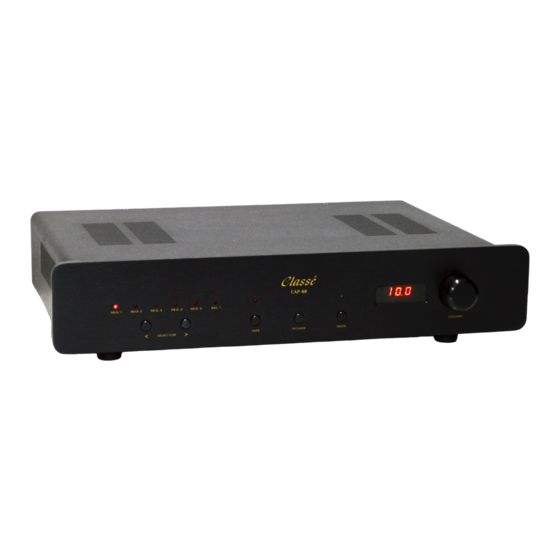
CAP80, Issue 1, June 97 FRONT PANEL CONTROLS POWER When the unit is first plugged in, a single LED will be lit on the display to show that the unit is plugged in When the POWER button is pressed, a single LED in the display will flash and the display will show a 20 second count down as the unit powers up. - Page 9 CAP80, Issue 1, June 97 TAPE (Continued) To Play a Tape press the TAPE button. The LED will light. Press the Play button on the Tape Machine, and set the CAP-80 volume at the level you wish to listen at. To Record on a Tape, select the source you wish to record (REG1, REG2, BAL1, etc.).
- Page 10 CAP80, Issue 1, June 97 VOLUME CONTROL The VOLUME Control varies the output level of both channels simultaneously. It can be operated remotely by using the VOLUME buttons on the remote handset supplied with the unit (see figure1 page 13) or by turning the VOLUME control knob on the front panel of the unit. The volume control has a total of 120 steps of level adjustments from 0 to 60 in 0.5 stepped increments...
-
Page 11: Remote Handset
CAP80, Issue 1, June 97 DISPLAY Pressing the DISPLAY button on the remote handset (see figure 1, page 13). allows you to control the brightness of the Display. There are 3 levels of brightness; Display Full On, Display Medium On, Display Low On, plus Display Full Off. Repeated pressing of the DISPLAY button will cycle through the four modes, from Display Full On to Display Full Off. -
Page 12: Protection Circuit
CAP80, Issue 1, June 97 PROTECTION CIRCUIT The Classé CAP-80 is equipped with rail fuses (GDB4, 4 amps fast-blow) to protect the output drivers and mosfet fuses (2AG 1/2 PT, 1/2 amp fast-blow) to protect the mosfets (see figure 5, page 16), which are used as pre-drivers for the output stage of the amplifier. - Page 13 CAP80, Issue 1, June 97...
- Page 14 CAP80, Issue 1, June 97 Figure3: CAP-80 faceplate...
- Page 15 CAP80, Issue 1, June 97 Figure 4 CAP-80 rear panel...
- Page 16 CAP80, Issue 1, June 97 Aux fuse Main fuse LEFT CHANNEL -Rail fuse +Rail fuse +MosFet fuse -MosFet fuse +Rail fuse -Rail fuse RIGHT CHANNEL Figure 5 CAP-80 top view...
- Page 17 CAP80, Issue 1, June 97 CLASSÉ AUDIO 5070 François-Cusson Lachine, Quebec Canada H8T 1B3 Telephone: 514 636 6384 Fax: 514 636 1428...
-
Page 18: Features And Specifications
CAP80, Issue 1, June 97 CLASSÉ CAP-80 FULLY REMOTE CONTROL BALANCED LINE INTEGRATED AMPLIFIER FEATURES AND SPECIFICATIONS SHEET CAP-80 FEATURES Remote control featuring power on/off, volume, mute, inputs, tape and display. Contoured, slimline chassis. Inputs featuring REG1, REG2, REG3, REG4, REG5 and BAL1 inputs. Front panel controls include INPUT SELECTOR, VOLUME, TAPE, MUTE and POWER.
Need help?
Do you have a question about the CAP 80 and is the answer not in the manual?
Questions and answers