Table of Contents
Advertisement
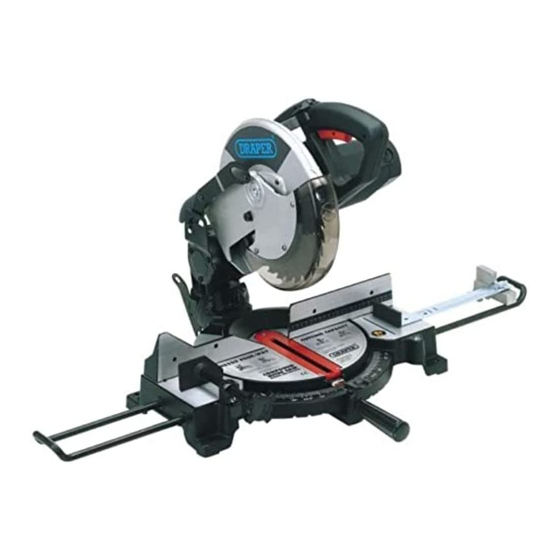
254mm COMPOUND
MITRE SAW
STOCK No. 52352
IMPORTANT: PLEASE READ THESE INSTRUCTIONS CAREFULLY TO ENSURE THE
This manual has been compiled by Draper Tools and is an integrated part of the power tool equipment, which
should be kept with the machine.
This manual describes the purpose for which this tool has been designed and contains all the necessary
information to ensure its correct and safe use.We recommend that this manual is read before any operation of
the machine, before performing any kind of adjustment to the machine, and prior to any maintenance tasks. By
following all the general safety instructions contained in this manual, it will ensure both machine and operator
safety, together with longer life of the tool itself.
All photographs and drawings in this manual are supplied by Draper Tools to help illustrate the operation of the
machine.
Whilst every effort has been made to ensure accuracy of information contained in this manual, the Draper Tool
policy of continuous improvement determines the right to make modifications without prior warning.
230V
55810
110V
• INSTRUCTIONS •
SAFE AND EFFECTIVE USE OF THIS TOOL.
GENERAL INFORMATION
PART No.MS250
03/2001
Advertisement
Table of Contents

Related Manuals for Draper MS250


Summary of Contents for Draper MS250
-
Page 1: General Information
03/2001 GENERAL INFORMATION This manual has been compiled by Draper Tools and is an integrated part of the power tool equipment, which should be kept with the machine. This manual describes the purpose for which this tool has been designed and contains all the necessary information to ensure its correct and safe use.We recommend that this manual is read before any operation of... -
Page 2: Table Of Contents
Glossary of Terms for Woodworking ..............18 Maintenance....................19 Troubleshooting .....................20 DECLARATION OF CONFORMITY Draper Tools Ltd. Hursley Road, Chandler’s Ford, Eastleigh, Hampshire. SO53 1YF. England. Declare under our sole responsibility that the product: Stock Nos:- 52352 & 55810. Part Nos:- MS250. -
Page 3: Specification/Guarantee
This guarantee applies in lieu of any other guarantee expressed or implied and variations of its terms are not authorised. Your Draper guarantee is not effective unless you can produce upon request a dated receipt or invoice to verify your proof of purchase within the 12 month period. -
Page 4: Power Supply/Wiring Diagram
The fuse cover is detachable, never use the plug with the cover omitted. If a replacement fuse cover is required, ensure it is of the same colour as that visible on the pin face of the plug (i.e. red). Fuse covers are available from your Draper Tools stockist. -
Page 5: General Safety Instructions For Power Tools
IMPORTANT Draper Tools Limited recommends that this machine should not be modified or used for any application other than that for which it was designed. If you are unsure of its relative applications do not hesitate to contact us in writing and we will advise you. -
Page 6: Additional Safety Instruction
ADDITIONAL SAFETY INSTRUCTIONS FOR MITRE SAWS Safety is a combination of common sense, staying BEFORE EACH USE: alert and knowing how your mitre saw works. 1. Inspect your saw. If any part of this mitre saw is missing, or bent, or has failed in any way, or BEFORE USING THE SAW: any electrical parts do not work properly, turn WARNING... -
Page 7: Additional Safety Instruction
ADDITIONAL SAFETY INSTRUCTIONS FOR MITRE SAWS 5. Never cut more than one workpiece at a time. 17. To avoid an electrical shock, make sure your fingers do not touch the metal prongs on the 6. Make sure the cut-off piece can move sideways plug when inserting or removing the plug to or after it’s cut off. -
Page 8: Getting To Know Your Mitre Saw
GETTING TO KNOW YOUR COMPOUND MITRE SAW Fig.1. Fig.2. ✖✌ ✗✌ ✙✌ ✕✙✌ ✕✜✌ ✕✕✌ ✕✘✌ ✕✔✌ ✖✔✌ ✘✌ ✛✌ ✜✌ ✕✚✌ ✕✖✌ ✢✌ ✕✢✌ ✕✌ ✕✛✌ ✚✌ ✕✗✌ Fig.1 & 2: 1. Base. 11. Spindle lock. 2. On/off trigger switch. 12. -
Page 9: Assembly
ASSEMBLY WARNING: Before carrying out any assembly, Fig.3. adjustment or replacement procedures ensure that the power is switch off and the machine is unplugged. ✫✌ ASSEMBLING THE LOWER BLADE GUARD (Fig.3 & 4) The mitre saw is equipped with a handle latch ✪✌ which is used to lock the mitre saw in the lower position. - Page 10 2 metal tabs are squeezed together. This should only be used for small cuts. For large amounts of work Draper Tools recommends the use of a vacuum cleaner (Stock No.64674) to reduce the airborne dust particles.
-
Page 11: Operation & Use
OPERATION & USE ALIGNING THE BLADE (Fig.11 - 14): Fig.11. The mitre saw was assembled, aligned and inspected before shipment. Alignment should be checked and any adjustments made to ensure a more accurate cut. Loosen handle ✶✌ and press down lever ✷✌ to move the table round to 0°. - Page 12 OPERATION & USE MITRE FENCE ADJUSTMENT (Fig.15 & 16): Fig.15. The mitre saw has two fence positions. The back position (Fig.15) is for standard 2 x 6" work pieces and the front position (Fig.16) is for smaller 2 x 4" work pieces.
- Page 13 OPERATION & USE CHANGING THE BLADE (Fig.19 & 20): Fig.19. Before the blade can be changed the lower blade guard must be removed to gain access to the blade locking flange. Follow the assemble instructions in reverse order on page 8 to remove the guard. Press the spindle locking lever ✿✌...
- Page 14 OPERATION & USE BASIC SAW OPERATIONS Fig.22. WARNING FOR YOUR OWN SAFETY, READ AND UNDERSTAND ALL SAFETY INSTRUCTIONS AND OPERATING PROCEDURES THROUGHOUT THE MANUAL BEFORE USING THIS MACHINE. BODY AND HAND POSITION Proper positioning of your body and hands when operating the mitre saw will make cutting easier and safer.
- Page 15 OPERATION & USE BEVEL CUT Fig.24. When a bevel cut is required, tilt the blade to the desired bevel angle. Stand to the left side of the handle to make the cut (Fig.24). COMPOUND CUT Fig.25. When a compound cut is required, select the correct bevel and mitre position.
- Page 16 OPERATION & USE CUTTING CURVED OR WARPED MATERIAL Before cutting a workpiece, check to make sure it is flat. If it is curved or warped, the workpiece must be positioned and cut as illustrated. Do not position workpiece incorrectly or try to cut the workpiece without the support of the fence.
- Page 17 OPERATION & USE FILLER BLOCKS FOR CUTTING CROWN Fig.28. MOULDINGS FENCE The majority of crown mouldings have contact surfaces of 52º and 38º to the rear surface of the FILLER BLOCK FACE moulding. When joining the face of the filler block these angles must be maintained.
- Page 18 OPERATION & USE WORKPIECE SUPPORT Long pieces need extra supports. The supports should be placed along the workpiece so the workpiece does not sag and the hand holding the workpiece is positioned 4" or more from the blade path. The support should let the workpiece lay flat on the base and worktable during the cutting operation (Fig.31).
-
Page 19: Glossary Of Terms For Woodworking
GLOSSARY OF TERMS FOR WOODWORKING ARBOR MITRE CUT The shaft on which a cutting tool is mounted. An angle cutting operation made across the width of the workpiece. BEVEL CUT An angle cutting operation made through the RESIN face of the workpiece. A stick, sap based substance that has dried and hardened. -
Page 20: Maintenance
MAINTENANCE MAINTENANCE SAWDUST Always unplug the power cable before any Periodically, sawdust will accumulate under the maintenance check on this saw. worktable and base. This could cause difficulty in the movement of the worktable when setting up a mitre DANGER cut. -
Page 21: Troubleshooting
TROUBLESHOOTING - MOTOR WARNING: FOR YOUR OWN SAFETY ALWAYS TURN THE MAIN SWITCH ON THE MACHINE “OFF” AND REMOVE THE PLUG FROM THE POWER SUPPLY BEFORE CARRYING OUT ANY MAINTENANCE OR TROUBLESHOOTING. Trouble Probable Cause Remedy Motor does not start. Fuse. - Page 22 NOTES - 21 -...
- Page 23 NOTES - 22 -...
- Page 24 ©Published by Draper Tools Ltd. No part of this publication may be reproduced, stored in a retrieval system or transmitted in any form or by any means, electronic, mechanical photocopying, recording or otherwise without prior permission in writing from Draper Tools Ltd.
Need help?
Do you have a question about the MS250 and is the answer not in the manual?
Questions and answers