Table of Contents
Advertisement
Owner's Manual
M157711C.1
Pressure Washer:
Any Questions, Comments, Problems or Parts Orders
Read this manual.
Serious injury or death can result if safety instructions are not followed.
Engine is shipped without oil.
- Before starting engine, fill engine oil.
- See engine manual for engine oil requirements.
Pump is shipped with oil.
- Remove shipping plug and install vented fill cap.
- See pump oil cap section of this manual.
Closely inspect all components.
-If you have damaged components then: Contact the freight company that
delivered the unit and file a claim.
-If you have missing components then: Contact Product Support at
1-866-443-2576.
Call Powerhorse Product Support 1-866-443-2576
ITEM NUMBER:
SERIAL NUMBER:
_______________
Machine that cleans dirty surfaces
with high pressure water.
WARNING
157711, 157712
Advertisement
Table of Contents

Related Manuals for Powerhorse M157711C.1


Summary of Contents for Powerhorse M157711C.1
-
Page 1: Pressure Washer
-If you have damaged components then: Contact the freight company that delivered the unit and file a claim. -If you have missing components then: Contact Product Support at 1-866-443-2576. Any Questions, Comments, Problems or Parts Orders Call Powerhorse Product Support 1-866-443-2576... - Page 2 Hazard Signal Word Definitions...
-
Page 3: Table Of Contents
Table of Contents Important Safety Rules ..................4 Warning Label Locations ................... 6 Assembly Instructions ..................7 Machine Component Identification ..............13 Pump Oil Cap and Pump Component Identification ........14 Operation Instructions Water Supply ....................14 Spray Gun Safety Lock ................... 15 Attaching the Lance.................. -
Page 4: Important Safety Rules
Important Safety Rules WARNING 1.) Read owner's manual completely. Serious injury or death can result if safety instructions are not followed. You must be 16 or older to operate this machine. Keep untrained people away. 2.) Skin puncture hazard. High pressure fluid can inject under skin resulting in serious injury including amputation. - Page 5 Important Safety Rules WARNING 5.) Risk of exposure to dangerous chemicals. Serious injury or death can result if chemical manufacturer instructions are not followed. -Wear protective gloves when handling and cleaning with chemicals. -Understand all safety hazards and first aid for all chemicals being used. -When cleaning filters, check if chemicals have been used and take any precautions that are recommended by the chemical manufacturer.
-
Page 6: Warning Label Locations
Warning Label Locations WARNING 1.) Skin puncture hazard. Do Call 1-866-443-2576 to order new labels. not direct spray at people or Warning & Caution Decal: Part No. 781026 animals. Seek IMMEDIATE surgical treatment. 2.) Risk of fire and explosion. Do not add fuel when engine is running or still hot. -
Page 7: Assembly Instructions
I.) Unpack Your pressure washer is shipped in one box. Separate and identify the components. Base Engine/ Pump assembly Handle Pressure Hose Lance Spray Gun Wheels Hardware Bag Any Questions, Comments, Problems or Parts Orders Call Powerhorse Product Support 1-866-443-2576... - Page 8 Assembly Instructions II.) Hardware Bag 5/16”Nut 5/16” x 1-1/2” Bolt Qty – 14, Qty – 8 Part # 82019 Part # 82017 5/16”x 3/4” Bolt Grommet Qty – 2 Qty - 5 Part # 82015 Vented Fill Cap Qty – 1 157712 only Breather Plug Tube with Dipstick...
- Page 9 Assembly Instructions III.) Cart Assembly 5/16”x 3/4” bolt Step 1.) Fasten rubber feet onto Rubber foot leg with wrench. 5/16” nut Step 2.) Fasten leg with feet and handle to base with wrench. Leg with feet 5/16” nut Handle Base 5/16”x 1-1/2”...
- Page 10 Assembly Instructions Step 3.) Slide 5/8” x 4” bolt through wheel and fasten with 5/8“ nut hand tight. 5/8” x 4” bolt Wheel 5/8” nut Step 4.) Fasten wheel assemblies to base with wrench. Check that wheels turn freely. Wheel assembly 5/8”...
- Page 11 Assembly instructions Step 5.) Thread 5/16” nuts onto hooks, then fasten hooks to Hose hook handle with wrench. Point hose hooks up. Press grommets into base, then press grommets into base. Gun hook Hose Hook Detail 5/16” nut 5/16” nut Gun Hook Detail 5/16”...
- Page 12 Assembly instructions Step 7.) Remove shipping plug from the pump and replace with the supplied cap or plug found in the hardware bag. 157711 157712 Breather plug Vented fill cap with dipstick...
-
Page 13: Machine Component Identification
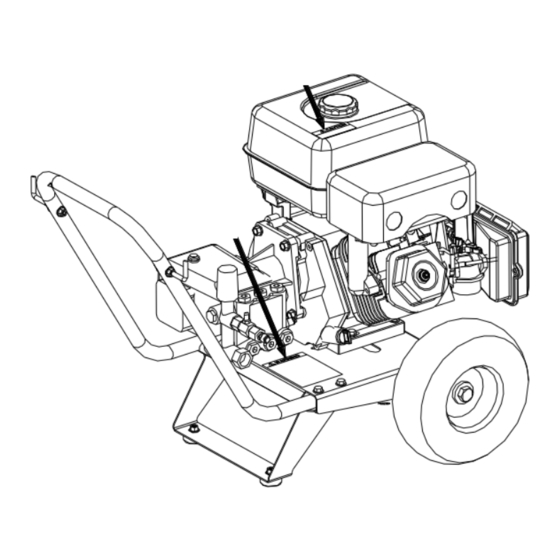
2. Hose Hook. Store pressure hose on hook. 3. Pressure Hose. Attach couplers to gun and water outlet. 4. Engine. Powerhorse engine provides years of reliable use. 5. Nozzles. Change nozzles for different spray patterns. 6. Water Pump. Inspect for loose/broken parts prior to each use. -
Page 14: Pump Oil Cap And Pump Component Identification
However, the water source pressure must not exceed 115 psi (8 bar). 5.) Always use a flexible rubber hose for your water supply. Do not use rigid piping. Any Questions, Comments, Problems or Parts Orders Call Powerhorse Product Support 1-866-443-2576... -
Page 15: Spray Gun Safety Lock
Operation Instructions Spray Gun Safety Lock When not spraying, use the spray gun safety lock to prevent accidental high-pressure discharge. Spray gun Attaching the Lance Spray gun safety lock Tighten spin-on coupler hand tight. Note: The o-rings make the seal so there is no need to tighten with a wrench. Lance Spin-on coupler Installing Nozzles... -
Page 16: Connecting Hoses
Operation Instructions WARNING Flying objects. Make sure nozzle is secure before squeezing trigger. If nozzle is not secure it will become a projectile. Serious injury can occur. Attaching the Pressure Hose – 157711 only To attach the pressure hose to the pump, thread the pressure hose’s 22mm coupler onto the water pump’s outlet hand tight. -
Page 17: Start-Up/Shut-Down Instructions
Operation Instructions Start-Up Instructions 1. Attach garden hose to water inlet. 2. Attach pressure hose to water outlet and gun. 3. Attach spray gun to lance. 4. Turn water supply ON. 5. Squeeze trigger to purge air from pump. 6. Insert nozzle. 7. -
Page 18: Applying Chemicals
Operation Instructions Applying Chemicals 1.) Install the black nozzle to spray chemicals onto the cleaning surface. 2.) Attach the chemical hose to the hose barb next to the pump outlet. 3.) Start the pressure washer according to the start-up instructions. 4.) Submerge chemical hose in cleaning solution. -
Page 19: Maintenance
Maintenance Maintenance Mode Before performing any maintenance on the pressure washer, it must be placed in maintenance mode. 1.) Turn off engine. 2.) Turn off water supply. 3.) Squeeze trigger to relieve system pressure. 4.) Unplug spark plug wire from spark plug, (see engine owner’s manual). Maintenance Schedule What to Check When To Check... -
Page 20: Pump Oil Change
Maintenance Pump Oil Change 1.) Place a suitable container below the pump to catch the used oil. Remove drain plug. 2.) Allow the used oil to drain completely. Reinstall drain plug. 3.) Please dispose of used oil in a manner that is compatible with the environment. We suggest you take used oil in a sealed container to your local recycling center or service station for reclamation. -
Page 21: Storage
Storage Long Term Storage Follow the engine owner’s manual for storing the engine. Winter Storage Protect your pump, hose, and gun from freezing. Items needed: 12” piece of garden hose or equivalent, funnel and RV antifreeze (approximately 6 oz.) 1.) Follow the storage instructions listed above. 2.) Disconnect spark plug cable. -
Page 22: Troubleshooting
The manufacturer reserves the right to make improvements in design and/or changes in specifications at any time without incurring any obligation to install them on units previously sold. Any Questions, Comments, Problems or Parts Orders Call Powerhorse Product Support 1-866-443-2576... -
Page 23: Parts Explosions
Parts Explosion M157711 - Rev C.1 REF# PART# DESCRIPTION MODEL REF# PART# DESCRIPTION MODEL 780150 208cc PowerHorse 157711 2215 Rubber Foot 780353 414cc PowerHorse 157712 780766 777914 Hose quick Coupler 157712 780767 Handle 780828 157711 38509 Gun/Hose Hook Spray gun... - Page 24 157711 Pump Exploded View – Rev C.1...
- Page 25 157711 Pump Exploded View – Rev C.1 Item Description Part # Item Description Part # Socket head screw 781361 31 Cone valve spring Kit #4 Kit #4 Pump basal flange 32 O-ring 14.2X1.9 Kit #1 Or Kit #5 O-ring 80X2.4 Kit #1 33 Hose barb seat Kit #4...
- Page 26 157711 Pump Kits – Rev C.1 Kit Qty Kit # Description Item # Items Included Kit Part # Needed Pump basal flange Flange w/ Seal O-ring 80X2.4 782837 Radial shaft seal FB36-50-7 Oil seal O-ring 15X2.2 Spacer Seal Kit 782843 O-ring 21.8X1.9 Water seal Compaction washer...
- Page 27 157712 Pump Exploded View – Rev C.1...
- Page 28 157712 Pump Exploded View – Rev C.1 Item Description Part # Qty Item Description Part # Screw M6*16 Valve body Kit #11 Drain plug Kit #1 O-ring Ø17.17*1.78 Kit #11 Gasket, drain plug Kit #1 O-ring Ø6.08*1.78 Kit #11 O-ring Ø110*3 Kit #2 Backup ring 6.2*9*1.2 Kit #11...
- Page 29 157712 Pump Kits – Rev C.1 Kits Qty Kit # Description Items Included Part # Needed 4 Drain plug 5 Gasket, drain plug Oil Drain Plug & 93 O-ring 784969 Sight Glass Kit 94 Oil Gauge 95 Spring Disk Crankcase Cover 7 O-ring Ø110*3 784968 92 Crankcase Cover...
- Page 30 157712 Pump Kits – Rev C.1 Kits Qty Kit # Description Items Included Part # Needed 40 Fix screw M6*5 41 Plastic cap, knob 42 Knob 43 Spring 44 Spring seat 45 Jam nut 46 Fix screw M4*4 47 Valve rod 48 Backup ring 8.2*11*1.2 49 O-ring Ø7.65*1.78 50 Valve body...
-
Page 31: Limited Warranty
Dear Valued Customer: The Powerhorse Product you just purchased is built with the finest material and craftsmanship. Use this product properly and enjoy the benefits from its high performance. By purchasing a Powerhorse product, you show a desire for quality and durability. - Page 32 Distributed by Northern Tool + Equipment Co., 2800 SouthCross Drive West P.O. Box 1499 Burnsville, MN 55337-0499...
Need help?
Do you have a question about the M157711C.1 and is the answer not in the manual?
Questions and answers