Table of Contents
Advertisement
Quick Links
1800 PSI Electric High Pressure Washer
Owner's Manual
WARNING:
Read carefully and understand all ASSEMBLY AND OPERATION
INSTRUCTIONS before operating. Failure to follow the safety rules and other basic safety
precautions may result in serious personal injury.
Item #157055
READ & SAVE THESE INSTRUCTIONS
Advertisement
Table of Contents

Related Manuals for Powerhorse 157055


Summary of Contents for Powerhorse 157055
- Page 1 1800 PSI Electric High Pressure Washer Owner’s Manual WARNING: Read carefully and understand all ASSEMBLY AND OPERATION INSTRUCTIONS before operating. Failure to follow the safety rules and other basic safety precautions may result in serious personal injury. Item #157055 READ & SAVE THESE INSTRUCTIONS...
- Page 2 ® Thank you very much for choosing a Powerhorse product! For future reference, please complete the owner’s record below: Serial Number/Lot Date Code: ________________________________ Purchase Date: ____________________________________________ Save the receipt, warranty, and this manual. It is important that you read the entire manual to become familiar with this product before you begin using it.
-
Page 3: Table Of Contents
Table of Contents Intended Use ............................4 Packaging Contents ..........................4 Technical Specifications ........................4 Important Safety Information ....................... 4 Specific Operation Warnings ....................... 6 Grounding .............................. 7 Main Parts of Product ........................... 9 Assembly Instructions .......................... 9 Before Each Use ..........................11 Operating Instructions ........................ -
Page 4: Intended Use
Intended Use The Powerhorse 1800 PSI Electric Pressure Washer is intended for cleaning the walls of buildings, facades, terraces, footpaths, garden equipment, machinery, vehicles, tools, etc., with a pressure water nozzle. If required, you can also use the pressure washer with added household cleaning agents. - Page 5 aware of the environment and ensure that the tool is used in a safe and responsible manner. Do not allow persons to operate or assemble the product until they have read this manual and have developed a thorough understanding of how it works. ...
-
Page 6: Specific Operation Warnings
Do not overreach. Keep proper footing and balance at all times. ⚠CAUTION PRESSURE WASHER USE AND CARE Do not force the pressure washer. Products are safer and do a better job when used in the manner for which they are designed. Plan your work, and use the correct product for the job. ... -
Page 7: Grounding
Never cover the pressure washer during operation to allow free air cooling. Always turn water supply on before turning the pressure washer on unless draining for storage. Running the pump dry causes serious damage. Not for use by or around children. INJECTION HAZARD ... - Page 8 an extension cord could override the GFCI built into the plug of the power supply cord resulting in the risk of electrical shock. CHECK with a qualified electrician or service person if you do not completely understand the grounding instructions, or if you are not sure the tool is properly grounded. Grounded Tools: Tools with 3-Prong Plugs Tools marked with Grounding Required have a 3-wire cord and 3-prong grounding plug.
-
Page 9: Main Parts Of Product
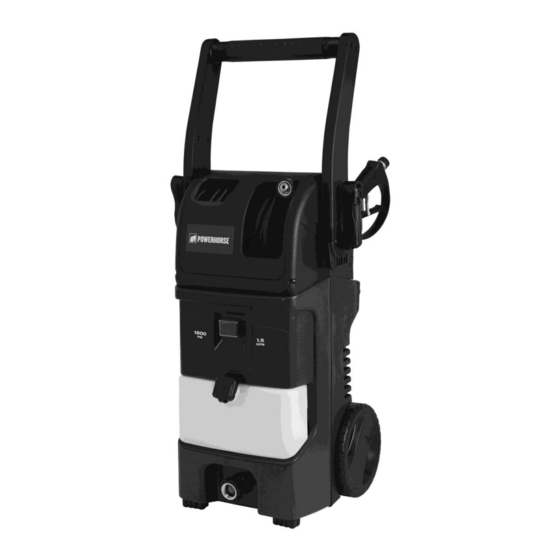
Main Parts of Product Reference Subassembly Ground Fault Circuit Interrupter (GFCI) High-pressure Hose Hand Crank Detergent Tank Quick-connect Wand Trigger Handle Spray Tips Water Filter Screen Tip Cleaning Needle Owner’s Manual *Water filter comes pre-attached on the water inlet, located on the front of the pressure washer. Assembly Instructions ⚠WARNING ... - Page 10 Remove any objects from the work area that could be tripped over, such as toys or outdoor furniture. Ensure that all doors and windows are closed tightly. Raise the handle to an upright position and set the position to cam - lock. Attach hand-cranks onto the hose reel and cord reel on both sides.
-
Page 11: Before Each Use
Attach the desired color-coded spray tip to the quick - connect wand by pushing to ensure it is clicked in securely. Insert the wand into the trigger handle and hand-tighten until the two parts are locked securely. Attach the garden hose to the water inlet (hand-tighten only). -
Page 12: Operating Instructions
Operating Instructions ⚠WARNING Risk of injury, do not direct discharge stream at self or other persons. Before cleaning any surface, an inconspicuous area should be cleaned to test spray pattern and distance for maximum cleaning results The pressure washer must only be used with clean water. Use of unfiltered water or corrosive chemicals will damage the pressure washer. - Page 13 Completely unwind the power cord by pulling Make sure the on/off switch is in the OFF and plug the Ground Fault Circuit Interrupter position before plugging in the pressure (GFCI) into a power outlet. The indicator washer. Turn the switch to the O mark to should turn red.
- Page 14 For most cleaning applications, a 40 spray angle is recommended to avoid damage to the surface being sprayed. The pressure of spray on the surface will increase when you move the wand closer to the surface. Cleaning Detergents Dispenser Only use cleaning detergents recommended for pressure washers.
-
Page 15: After Each Use
Turn ON the pressure washer. Depress the trigger to operate the washer. The liquid detergent will automatically mix with water and be discharged through the spray tip. Allow the detergent to remain on the surface for a short time before rinsing. Do not allow detergent to dry on the surface. - Page 16 (If you are not using detergent, go directly to next point.) When you have finished using the detergent dispensing system, fill the detergent tank with clean water to rinse the system clean. Depress the trigger for one minute at low-pressure so that all detergents remaining in system are thoroughly flushed out.
-
Page 17: Troubleshooting
prevent any foreign matter from entering the pump. Main Body Cleaning Use only mild soap and a damp cloth to clean the main body. Connections Connections on pressure washer hose trigger handles and spray wands should be cleaned regularly and lubricated with non-water soluble grease. Failure to do so could void the product warranty. Spray Tips Only Clogged spray tips can cause the pump pressure to be too high and cleaning is immediately required. - Page 18 Fault / Malfunction Possible Cause Corrective Action Washer does not Diameter of garden hose is too small. Replace with a 1" (25 mm) or 5/8" reach high- mm) garden hose. pressure. Check garden hose for kinks, Water supply is restricted. leaks, and blockage.
- Page 19 Fault / Malfunction Possible Cause Corrective Action Damaged or clogged detergent Remove obstruction or replace suction tube. detergent suction tube. Nozzle is in high-pressure position. Use low-pressure (black) tip. Discharge nozzle is obstructed. Blow out or remove debris with a tip cleaning needle.
- Page 20 Fault / Malfunction Possible Cause Corrective Action Residual friction among components. Disconnect water supply and power Washer might hum. on for 2 to 3 seconds, repeat couple times or until the motor starts. No water. Water supply is off. Turn on water supply. Kink in the garden hose.
-
Page 21: Parts Diagram
Parts Diagram Page 21 of 27... -
Page 22: Parts List
Parts List Reference Part Description Quantity Filter Valve O-ring 10X2.65 Detergent bottle Detergent bottle cap Small panel Cross recessed pan head tapping screw ST3.5X13 Main panel Cross recessed pan head tapping screw ST3.5X16 PVC cover Main switch Switch box front cover Switch box back cover Cross recessed pan head tapping screw ST3.5X16 Hemicycle front cover... - Page 23 Reference Part Description Quantity Cross recessed pan head tapping screw ST3.5X19 Cable sheath Power cord fixture board Round cable sheath Left handle Self-locking handle tuning button Self-locking handle tuning button Left self-locking handle Left handle cover Cross recessed pan head tapping screw ST3.5X13 Hemicycle back cover TIP PVC cap Tips...
- Page 24 Reference Part Description Quantity Back housing Wheel Wheel fixture cap Wheel cap Right self-locking handle Right hose reel cover Hose cap B Long high-pressure hose O-ring 8.5X1.8 Hose clip O-ring 7.5X1.8 Left hose reel cover Short high-pressure hose E-rings PVC cable sheath Cable reel semicircular fixture cap O-ring 65x2 Copper circle seat...
-
Page 25: Replacement Parts
Reference Part Description Quantity Prevailing torque type hexagon nuts (with non-metallic insert), style I/M4 Steel foot holder Foot-holder Pan head screws with cross recess M4x25 Adaptor Replacement Parts For replacement parts and technical questions, please call Customer Service at 1-866-902-9690. ... -
Page 26: Limited Warranty
Northern Tool and Equipment Company, Inc. ("We'' or "Us'') warrants to the original purchaser only ("You'' or "Your") that the Powerhorse product purchased will be free from material defects in both materials and workmanship, normal wear and tear excepted, for a period of two years from date of purchase. - Page 27 Distributed by: Northern Tool & Equipment Company, Inc. Burnsville, Minnesota 55306 www.northerntool.com Made in China Page 27 of 27...
Need help?
Do you have a question about the 157055 and is the answer not in the manual?
Questions and answers
garden hose connector will not turn thus can not attach garden hose. How to replace garden hose connector
The document does not provide specific steps to replace the garden hose connector on a Powerhorse 157055. However, it does mention that the garden hose should be attached to the water inlet by hand-tightening only. To replace the garden hose connector, follow these general steps:
1. Turn off the water supply and disconnect the pressure washer from power.
2. Detach the garden hose from the water inlet by unscrewing it.
3. If a quick-connect assembly is used and attached in reverse, verify that the inlet adapter is connected to the washer’s water inlet and the quick-connect coupler to the garden hose.
4. Replace the damaged or incorrect connector with a proper one, ensuring it matches the water inlet size.
5. Hand-tighten the new connector securely to the water inlet.
If additional disassembly is required, use only original parts and ensure all connections are airtight.
This answer is automatically generated