Table of Contents
Advertisement
Advertisement
Table of Contents

Related Manuals for York Fitness anniversary t200


Summary of Contents for York Fitness anniversary t200
- Page 1 29/05/2007 - version III...
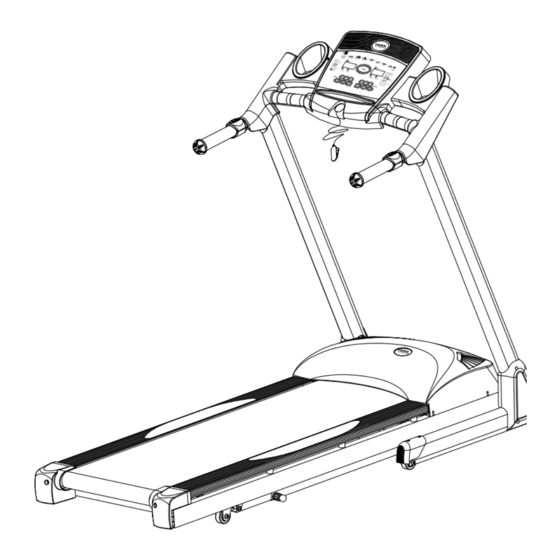
- Page 2 Congratulations on purchasing a treadmill from York Fitness. You have chosen a high quality, safe and innovative piece of equipment as your training partner and we are certain it will keep you motivated on the way to achieving your personal fitness goals.
-
Page 3: Table Of Contents
contents safety information customer support assembly instructions user instructions - quick start - console display and feedback - button functions - using workout programs treadmill features explained how to take care of your treadmill exercising with your treadmill troubleshooting your warranty exploded diagrams and parts list... -
Page 4: Safety Information
safety information PLEASE READ THIS INSTRUCTION MANUAL BEFORE YOU BEGIN ASSEMBLY. GREAT CARE HAS BEEN TAKEN TO DESIGN THESE INSTRUCTIONS AND FOLLOWING THEM WILL HELP YOU WITH QUICKER ASSEMBLY AND MINIMISE THE RISK OF INJURY YOU ARE RESPONSIBLE FOR YOUR OWN SAFETY - THIS LIST IS NOT EXHAUSTIVE. -
Page 5: Customer Support
Care & Maintenance • Always place the equipment in a dry environment. • Use a warm, damp cloth to keep the product clean. • No wet cleaning of electrical components, unplug before any care and maintenance • The safety level of the equipment can be maintained only if it is regularly examined for damage and wear. This includes any ropes, pulleys, nuts, bolts, moving parts, bushes, chains, wheels, bearings &... -
Page 6: Assembly Instructions
assembly instructions 1. Before you start 1. Prepare your work area - 2. Work with a friend - 3. Open the carton - 4. Unpack the carton it is important you assemble we recommend you have checking any warnings on a. - Page 7 2. Fix the uprights in place FIXINGS: FIXINGS: 1. Lift the uprights Part 2. Attach at the base using 4 x bolts (C05), 2 x washers (C04) and 2 x washers (C25) – use the allen key to tighten them well Part Part...
- Page 8 3. Attach the console FIXINGS: FIXINGS: 1. Rotate the console until it’s in the position shown Part 2. Attach to the top of the uprights using 2 screws (C05) and 2 washers (C04) –use the allen key to tighten them well Part...
- Page 9 4. Attach plastic covers FIXINGS: FIXINGS: 1. Using 6 x screws (C31) attach the plastic covers to the base of the uprights Part safety switch ON/OFF power cord NOTE: Before you run on the treadmill for the first time, use the Quick Start instructions on page 10 and allow the treadmill to run independently for 10 minutes.
-
Page 10: User Instructions
user instructions Quick Start • Make sure the treadmill is plugged in, switched on, and the safety key is in position • Press the ‘enter’ button • Press the ‘start / stop’ button • The treadmill mat will slowly begin to move (0.8km/h) •... -
Page 11: Using Workout Programs
Using Workout Programs Manual Program NOTE: If you don’t want to enter a maximum NOTE: The HRC program has a 31/2 minute To use the treadmill in the manual mode speed or workout time you can begin your warm-up phase. During this time the (user controls the speed and incline settings workout by pressing ‘start’... -
Page 12: Treadmill Features Explained
treadmill features explained Easi-lift Fold-up To make storage simple, quick and easy this treadmill features a hydraulic folding system. Simply lift the running deck to fold. Make sure you hear the sound of the deck locking into position – this ensures the deck is locked in place and will not fall back down. Make sure the treadmill incline is at the lowest position before attempting to fold. -
Page 13: Cushioned Running Deck
Cushioned Running Deck This treadmill features a cushioned running deck. The cushioning is provided by elastomer blocks image of elastover block placed between the deck and the metal frame. They help reduce impact on the joints by up to 300% over road running. Handlebar Controls This treadmill features handlebar controls that enable you to change the speed and incline settings. -
Page 14: How To Take Care Of Your Treadmill
how to take care of your treadmill Storage Adjusting running mat tension Keep the treadmill in a dry place with as little temperature Check lubrication before variation as possible. Try to protect from dust and always adjusting the mat as unplug when not in use. -
Page 15: Exercising With Your Treadmill
exercising with your treadmill Always consult your doctor If you experience nausea, dizziness or other abnormal before undertaking a new symptoms during exercise, stop at once and consult exercise regime your doctor Starting your workout Finishing your workout • Begin each workout with a Warm Up session – a few minutes of turn the treadmill to the lowest speed and incline settings •... -
Page 16: Troubleshooting
troubleshooting If you have a problem with your treadmill, before you do anything else please check that all the cables have been connected correctly. Loose cables are very common and many problems can be solved by making sure the cables are properly connected The table below details the most common problems and how to fix them. -
Page 17: Your Warranty
your warranty This product is supplied with a standard warranty as follows: • Lifetime frame • 10 year treadmill motor • 12 month other parts • 12 months labour This product is warranted for use in a home, personal, family or household environment Please Note: Warranty details may vary from one market area to another Warranty Terms York Barbell Ltd. -
Page 18: Exploded Diagrams And Parts List
exploded diagram... - Page 19 part list...
Need help?
Do you have a question about the anniversary t200 and is the answer not in the manual?
Questions and answers
I have a t200 anniversary Model 51045-G03 it has developed a E-1 fault. What the common causes of this. Thanks for any help you can give me