
Related Manuals for King-Griller 16619


Summary of Contents for King-Griller 16619
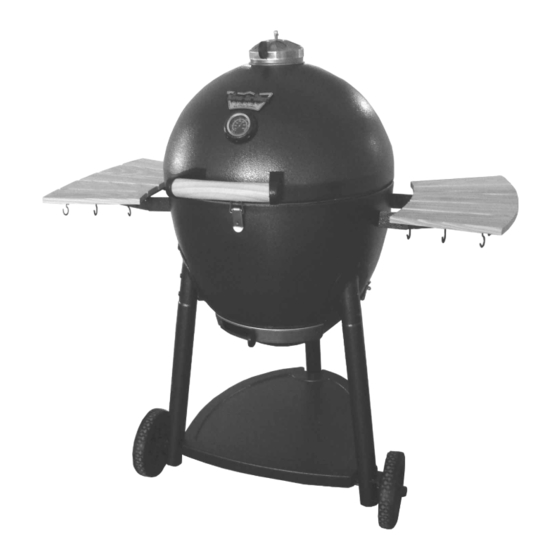
- Page 1 Kamado Kooker ™ Model #16619 Keep your receipt with this manual for Warranty. OM16619A.1 ™ & © Char-Griller / A&J Mfg.
-
Page 2: Important Safety Warnings
IMPORTANT SAFETY WARNINGS READ ALL SAFETY WARNINGS AND INSTRUCTIONS CAREFULLY BEFORE ASSEMBLING AND OPERATING YOUR GRILL Use caution when assembling and operating your grill to avoid scrapes or cuts from sharp edges. Do not use gasoline, kerosene or alcohol for lighting charcoal. Use of any of these or similar products ... - Page 3 Page intentionally left blank for notes OM16619A.1 ™ & © Char-Griller / A&J Mfg.
-
Page 4: Parts List
Parts List Item QTY. Part Name Part Number Item QTY. Part Name Part Number WARMING RACK 20-0041 THERMOMETER 55-0012 GRATE LIFTER 10-0045 BEZEL 10-0058 FIRE GRATE 20-0042 STACK DAMPER 30-0018 FIRE BOWL 10-0046 HOOD 30-0025 ASH PAN 30-0028 HOOD HINGE 30-0026 LEG BRACKET 20-0044... - Page 5 CAUTION: Do not attempt to move grill unless the lid is latched, failing to do so my lead to damage or injury. NOTICE: Read all operating and assembly instructions before attempting to use your grill. NOTICE: Always have a fire extinguisher near at all times. Maintain and check your fire extinguisher regularly.
- Page 6 Step 1 Place GRILL BODY upside down and install LEG BRACKETS with three (3) ½ inch hex bolts each. Next install LEGS (3) with two (2) ½ inch hex bolts and two 1/4 inch lock washers each into LEG BRACKETS, DO Not Tighten Bolts Until After Step #3. Screw CASTER onto rear leg, lock CASTER before tightening.
- Page 7 Step 5 Turn grill upright, LOCK CASTER and place HOOD on the GRILL BODY. Attach hinge on back of HOOD to GRILL BODY using four (4) 1/2 inch hex bolts. Hood Grill Body Hex Bolt Step 6 Attach FRONT HANDLE to HOOD with four (4) 1/2 inch hex bolts. First attach one HANDLE BRACKET to the Lid and then hold the HANDLE in place while attaching the other HANDLE BRACKET to the Lid.
- Page 8 Step 8 To install ASH PAN, hold ASH PAN up against the bottom of the GRILL BODY from the front with the center pin on the inside. Slide the ASH PAN back and use clips on the sides of the grill to snap into position as shown.
- Page 9 Step 10 Install: FIRE BOWL, FIRE GRATE, COOKING GRATES and WARMING RACK inside of the lower body. Step 11 Attach six (6) UTENSIL HOOKS to the underside of the two side shelves (3 each). Use de- pressions in the wood as a starting point for screwing in the UTENSIL HOOKS. Warming Rack Cooking Grates Fire Grate...
-
Page 10: Lighting Your Grill
GRILL PREPARATION & OPERATING INSTRUCTIONS PLEASE NOTE: NO RETURNS ON USED GRILLS Read all safety warnings and instructions carefully Before assembling and operating your grill. IMPORTANT! BEFORE YOU USE YOUR GRILL FOR THE FIRST TIME YOU MUST SEASON THE CAST IRON COOKING GRATE. - Page 11 For lower temperature (250 ˚F and below), long duration grilling and smoking: Use approximately 1lb. of mostly computer mouse or larger sized pieces of lump charcoal to build a fire in the center of the fire grate. Start fire as described above. Once the fire has reached your desired cooking temperature adjust dampers to let less air through, monitor your grill temperature and adjust accordingly.
-
Page 12: Grilling Recipes
GRILLING RECIPES In addition to the recipes, you might like some of the Kamado recipes that can be found searching the internet. DIRECT METHOD The more you use your Kamado Kooker the more you will get a feel for cooking times and amount and size of charcoal. - Page 13 SMOKIN’ RECIPES: with a WATER PAN (also called INDIRECT METHOD). Pan not included. Disposable bread pan is recommended. SMOKE BY COOKING SLOWLY (See chart on page 27 for smoking times). 1) Place water/drip pan on left side of fire grate. 2) Place hot coals on right side of fire grate.
- Page 14 SMOKED FISH: Marinate in brine (1/4 cup dissolved in 1 qt of water) or marinate fish in 1 cup white wine, 1 cup soy sauce mixed with 1 cup lemon juice. Marinate overnight in covered dish in refrigerator. Let air on rack 20 minutes before placing on Pam sprayed grill. Smoke 25 minutes. SMOKED SPARE/BACK RIBS: Peel off tough layer of skin on back side.
-
Page 15: Accessories Order Form
Visit our website for shipping costs 15% Restocking Fee on all returns 912-638-4724 No Returns on Used Product. Please Shipping Charge Model 16619 Kamado Kooker visit our website for updated Pricing and Product Availability. Total Georgia Customers add a 7% sales tax. - Page 16 P.O. Box 30864 Sea Island, GA 31561 912-638-4724 www.CharGriller.com Warranty Information — Charcoal Grill Char-Griller® will repair or replace any defective part of its grillers/smokers for a period of up to one year from the date of purchase. Char-Griller® will also repair or replace the body (bottom half) of its grillers/smokers if the metal is rusted through or burned through for a pe- riod up to five years.
Need help?
Do you have a question about the 16619 and is the answer not in the manual?
Questions and answers